
1. ບົດແນະນຳ
Welcome to the instruction manual for the Supermicro X13SEM-TF motherboard. This document provides essential information for the proper installation, configuration, and maintenance of your motherboard. Please read this manual thoroughly before proceeding with any installation or operation.
The Supermicro X13SEM-TF is designed to support Intel Xeon SPR-SP CPUs with up to 56 cores and 350W TDP, featuring EBGPCH and 8-channel DDR5 memory support.
2. ຜະລິດຕະພັນເກີນview
Below is an image of the Supermicro X13SEM-TF motherboard, highlighting its key components.
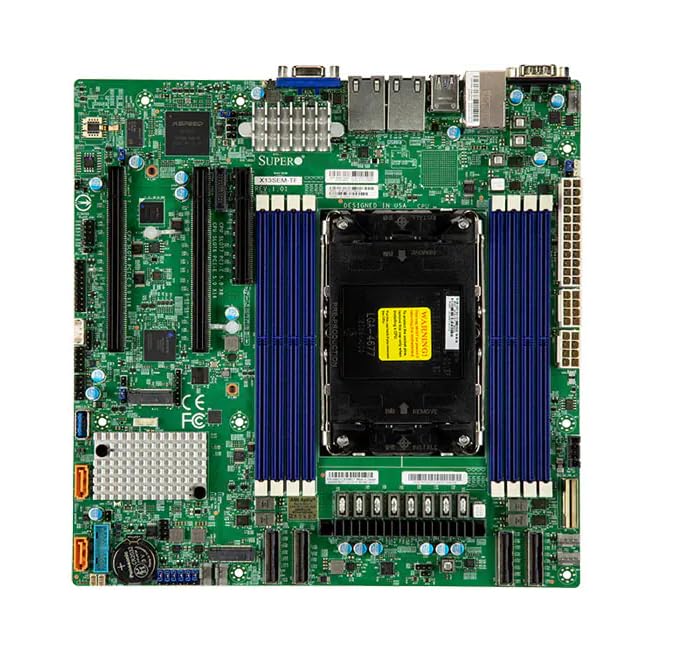
Image Description: This image displays the Supermicro X13SEM-TF motherboard. Key visible components include the large LGA 4677 CPU socket at the center, surrounded by eight DDR5 DIMM slots (blue). Various PCIe slots, SATA ports, USB headers, and power connectors are distributed across the green PCB. The rear I/O panel features USB ports, Ethernet ports, and a VGA port. Heatsinks are visible over the VRM and chipset areas.
3. ຂໍ້ມູນຄວາມປອດໄພ
Always observe standard electrostatic discharge (ESD) precautions when handling the motherboard.
- Disconnect all power sources before installation or maintenance.
- ໃສ່ສາຍແຂນຕ້ານສະຖິດ.
- Avoid touching components directly unless necessary.
- Ensure proper ventilation within the system chassis.
- Refer to professional assistance if unsure about any procedure.
4. ການຕິດຕັ້ງແລະການຕິດຕັ້ງ
4.1. ເນື້ອໃນຊຸດ
ກວດສອບວ່າອົງປະກອບທັງໝົດມີຢູ່ໃນຊຸດ:
- Supermicro X13SEM-TF Motherboard
- I/O Shield (ຖ້າບໍ່ປະສົມປະສານ)
- ສາຍ SATA
- ຄູ່ມືຜູ້ໃຊ້ (ເອກະສານນີ້)
- ໄດເວີ CD/USB (ຫຼືຄໍາແນະນໍາການດາວໂຫຼດ)
4.2. ການຕິດຕັ້ງເມນບອດ
- ການກະກຽມ Chassis: Ensure the computer chassis is ready for motherboard installation. Install standoffs in the appropriate locations.
- ຕິດຕັ້ງ I/O Shield: If provided separately, install the I/O shield into the chassis opening.
- Mount Motherboard: Carefully place the motherboard into the chassis, aligning it with the standoffs and I/O shield. Secure it with screws.
- ຕິດຕັ້ງ CPU:
- ເປີດແລັບຊັອກເກັດ CPU.
- Align the CPU (Intel Xeon SPR-SP) with the socket, matching the triangular markers.
- ຄ່ອຍໆວາງ CPU ເຂົ້າໄປໃນເຕົ້າຮັບ. ຢ່າບັງຄັບມັນ.
- ປິດຊ່ອງສຽບເຕົ້າຮັບເພື່ອຮັບປະກັນ CPU.
- ຕິດຕັ້ງ CPU Cooler: Attach the compatible CPU cooler according to its manufacturer's instructions. Ensure proper thermal paste application.
- ຕິດຕັ້ງຫນ່ວຍຄວາມຈໍາ (RAM):
- ເປີດຄລິບຢູ່ໃນຊ່ອງ DDR5 DIMM.
- Align the memory modules with the slots, ensuring the notch matches.
- Press down firmly on both ends until the clips snap into place. Refer to the motherboard layout for optimal memory population.
- ເຊື່ອມຕໍ່ພະລັງງານ:
- ເຊື່ອມຕໍ່ຕົວເຊື່ອມຕໍ່ໄຟຫຼັກ ATX 24-pin.
- Connect the 8-pin (or 4+4-pin) CPU power connector(s).
- ເຊື່ອມຕໍ່ອຸປະກອນການເກັບຮັກສາ: Connect SATA data and power cables to your storage drives (HDDs/SSDs) and the motherboard's SATA ports.
- ເຊື່ອມຕໍ່ຫົວແຜງໜ້າ: Connect the power switch, reset switch, HDD LED, power LED, and front panel USB/audio headers to their respective pins on the motherboard. Refer to the motherboard diagram for correct pin assignments.
- ຕິດຕັ້ງບັດຂະຫຍາຍ: Insert any necessary PCIe expansion cards (e.g., graphics cards, network cards) into the appropriate PCIe slots and secure them.
5. ຄໍາແນະນໍາການດໍາເນີນງານ
5.1. ການເປີດເຄື່ອງເບື້ອງຕົ້ນ
After completing all connections, connect the power supply to an electrical outlet and power on the system.
The system should boot to the BIOS/UEFI interface or an installed operating system.
5.2. ການຕັ້ງຄ່າ BIOS/UEFI
To enter the BIOS/UEFI setup, press the designated key (usually DEL or F2) ໃນລະຫວ່າງການເລີ່ມຕົ້ນ.
Configure boot order, system time, and other necessary settings. Save changes before exiting.
5.3. ການຕິດຕັ້ງໄດເວີ
Install all necessary drivers for the motherboard chipset, network, audio, and any other integrated components. Drivers can be found on the Supermicro website or the provided driver media.
6. ບໍາລຸງຮັກສາ
Regular maintenance ensures optimal performance and longevity of your motherboard.
- ການກຳຈັດຂີ້ຝຸ່ນ: ເຮັດຄວາມສະອາດຝຸ່ນຈາກເມນບອດເປັນໄລຍະໆແລະອົງປະກອບຕ່າງໆໂດຍໃຊ້ອາກາດບີບອັດ. ກວດໃຫ້ແນ່ໃຈວ່າລະບົບປິດ ແລະຖອດປລັກອອກ.
- ອັບເດດ BIOS/UEFI: ກວດເບິ່ງ Supermicro website for BIOS/UEFI updates. Update only if necessary and follow the provided instructions carefully.
- ອັບເດດໄດເວີ: Keep drivers updated for optimal compatibility and performance.
- ການກວດຮ່າງກາຍ: ກວດສອບເມນບອດເປັນໄລຍະໆວ່າມີອາການເສຍຫາຍ, ສາຍເຊື່ອມຕໍ່ວ່າງ, ຫຼື ຕົວເກັບປະຈຸໂປ່ງອອກຫຼືບໍ່.
7. ການແກ້ໄຂບັນຫາ
7.1. ບໍ່ມີພະລັງງານ
- ກວດເບິ່ງການເຊື່ອມຕໍ່ພະລັງງານທັງຫມົດ (24-pin ATX, CPU 8-pin).
- ໃຫ້ແນ່ໃຈວ່າການເປີດການສະຫນອງພະລັງງານ.
- ທົດສອບແຫຼ່ງຈ່າຍໄຟດ້ວຍລະບົບອື່ນ ຫຼື ເຄື່ອງທົດສອບແຫຼ່ງຈ່າຍໄຟ.
- ຢືນຢັນການເຊື່ອມຕໍ່ສະວິດໄຟແຜງດ້ານໜ້າ.
7.2. ບໍ່ມີຈໍສະແດງຜົນ
- ໃຫ້ແນ່ໃຈວ່າຈໍພາບໄດ້ເຊື່ອມຕໍ່ ແລະ ເປີດຢູ່.
- Check if the graphics card (if dedicated) is properly seated and powered.
- ລອງຣີເຊັດໂມດູນ RAM.
- If using integrated graphics, ensure the CPU supports it and the display cable is connected to the motherboard's video output.
7.3. ຄວາມບໍ່ສະຖຽນລະພາບຂອງລະບົບ / ການຂັດຂ້ອງ
- ກວດເບິ່ງອຸນຫະພູມ CPU ແລະ GPU.
- Verify RAM is correctly installed and compatible.
- ແລ່ນເຄື່ອງມືການວິນິດໄສຄວາມຈຳ.
- ໃຫ້ແນ່ໃຈວ່າໄດເວີທັງຫມົດຖືກຕິດຕັ້ງແລະທັນສະໄຫມ.
- Check for loose cables or components.
8. ຂໍ້ມູນຈໍາເພາະ
| ຄຸນສົມບັດ | ລາຍລະອຽດ |
|---|---|
| ຕົວແບບ | Supermicro X13SEM-TF (MBD-X13SEM-TF-B) |
| ຮອງຮັບ CPU | Intel Xeon SPR-SP, up to 56 cores, 350W TDP |
| ເຕົ້າສຽບ CPU | LGA 4677 |
| ຊິບເຊັດ | EBGPCH |
| ຄວາມຊົງຈໍາ | 8-channel DDR5 DIMM slots |
| ຂະໜາດ (LxWxH) | 16 x 12 x 5 ນິ້ວ |
| ນ້ຳໜັກ | 2.86 ປອນ |
| ຜູ້ຜະລິດ | SuperMicro |
| ວັນທີທໍາອິດທີ່ມີ | ວັນທີ 20 ມັງກອນ 2023 |
9. ການຮັບປະກັນແລະການສະຫນັບສະຫນູນ
9.1. ຂໍ້ມູນການຮັບປະກັນ
For detailed warranty information, please refer to the official Supermicro webເວັບໄຊ ຫຼືບັດຮັບປະກັນລວມຢູ່ໃນຜະລິດຕະພັນຂອງທ່ານ.
9.2. ສະຫນັບສະຫນູນດ້ານວິຊາການ
If you encounter issues that cannot be resolved using this manual, please contact Supermicro technical support.
Visit the official Supermicro website for support resources, driver downloads, and contact information: www.supermicro.com/support