
1. ຜະລິດຕະພັນເກີນview
This manual provides essential information for the installation, operation, and maintenance of the Cloudray EZCAD3 Fiber Marking Controller, model JCZ DLC2-M4-2D. This advanced control board is designed for fiber laser marking machines, offering robust performance and support for complex marking tasks, including 2.5D deep marking.
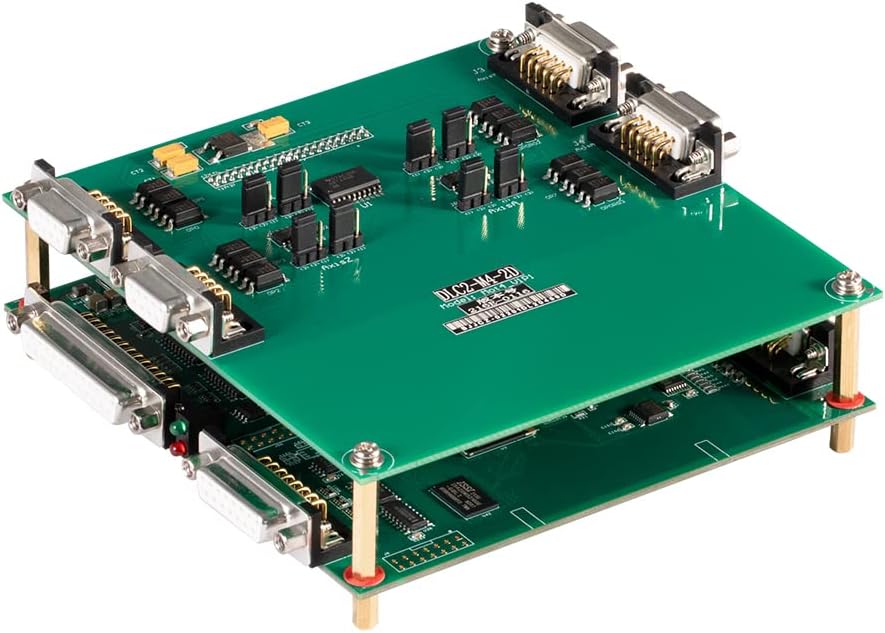
ຮູບພາບ 1: ເທິງລົງລຸ່ມ view of the Cloudray EZCAD3 Fiber Marking Controller JCZ DLC2-M4-2D, showcasing its dual-layer PCB design with various electronic components and connectors.
2. ຄຸນນະສົມບັດທີ່ສໍາຄັນ
- Advanced Software Kernel: Utilizes a 64-bit EZCAD3 software kernel for faster processing of large files, capable of handling gigabyte-level data.
- Diverse Marking Methods: Offers 8 types of marking filling methods in EZCAD3 and 5 types in EZCAD2 for versatile application.
- 2.5D Deep Marking Support: Supports 2.5D deep marking and relief marking functions, requiring a motorized Z-axis lifting column for optimal performance.
- ການດໍາເນີນງານອອຟໄລ: ເຄື່ອງຫມາຍ files can be saved directly onto the control board, enabling offline marking initiation via the I/O interface.
- 3D Galvanometer Compatibility: Achieves 3D curved surface or large-format marking when paired with a 3D galvanometer.
- ການຕິດຕາມເວລາຈິງ: Allows real-time monitoring of the processing area through a webcam integrated into the software interface (webcam software license sold separately).
- ການຄວບຄຸມເຄືອຂ່າຍ: Supports TCP/IP command control via a server on the same local network for remote operation.
- Parameter Optimization: EZCAD3 includes a parameter assistant to quickly generate arrays of processing parameters, aiding in finding the best settings for marking results.

ຮູບພາບ 2: ມຸມ view of the Cloudray EZCAD3 Fiber Marking Controller, highlighting the various input/output ports and connectors for integration into a fiber marking system.
3. ຄໍາແນະນໍາການຕິດຕັ້ງ
3.1 ການຫຸ້ມຫໍ່ແລະການກວດກາ
Carefully unpack the control board and inspect it for any visible damage. Ensure all components are present according to the packing list. If any damage or missing parts are found, contact your supplier immediately.
3.2 ການເຊື່ອມຕໍ່ຮາດແວ
- ການສະຫນອງພະລັງງານ: Connect a stable +12V DC / 3A power supply to the designated power input port on the control board. Ensure correct polarity.
- Galvanometer Connection: Connect the galvanometer scanner to the appropriate ports on the control board. Refer to the wiring diagram provided with your galvanometer for specific pin assignments.
- Laser Source Connection: Connect the fiber laser source control signals (e.g., Q-switch, enable, power modulation) to the corresponding output ports on the control board.
- ການເຊື່ອມຕໍ່ຄອມພິວເຕີ: Connect the control board to your computer via a USB cable. Ensure the USB connection is secure.
- ການເຊື່ອມຕໍ່ I/O: If using external devices or sensors, connect them to the available input and output signal ports as required for your application.
- Z-Axis (Optional): For 2.5D deep marking, connect a motorized Z-axis lifting column to the designated control ports.

Image 3: Dimensional drawing illustrating the layout and measurements of the 1st Layer (DLC2 Control Board) and 2nd Layer (M4 Motion Control Board) of the Cloudray controller, including mounting hole positions.
3.3 ການຕິດຕັ້ງຊອບແວ
Install the EZCAD3 software on your computer. Follow the instructions provided with the software package. Ensure that the correct drivers for the control board are installed during this process.
4. ຄໍາແນະນໍາການດໍາເນີນງານ
4.1 Starting the Software
Launch the EZCAD3 software. The software should automatically detect the connected control board. If not, check your USB connection and driver installation.
4.2 Loading and Creating Designs
You can import existing design files (e.g., DXF, AI, PLT) or create new designs directly within the EZCAD3 software. Utilize the various drawing and editing tools available.
4.3 Setting Marking Parameters
Configure the laser marking parameters according to your material and desired marking effect. This includes:
- ພະລັງງານເລເຊີ
- ຄວາມໄວຂອງເຄື່ອງຫມາຍ
- ຄວາມຖີ່
- Fill type and density
- ຈໍານວນຜ່ານ
- Z-axis height (for 2.5D marking)
Use the parameter assistant feature to help optimize these settings.
ກ່ອນປີ 4.4view and Positioning
ໃຊ້ຊອບແວກ່ອນview function to visualize the marking path. Adjust the position of your workpiece and the marking area as needed. For systems with a webcam, use the real-time monitoring feature for precise alignment.
4.5 Initiating Marking
Once all parameters are set and the design is positioned, click the 'Mark' button in the software to begin the laser marking process. Ensure all safety precautions are observed before starting.
5. ບໍາລຸງຮັກສາ
To ensure the longevity and optimal performance of your Cloudray EZCAD3 Fiber Marking Controller, follow these maintenance guidelines:
- ຮັກສາຄວາມສະອາດ: Regularly clean the control board and its connectors to prevent dust accumulation, which can lead to overheating or short circuits. Use a soft, dry brush or compressed air.
- ສະພາບແວດລ້ອມ: Operate the board in a clean, dry, and temperature-controlled environment. Avoid exposure to excessive humidity, extreme temperatures, or corrosive substances.
- ການໄຫຼຄົງທີ່: Always handle the board with anti-static precautions to prevent damage from electrostatic discharge (ESD).
- ກວດສອບການເຊື່ອມຕໍ່: ກວດເບິ່ງທຸກສາຍເຊື່ອມຕໍ່ແຕ່ລະໄລຍະເພື່ອຮັບປະກັນວ່າພວກມັນປອດໄພ ແລະ ບໍ່ເສຍຫາຍ.
6. ການແກ້ໄຂບັນຫາ
If you encounter issues with your Cloudray EZCAD3 Fiber Marking Controller, refer to the following common troubleshooting steps:
- ບໍ່ມີພະລັງງານ: Verify that the +12V DC power supply is correctly connected and functioning. Check the power indicator light on the board.
- Software Not Detecting Board: Ensure the USB cable is securely connected to both the computer and the control board. Reinstall the EZCAD3 software and drivers if necessary. Try a different USB port or cable.
- ເລເຊີບໍ່ຍິງ: Check connections to the laser source. Verify laser parameters in EZCAD3. Ensure the laser source is enabled and ready.
- Galvanometer Not Moving: Check galvanometer connections. Ensure the galvanometer is powered and calibrated correctly within the software.
- Marking Quality Issues: Review and adjust laser parameters (power, speed, frequency, fill settings). Ensure the focal distance is correct. Check for any mechanical issues with the laser system.
- ຊອບແວຜິດພາດ: Consult the EZCAD3 software manual for specific error codes. Ensure your software version is up to date.
If the problem persists after attempting these steps, contact Cloudray technical support or your local distributor for further assistance.
7. ຂໍ້ມູນຈໍາເພາະ
| ພາລາມິເຕີ | ມູນຄ່າ |
|---|---|
| ຍີ່ຫໍ້ | Cloudray |
| ໝາຍເລກຮຸ່ນ (ຜູ້ຜະລິດ) | LC04JCZDS303 |
| ໝາຍເລກຕົວແບບ | JCZ DLC2-M4-2D |
| ຄວາມເຂົ້າກັນໄດ້ຂອງຊອບແວ | EZCAD3 |
| ການປ້ອນຂໍ້ມູນພະລັງງານ | +12V DC / 3A |
| Extend Axes Support | 4 |
| ສັນຍານການປ້ອນຂໍ້ມູນ | 10 |
| ສັນຍານຜົນໄດ້ຮັບ | 8 |
| ຂະໜາດແພັກເກັດ | 27 x 17 x 8 cm |
| ວັນທີທີ່ມີໃຫ້ທໍາອິດ | ວັນທີ 24 ເມສາ 2022 |

Image 4: Comparison table detailing parameters for DLC2-M4 (EZCAD3), LMC-V4 (EZCAD2), and LMC-V4 Lite (EZCAD2 Lite) controllers, including software, power input, extend axes, input signals, and output signals.
8. ການຮັບປະກັນແລະການສະຫນັບສະຫນູນ
For warranty information and technical support, please refer to the documentation provided with your purchase or contact Cloudray directly through their official website or customer service channels. Ensure you have your product model number (JCZ DLC2-M4-2D) and purchase details available when seeking support.