
1. ບົດແນະນຳ
Welcome to the user manual for your new Cheerlux C50 Projector. This guide provides essential information on setting up, operating, maintaining, and troubleshooting your device. Please read this manual thoroughly before using the projector to ensure optimal performance and safety. Keep this manual for future reference.
2. ຄໍາແນະນໍາຄວາມປອດໄພ
ເພື່ອປ້ອງກັນໄຟໄໝ້, ໄຟຟ້າຊັອດ, ຫຼືບາດເຈັບ, ກະລຸນາປະຕິບັດຕາມຂໍ້ຄວນລະວັງດ້ານຄວາມປອດໄພຕໍ່ໄປນີ້:
- ຢ່າປິດຊ່ອງລະບາຍອາກາດ. ຮັບປະກັນພື້ນທີ່ພຽງພໍຮອບໆໂປເຈັກເຕີເພື່ອການໄຫຼວຽນຂອງອາກາດທີ່ເໝາະສົມ.
- Do not expose the projector to rain or moisture. Avoid placing objects filled with liquids, such as vases, on the projector.
- ຫ້າມເປີດໂປເຈັກເຕີ ຄasing. ອ້າງອີງການບໍລິການທັງໝົດໃຫ້ກັບພະນັກງານບໍລິການທີ່ມີຄຸນວຸດທິ.
- ໃຊ້ພຽງແຕ່ອະແດັບເຕີໄຟທີ່ສະໜອງໃຫ້ກັບໂປເຈັກເຕີເທົ່ານັ້ນ.
- ຫຼີກເວັ້ນການເບິ່ງໂດຍກົງໃນເລນໂປເຈັກເຕີໃນເວລາທີ່ lamp ເປີດຢູ່, ເນື່ອງຈາກແສງສະຫວ່າງສາມາດທໍາລາຍຕາຂອງທ່ານໄດ້.
- ວາງໂປເຈັກເຕີຢູ່ເທິງພື້ນຜິວທີ່ມີລະດັບຄວາມຫມັ້ນຄົງເພື່ອປ້ອງກັນບໍ່ໃຫ້ມັນຫຼຸດລົງ.
- ຖອດສາຍໂປເຈັກເຕີອອກຈາກປລັກສຽບໄຟໃນເວລາມີພະຍຸຟ້າຜ່າ ຫຼືເມື່ອບໍ່ໄດ້ໃຊ້ເປັນເວລາດົນນານ.
3. ເນື້ອໃນຊຸດ
ກະລຸນາກວດສອບວ່າທຸກລາຍການມີຢູ່ໃນສະພາບທີ່ດີ:
- ໂປເຈັກເຕີ Cheerlux C50
- ການຄວບຄຸມໄລຍະໄກ
- ສາຍໄຟ
- ສາຍ HDMI
- ສາຍ AV
- ຄູ່ມືຜູ້ໃຊ້
4. ຜະລິດຕະພັນເກີນview
Familiarize yourself with the components and ports of your Cheerlux C50 Projector.

This image displays the Cheerlux C50 Projector from a front-top angle, highlighting its lens, focus ring, and control panel buttons on the top surface. The projector features a white and grey casing.
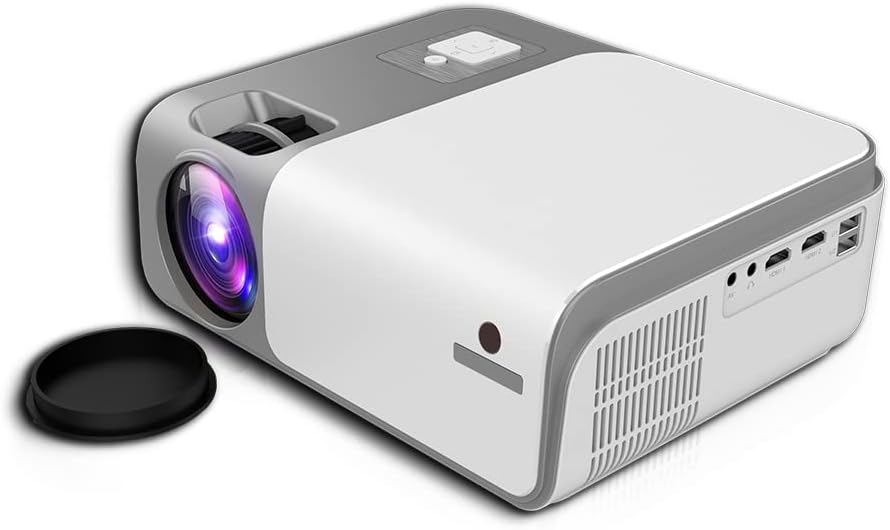
This image shows the rear and side of the Cheerlux C50 Projector, revealing various input/output ports such as HDMI, USB, and AV, along with ventilation grilles. A lens cap is visible next to the lens.
4.1. ກະດານດ້ານຫນ້າ
- ເລນການສາຍ: ປ່ອຍຮູບພາບ.
- ແຫວນຈຸດສຸມ: ປັບຄວາມຄົມຊັດຂອງຮູບພາບ.
4.2. ກະດານດ້ານເທິງ
- ປຸ່ມຄວບຄຸມ: Power, Menu, Source, Navigation (Up/Down/Left/Right), OK.
4.3. ກະດານດ້ານຫລັງ
- ການປ້ອນຂໍ້ມູນພະລັງງານ: ເຊື່ອມຕໍ່ກັບສາຍໄຟ.
- ຜອດ HDMI (x2): Connect to HDMI-enabled devices (laptops, gaming consoles, Blu-ray players).
- ພອດ USB (x2): ເຊື່ອມຕໍ່ USB drives ສໍາລັບການຫຼິ້ນມີເດຍ.
- ພອດ AV: ເຊື່ອມຕໍ່ກັບອຸປະກອນເກົ່າໂດຍໃຊ້ສາຍ AV.
- ສຽງອອກ (3.5mm): ເຊື່ອມຕໍ່ລຳໂພງ ຫຼືຫູຟັງພາຍນອກ.
- ຕົວຮັບ IR: ສໍາລັບສັນຍານການຄວບຄຸມໄລຍະໄກ.
5. ຕັ້ງຄ່າ
5.1. ການເຊື່ອມຕໍ່ພະລັງງານ
- ເຊື່ອມຕໍ່ສາຍໄຟເຂົ້າກັບພອດປ້ອນຂໍ້ມູນພະລັງງານຂອງໂປເຈັກເຕີ.
- ສຽບສາຍໄຟອີກດ້ານໜຶ່ງເຂົ້າໄປໃນປລັກສຽບໃສ່ຝາ.
- ໄຟສະແດງພະລັງງານເທິງໂປເຈັກເຕີຈະສະຫວ່າງຂຶ້ນ.
5.2. ບັນຈຸເຂົ້າຮຽນ
Position the projector on a stable, flat surface. The ideal projection distance for the Cheerlux C50 is between 1.5 to 6 meters, depending on the desired screen size. Ensure the projector is centered with your projection screen or wall.
5.3. ຈຸດສຸມແລະການແກ້ໄຂ Keystone
- ການປັບຈຸດສຸມ: Turn the focus ring on the front of the projector until the projected image appears sharp and clear.
- Keystone Correction (4P): If the projected image appears trapezoidal (wider at the top or bottom), use the 4P keystone correction function. This can typically be accessed via the projector's menu or dedicated buttons on the remote control. Adjust each of the four corners independently to achieve a perfectly rectangular image.
6. ການເຮັດວຽກ
6.1. ເປີດ/ປິດ
- ເປີດ: Press the power button on the projector or the remote control. The projector will start up, and the lamp ຈະສະຫວ່າງ.
- ປິດພະລັງງານ: Press the power button again. Confirm shutdown if prompted. Allow the projector to cool down before unplugging it.
6.2. ແຫຼ່ງປ້ອນຂໍ້ມູນ
Connect your desired device to the projector using the appropriate cable (HDMI, AV, USB). Then, press the 'Source' button on the projector or remote control to select the corresponding input source.
- HDMI: For high-definition video and audio from laptops, game consoles, etc.
- USB: ສໍາລັບການຫຼິ້ນສື່ມວນຊົນ files (photos, videos, music) directly from a USB flash drive.
- ຂອງ: For standard definition video and audio from older devices like DVD players.
6.3. ການເຊື່ອມຕໍ່ແບບໄຮ້ສາຍ (WiFi ແລະ Bluetooth)
The Cheerlux C50 Projector features built-in WiFi and Bluetooth for enhanced connectivity.
- ການເຊື່ອມຕໍ່ WiFi: Navigate to the 'Settings' menu, select 'Network' or 'WiFi Settings'. Choose your desired WiFi network from the list and enter the password.
- ການເຊື່ອມຕໍ່ບູທູດ: In the 'Settings' menu, select 'Bluetooth'. Turn on Bluetooth and pair with your Bluetooth-enabled speakers or headphones.
6.4. ການສະທ້ອນຫນ້າຈໍ
The projector supports wireless screen mirroring from compatible smartphones and tablets.

This image illustrates the Cheerlux C50 Projector wirelessly connected to a smartphone. The phone's screen, displaying a movie scene, is being mirrored to the projector, indicated by a Wi-Fi signal icon between the devices.
- Ensure both your projector and mobile device are connected to the same WiFi network.
- ໃນໂປເຈັກເຕີ, ເລືອກຕົວເລືອກ 'Screen Mirroring' ຫຼື 'Wireless Display' ຈາກເມນູຫຼັກ.
- On your mobile device, activate its screen mirroring feature (e.g., 'Smart View' for Samsung, 'Screen Mirroring' for Android, 'AirPlay' for iOS).
- Select the projector's name from the list of available devices on your phone.
- The mobile device's screen content will now be projected.
6.5. ເມນູນໍາທາງ
Use the navigation buttons (Up, Down, Left, Right) and 'OK' button on the projector or remote control to browse through the on-screen menu. The 'Menu' button typically opens the main settings, and the 'Return' or 'Exit' button closes menus.
7. ບໍາລຸງຮັກສາ
7.1. ທໍາຄວາມສະອາດ
- ເລນ: ໃຊ້ຜ້າທີ່ອ່ອນນຸ່ມ, ບໍ່ມີເສັ້ນດ່າງທີ່ອອກແບບມາໂດຍສະເພາະສໍາລັບເລນ optical. ຢ່າໃຊ້ເຄື່ອງເຮັດຄວາມສະອາດຂັດ.
- Casing: ເຊັດດ້ານນອກຂອງໂປເຈັກເຕີດ້ວຍຜ້າອ່ອນ, ແຫ້ງ. ສໍາລັບຝຸ່ນ stubborn, ເລັກນ້ອຍ dampen ຜ້າທີ່ມີນ້ໍາ.
- ຊ່ອງລະບາຍອາກາດ: Periodically clean the vents with a soft brush or compressed air to prevent dust buildup, which can affect cooling.
7.2. ການເກັບຮັກສາ
ເມື່ອບໍ່ໄດ້ໃຊ້ງານເປັນເວລາດົນ, ໃຫ້ເກັບຮັກສາໂປເຈັກເຕີໄວ້ໃນບ່ອນທີ່ເຢັນ, ແຫ້ງ, ຫ່າງຈາກແສງແດດໂດຍກົງ ແລະ ອຸນຫະພູມທີ່ຮຸນແຮງ. ປິດຝາເລນດ້ວຍຝາປິດເພື່ອປົກປ້ອງມັນຈາກຝຸ່ນ ແລະ ຮອຍຂີດຂ່ວນ.
8. ການແກ້ໄຂບັນຫາ
ຖ້າເຈົ້າພົບບັນຫາກັບໂປເຈັກເຕີຂອງເຈົ້າ, ໃຫ້ອ້າງອີງເຖິງບັນຫາ ແລະວິທີແກ້ໄຂບັນຫາທົ່ວໄປຕໍ່ໄປນີ້:
| ບັນຫາ | ສາເຫດທີ່ເປັນໄປໄດ້ | ການແກ້ໄຂ |
|---|---|---|
| ບໍ່ມີຮູບທີ່ຄາດໄວ້ | ສາຍໄຟວ່າງ, ແຫຼ່ງປ້ອນຂໍ້ມູນບໍ່ຖືກຕ້ອງ, ອຸປະກອນບໍ່ໄດ້ເຊື່ອມຕໍ່. | Check power connection, select correct input source, ensure source device is on and connected. |
| ຮູບພາບມົວ | Focus not adjusted, projector too close/far. | Adjust the focus ring. Reposition the projector within the recommended distance. |
| ຮູບພາບແມ່ນ trapezoidal | ໂປເຈັກເຕີບໍ່ຕັ້ງສາກກັບໜ້າຈໍ. | Use the 4P keystone correction function in the menu. |
| ບໍ່ມີສຽງ | Volume too low, external speakers not connected, source device muted. | Increase projector volume, check external speaker connection, unmute source device. |
| ການຄວບຄຸມໄລຍະໄກບໍ່ເຮັດວຽກ | Batteries dead, obstruction, not pointing at IR receiver. | Replace batteries, remove obstructions, point remote directly at the projector's IR receiver. |
9. ຂໍ້ມູນຈໍາເພາະ
Technical specifications for the Cheerlux C50 Projector:
| ຄຸນສົມບັດ | ຂໍ້ມູນຈໍາເພາະ |
|---|---|
| ຊື່ຍີ່ຫໍ້ | Generic (Cheerlux C50) |
| ເຕັກໂນໂລຊີການເຊື່ອມຕໍ່ | Wi-Fi, Bluetooth |
| ຄວາມລະອຽດເດີມ | 1920 x 1080 |
| ຄວາມສະຫວ່າງ | 4000 Lumen |
| ປັດໄຈແບບຟອມ | ແບບພົກພາ |
| ປະເພດການຕິດຕັ້ງ | ພູຕັ້ງໂຕະ |
| ປະເພດການຄວບຄຸມ | ການຄວບຄຸມໄລຍະໄກ |
| ໄລຍະການຖິ້ມສູງສຸດ | 6 ແມັດ |
| ວັດtage | 3 ວັດ |
| ຄຸນນະສົມບັດພິເສດ | Built In Wi Fi, Portable, Wireless, 4P Keystone Correction |
10. ການຮັບປະກັນແລະການສະຫນັບສະຫນູນ
The Cheerlux C50 Projector comes with a standard manufacturer's warranty. Please refer to the warranty card included in your package for specific terms and conditions, including warranty period and coverage details. For technical support, service, or further inquiries, please contact your retailer or the manufacturer's customer service department.
ຮັກສາໃບຮັບເງິນການຊື້ຂອງທ່ານໄວ້ເປັນຫຼັກຖານການຊື້ສໍາລັບການຮ້ອງຂໍການຮັບປະກັນ.