
1. ບົດແນະນຳ
The Raspberry Pi 4 Model B is a powerful, credit-card sized computer designed for a wide range of applications, from desktop computing to embedded projects. This 8GB RAM version offers enhanced performance for demanding tasks. It features a quad-core Cortex-A72 (ARM v8) 64-bit SoC, dual display support up to 4K@60Hz, true Gigabit Ethernet, 2.4 GHz and 5.0 GHz wireless LAN, Bluetooth 5.0, and upgraded USB 3.0 ports.
ຄູ່ມືນີ້ໃຫ້ຂໍ້ມູນທີ່ຈຳເປັນສຳລັບການຕັ້ງຄ່າ, ການດໍາເນີນງານ, ການຮັກສາ ແລະ ການແກ້ໄຂບັນຫາ Raspberry Pi 4 Model B ຂອງທ່ານ.

ຮູບພາບ 1: ເທິງລົງລຸ່ມ view of the Raspberry Pi 4 Model B (8GB) board, showing the main components and ports.
2. ຕັ້ງຄ່າ
2.1 ອົງປະກອບທີ່ຕ້ອງການ
- Raspberry Pi 4 Model B (8GB) board
- Official Raspberry Pi USB-C Power Supply (5.1V, 3A) or equivalent
- MicroSD card (minimum 8GB, Class 10 recommended) with Raspberry Pi OS installed
- Micro HDMI to HDMI cable (x2 for dual display)
- ແປ້ນພິມ USB ແລະຫນູ
- ຈໍພາບ ຫຼືໂທລະພາບທີ່ມີອິນພຸດ HDMI
- (Optional) Ethernet cable for wired network connection
2.2 ການກະກຽມກາດ MicroSD
- Download the Raspberry Pi Imager software from the official Raspberry Pi webເວັບໄຊ.
- Insert your MicroSD card into a card reader connected to your computer.
- Open Raspberry Pi Imager, select your desired operating system (e.g., Raspberry Pi OS Full), and choose your MicroSD card.
- Click "Write" to install the operating system onto the MicroSD card. This process will erase all existing data on the card.
- Once the writing process is complete, safely eject the MicroSD card from your computer.
2.3 ການເຊື່ອມຕໍ່ອຸປະກອນຕໍ່
Before applying power, connect all necessary peripherals:
- ກາດ MicroSD: Insert the prepared MicroSD card into the card slot on the underside of the Raspberry Pi.
- ຈໍສະແດງຜົນ: Connect one or two Micro HDMI to HDMI cables from the Raspberry Pi's Micro HDMI ports to your monitor(s).
- ແປ້ນພິມແລະຫນູ: Connect your USB keyboard and mouse to the USB 2.0 or USB 3.0 ports.
- ເຄືອຂ່າຍ (ທາງເລືອກ): For a wired connection, plug an Ethernet cable into the Ethernet port.
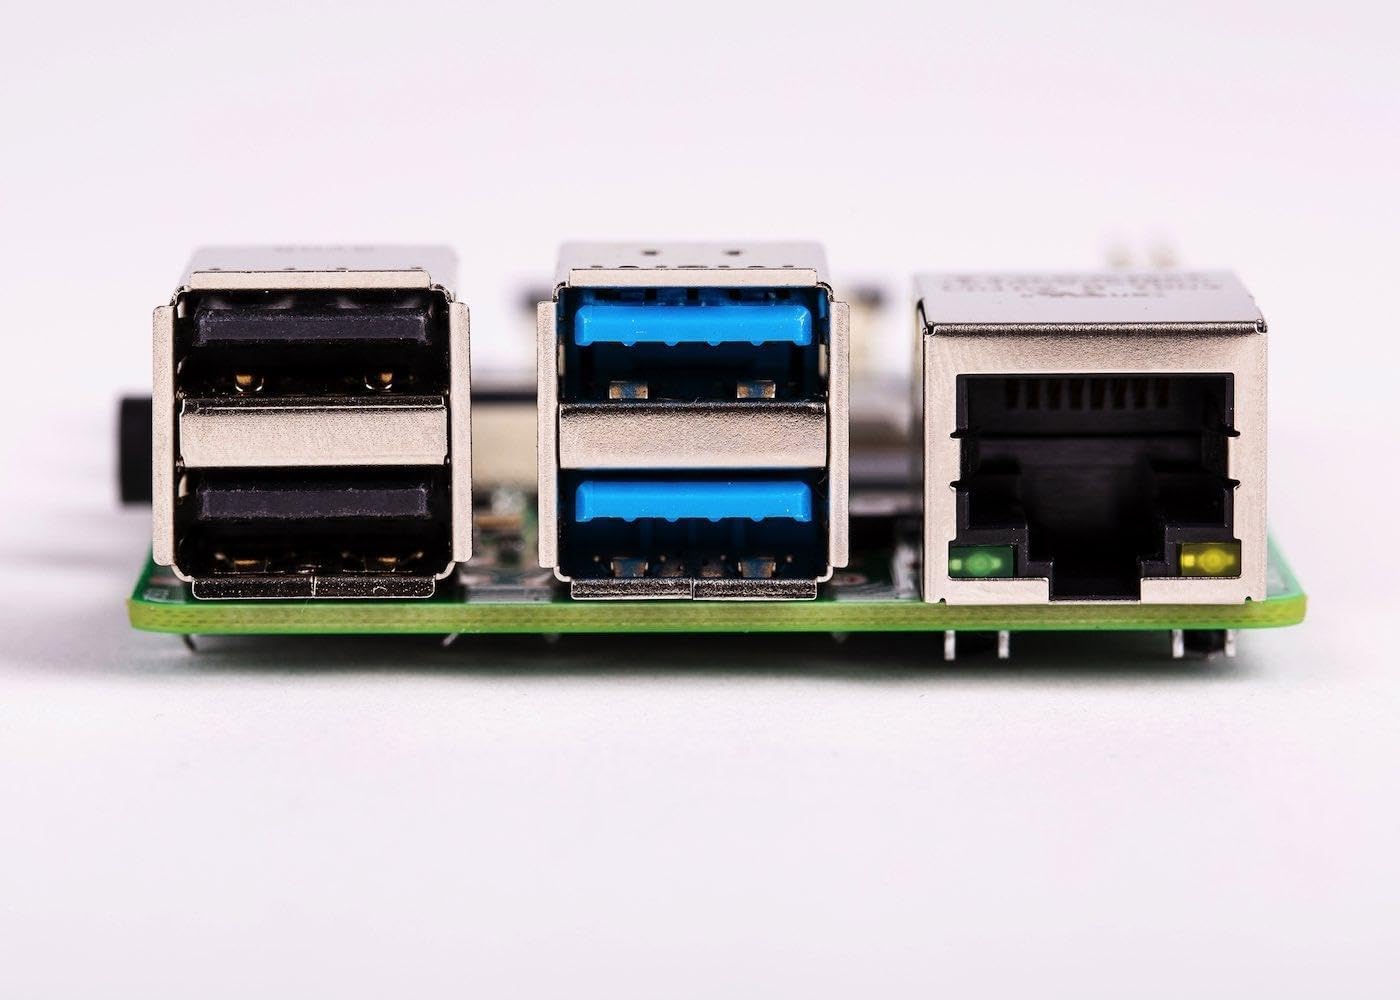
ຮູບພາບ 2: ຂ້າງ view of the Raspberry Pi 4 Model B, highlighting the USB 2.0, USB 3.0, and Ethernet ports.
2.4 ການເປີດເຄື່ອງ
Once all peripherals are connected, plug the USB-C power supply into the Raspberry Pi's USB-C power port. The Raspberry Pi will automatically power on and begin the boot process. The red power LED will illuminate, and the green activity LED will flash during boot.
3. ຄໍາແນະນໍາການດໍາເນີນງານ
3.1 First Boot and Initial Configuration
On the first boot, Raspberry Pi OS will guide you through an initial setup wizard. This includes setting your country, language, timezone, creating a new password, connecting to Wi-Fi, and updating software. Follow the on-screen prompts to complete the setup.
3.2 Desktop Environment
After initial setup, you will be presented with the Raspberry Pi OS desktop environment. This functions similarly to other desktop operating systems, allowing you to browse the web, edit documents, program, and more.
3.3 ການເຊື່ອມຕໍ່
- Wi-Fi: Connect to a wireless network using the network icon in the top-right corner of the desktop.
- Bluetooth: Pair Bluetooth devices via the Bluetooth icon in the top-right corner.
- ອີເທີເນັດ: If an Ethernet cable is connected, the Raspberry Pi will automatically establish a wired network connection.
3.4 ສ່ວນຫົວ GPIO
The 40-pin GPIO (General Purpose Input/Output) header allows you to connect and control various electronic components and sensors. Refer to the official Raspberry Pi documentation for detailed information on GPIO programming and usage.

ຮູບພາບ 3: ທາງເທິງ view of the Raspberry Pi 4 Model B, showing the 40-pin GPIO header on the left side.
4. ບໍາລຸງຮັກສາ
4.1 ການປັບປຸງຊອບແວ
Regularly update your Raspberry Pi OS to ensure optimal performance, security, and access to the latest features. Open a terminal and run the following commands:
sudo apt update
sudo apt full-upgrade -y
sudo reboot
4.2 ຄວາມເຢັນ
The Raspberry Pi 4 can generate significant heat under heavy load. For sustained performance, especially in enclosed spaces or demanding applications, consider using a heatsink or an active cooling solution (e.g., a fan) to prevent thermal throttling.

ຮູບພາບທີ 4: ໄລຍະໃກ້ view of the main processor chip on the Raspberry Pi 4 Model B, which can benefit from cooling solutions.
4.3 Safe Shutdown
Always shut down your Raspberry Pi properly to prevent data corruption on the MicroSD card. You can do this via the desktop menu (Menu > Shutdown > Shutdown) or by opening a terminal and typing:
sudo shutdown -h nowWait for the green activity LED to stop flashing before disconnecting power.
5. ການແກ້ໄຂບັນຫາ
- ບໍ່ມີການສະແດງຜົນອອກ:
- Ensure Micro HDMI cables are securely connected to both the Raspberry Pi and the monitor.
- Verify the monitor is set to the correct input source.
- Try a different Micro HDMI cable or monitor.
- Ensure the MicroSD card has a valid operating system installed.
- Power Issues (No LEDs, No Boot):
- Confirm you are using a compatible 5.1V 3A USB-C power supply.
- Check the power cable and connection.
- Try a different power supply if available.
- ບັນຫາການເຊື່ອມຕໍ່ Wi-Fi/Bluetooth:
- Ensure the Wi-Fi/Bluetooth module is enabled in the Raspberry Pi OS settings.
- Check for correct network credentials.
- Move the Raspberry Pi closer to the wireless access point.
- Ensure no physical obstructions are blocking the signal.
- ປະສິດທິພາບຊ້າ:
- Check for excessive heat and consider adding a cooling solution.
- Ensure your MicroSD card is a high-speed (Class 10 or higher) card.
- ປິດແອັບພລິເຄຊັນທີ່ບໍ່ຈໍາເປັນ.
- ດໍາເນີນການປັບປຸງຊອບແວ.
For more detailed troubleshooting, visit the official Raspberry Pi documentation and community forums.
6. ຂໍ້ມູນຈໍາເພາະ
| ຄຸນສົມບັດ | ລາຍລະອຽດ |
|---|---|
| ໂຮງງານຜະລິດ | Broadcom BCM2711, Quad-core Cortex-A72 (ARM v8) 64-bit SoC @ 1.5GHz |
| RAM | 8GB LPDDR4-2400 SDRAM |
| ການເຊື່ອມຕໍ່ | 2.4 GHz and 5.0 GHz IEEE 802.11b/g/n/ac wireless LAN, Bluetooth 5.0, BLE, Gigabit Ethernet |
| ພອດ USB | ພອດ USB 3.0 2 ພອດ, ພອດ USB 2.0 2 ພອດ |
| Video & Sound | 2 × micro-HDMI ports (up to 4Kp60 supported), 2-lane MIPI DSI display port, 2-lane MIPI CSI camera port, 4-pole stereo audio and composite video port |
| GPIO | ລະບົບຫົວແບບ GPIO 40-pin ມາດຕະຖານ (ດ້ານຫຼັງເຕັມ - ເຂົ້າກັນໄດ້ກັບກະດານທີ່ຜ່ານມາ) |
| ພະລັງງານ | 5V DC via USB-C connector (minimum 3A), 5V DC via GPIO header, Power over Ethernet (PoE) enabled (requires separate PoE HAT) |
| ຂະໜາດ | 2.76 x 1.97 x 0.39 ນິ້ວ (70 x 50 x 10 ມມ) |
| ລະບົບປະຕິບັດການ | Raspberry Pi OS (formerly Raspbian) |

ຮູບພາບທີ 5: ໄລຍະໃກ້ view of the dual Micro HDMI ports and the MIPI CSI camera port on the Raspberry Pi 4 Model B.
7. ການຮັບປະກັນແລະການສະຫນັບສະຫນູນ
ສຳລັບຂໍ້ມູນການຮັບປະກັນ ແລະ ການຊ່ວຍເຫຼືອດ້ານເຕັກນິກ, ກະລຸນາອ້າງອີງເຖິງ Raspberry Pi ຢ່າງເປັນທາງການ webເວັບໄຊ ຫຼືຕິດຕໍ່ຈຸດຊື້ຂອງທ່ານ. ຮັກສາຫຼັກຖານການຊື້ຂອງທ່ານສໍາລັບການຮ້ອງຂໍການຮັບປະກັນ.
Raspberry Pi ຢ່າງເປັນທາງການ Webເວັບໄຊ: www.raspberrypi.org