ແນະນຳ
Thank you for choosing the Mornwell Water Flosser. This device is designed to provide effective oral hygiene by removing food debris and plaque from between teeth and below the gumline, promoting healthier gums and a cleaner mouth. Please read this manual thoroughly before use to ensure proper operation and maintenance.
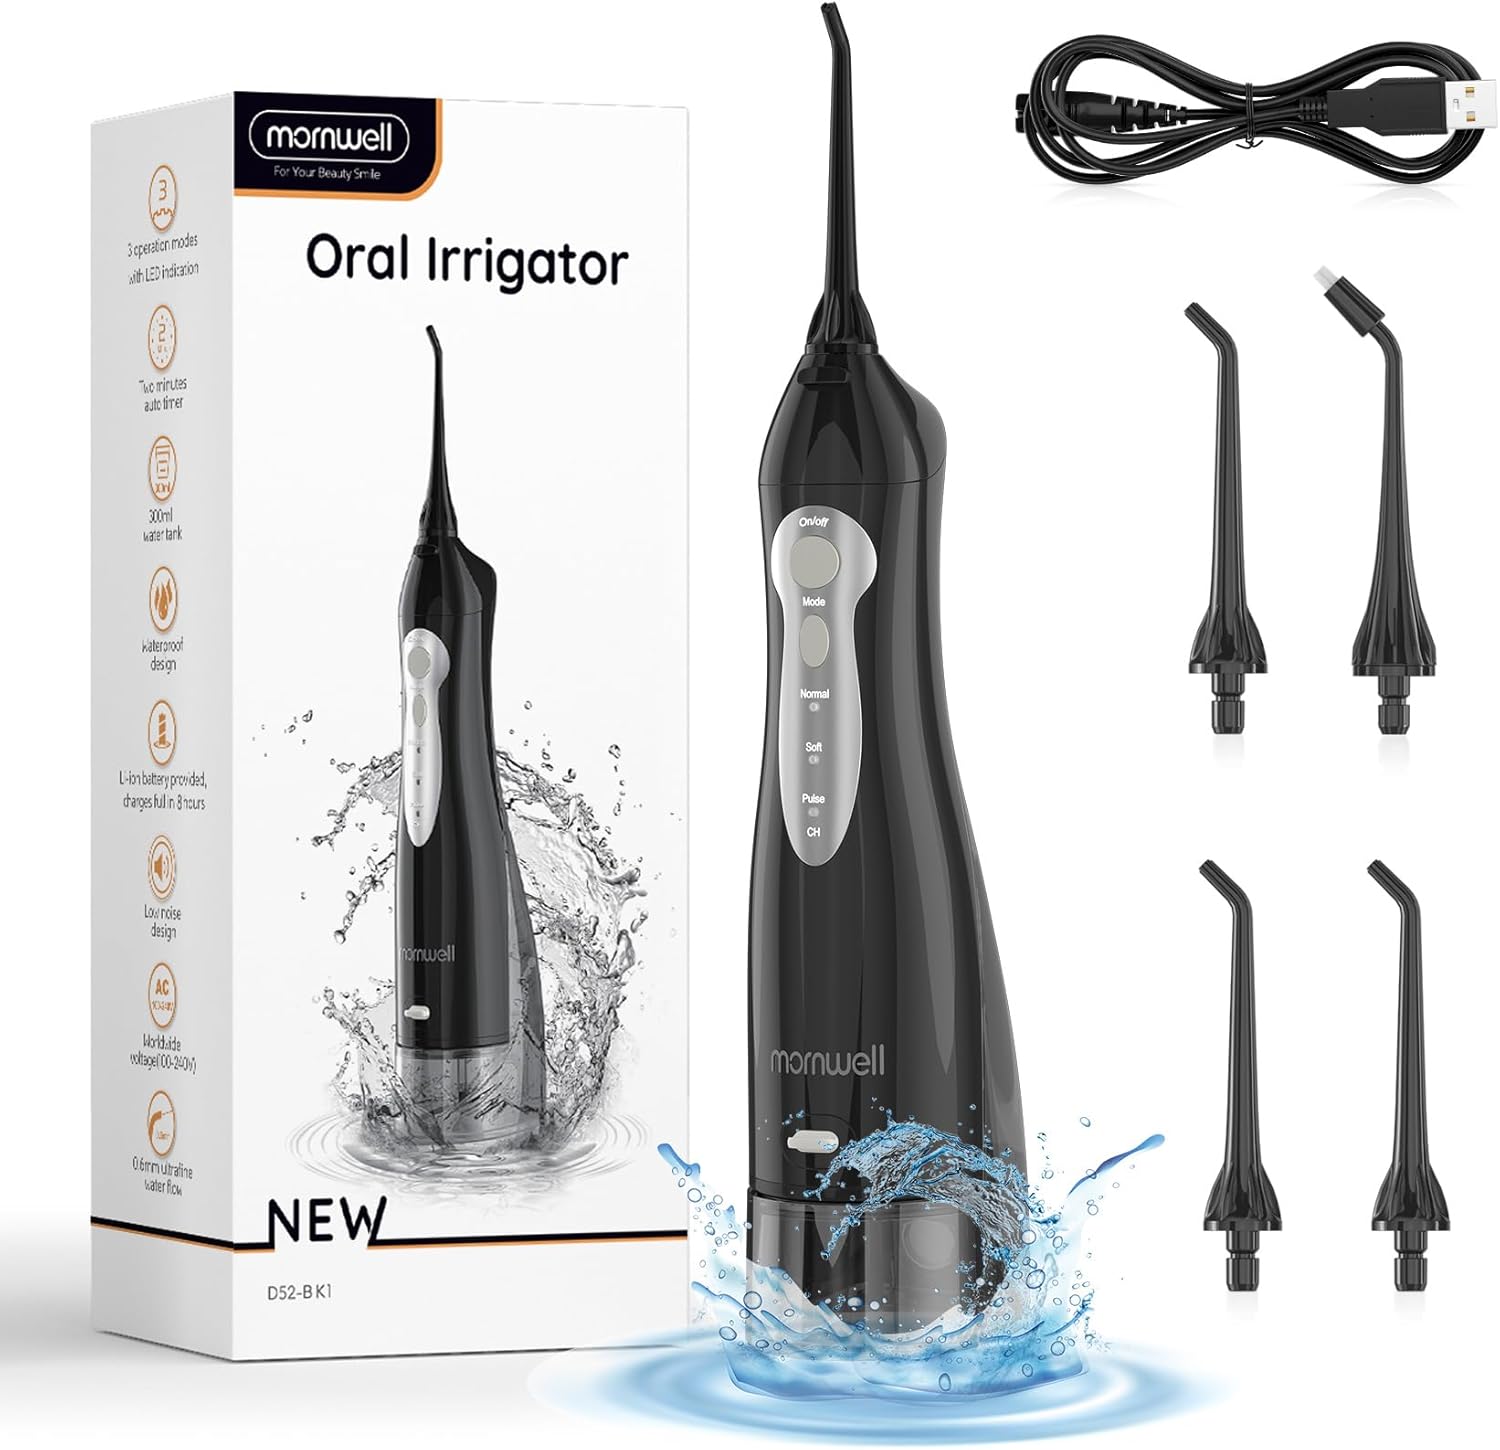
Figure 1: Mornwell Water Flosser and included accessories.
ຂໍ້ມູນຄວາມປອດໄພທີ່ສໍາຄັນ
ເພື່ອຄວາມປອດໄພຂອງທ່ານ, ກະລຸນາປະຕິບັດຕາມຄວາມລະມັດລະວັງຕໍ່ໄປນີ້:
- Keep the device away from water sources when charging.
- Be mindful of electrical safety when using the device in the shower.
- Do not add mouthwash or other solutions to the water tank that are not explicitly approved by the manufacturer, as this may damage the rubber seals.
- This device is intended for oral hygiene only. Do not use for any other purpose.
- ຮັກສາໃຫ້ໄກຈາກເດັກນ້ອຍ.
ສ່ວນປະກອບຂອງຜະລິດຕະພັນ
The Mornwell Water Flosser package includes:
- Mornwell Water Flosser Unit
- ສາຍສາກ USB
- Multiple Jet Tips (Standard and Orthodontic/Tongue Cleaner depending on configuration)
- ກະເປົ໋າເດີນທາງ

Figure 2: Different nozzle configurations that may be included with your unit.
ຕັ້ງຄ່າ
ກຳລັງສາກອຸປະກອນ
Before first use, fully charge the water flosser. The built-in 1400mAh lithium battery takes approximately 4 hours to fully charge and can last up to 30 days on a single charge, depending on usage.
- Locate the charging port on the device, usually covered by a protective plug.
- ໃສ່ສາຍສາກ USB ເຂົ້າໄປໃນຜອດ.
- Connect the other end of the USB cable to a compatible power source (e.g., USB adapter, computer USB port).
- The charging indicator lights will illuminate during charging and turn off or change color when fully charged.

Figure 3: Charging the water flosser.
ການຕື່ມຖັງນ້ໍາ
The 330ml detachable water tank provides sufficient capacity for a complete cleaning session without frequent refills.
- Detach the water tank from the main unit by sliding it down.
- Open the leak-proof drain lid.
- Fill the tank with lukewarm water. For sensitive teeth, warm water is recommended as the device does not have a water heater.
- Close the drain lid securely and reattach the tank to the main unit until it clicks into place.

Figure 4: Detachable water tank for easy filling and cleaning.
ຄໍາແນະນໍາການດໍາເນີນງານ
ການເລືອກໂໝດ
The Mornwell Water Flosser offers three distinct cleaning modes to suit your oral care needs:
- ໂໝດປົກກະຕິ: Provides a relatively strong water flow, suitable for daily cleaning for most users.
- ໂໝດອ່ອນ: Offers a gentle water flow, recommended for first-time users or individuals with sensitive gums.
- ໂໝດກຳມະຈອນ: Delivers an intermittent water flow, ideal for gum massage and enhanced cleaning.
Press the 'Mode' button to cycle through the available settings. The indicator lights will show the currently selected mode.

Figure 5: Three operating modes for customized cleaning.
ເຕັກນິກການຖູ
Follow these steps for effective water flossing:
- Select your desired mode (Normal, Soft, or Pulse).
- Lean over a sink to allow water to drain.
- Place the flosser tip into your mouth, aiming it at the gumline at a 90-degree angle. The 360° rotatable nozzle allows easy access to all areas.
- Press the 'On/Off' button to start the water flow.
- Move the tip along the gumline, pausing briefly between teeth. Ensure the water stream reaches all surfaces.
- Keep your mouth slightly open to allow water to flow into the sink.
- The device has an auto-timer design for optimal cleaning duration.

Figure 6: How the water flosser effectively removes plaque.
ບໍາລຸງຮັກສາ
Cleaning the Water Tank and Tips
Regular cleaning ensures hygiene and extends the life of your device.
- ຫຼັງຈາກການນໍາໃຊ້ແຕ່ລະຄັ້ງ, ລ້າງນ້ໍາທີ່ຍັງເຫຼືອອອກຈາກຖັງ.
- Detach the tank and rinse it thoroughly with clean water.
- Rinse the jet tips under running water.
- The device features internal and external double IPX7 waterproof protection, allowing for safe use and rinsing in the shower.
- Allow all components to air dry before reassembling or storing.

Figure 7: The water flosser is fully waterproof for easy cleaning.
ການແກ້ໄຂບັນຫາ
If you encounter issues with your Mornwell Water Flosser, consider the following:
- ບໍ່ມີນ້ໍາໄຫຼ: Ensure the water tank is properly filled and securely attached. Check if the nozzle is correctly inserted.
- ຄວາມກົດດັນນ້ໍາອ່ອນແອ: Verify the selected mode. If on 'Soft' mode, try 'Normal' or 'Pulse'. Ensure the device is fully charged.
- ອຸປະກອນບໍ່ເປີດ: Confirm the device is charged. If not, connect it to the charger.
- ຮົ່ວ: Ensure the water tank is properly seated and the drain lid is tightly closed.
ສຳລັບບັນຫາທີ່ຍັງຄົງຄ້າງຢູ່, ກະລຸນາອ້າງອີງໃສ່ພາກສ່ວນການຮັບປະກັນ ແລະ ການສະໜັບສະໜູນສຳລັບຂໍ້ມູນຕິດຕໍ່.
ຂໍ້ມູນຈໍາເພາະ
| ຄຸນສົມບັດ | ລາຍລະອຽດ |
|---|---|
| ຂະໜາດສິນຄ້າ | 9.49 x 4.33 x 2.72 ນິ້ວ |
| ໝາຍເລກຕົວແບບ | RST5012-BK |
| ນ້ຳໜັກ | 15.17 ອອນ |
| ໝໍ້ໄຟ | ແບັດເຕີຣີ Lithium Ion 1 ອັນ (ລວມ) |
| ແຫຼ່ງພະລັງງານ | ພະລັງງານຫມໍ້ໄຟ |
| ຄວາມອາດສາມາດຂອງຖັງນໍ້າ | 330ML |
| ການປະເມີນກັນນ້ໍາ | IPX7 |
| ຮູບແບບການເຮັດວຽກ | ປົກກະຕິ, ອ່ອນ, ກໍາມະຈອນ |
| ຄຸນນະສົມບັດພິເສດ | Portable, Timer, Rotatable Tip, Rechargeable, Multiple Tips |
| ວັດtage | 3 ວັດ-ຊົ່ວໂມງ |
ການຮັບປະກັນ & ສະຫນັບສະຫນູນ
Mornwell Cordless Water Flosser is Certificated by CE/FCC. Mornwell electric water flossers always offer a 12-month 'replace, don't repair' warranty.
If you have any questions or require support, please feel free to contact us. We aim to respond within 24 hours.
ສໍາລັບຂໍ້ມູນເພີ່ມເຕີມ, ທ່ານອາດຈະອ້າງອີງໃສ່ PDF ຄູ່ມືຜູ້ໃຊ້ຢ່າງເປັນທາງການ: Mornwell Water Flosser User Manual (PDF)