
1. ການແນະນໍາ ແລະຫຼາຍກວ່າview
Thank you for choosing the WORKPRO 20V Cordless Drill/Driver Kit. This manual provides essential information for the safe and efficient operation, maintenance, and troubleshooting of your new tool. Please read it thoroughly before use and keep it for future reference.
This 20V Drill Driver is designed for general-purpose drilling and driving tasks, offering powerful torque and versatile speed settings. Its cordless design provides maximum portability and convenience for various projects.
Video: WORKPRO 20V Cordless Drill/Driver Kit Overview
ວິດີໂອນີ້ສະຫນອງການທີ່ສົມບູນແບບview of the WORKPRO 20V Cordless Drill/Driver Kit, showcasing ຄຸນນະສົມບັດແລະອຸປະກອນເສີມຂອງມັນ.
2. ມີຫຍັງແດ່
Your WORKPRO 20V Cordless Drill/Driver Kit includes the following components:
- 1 x 20V Cordless Drill Driver
- 1 x 20V Li-ion Battery (2000mAh)
- ເຄື່ອງສາກດ່ວນ 1 x 2.4A
- 10 x 2-inch Screwdriver bits (SL3/16, 1/4; PH1, PH2, PH3; H5/32, H3/16, H1/4; T15, T25)
- 6 x Twist Drill Bits (1/8", 5/32", 3/16", 1/4", 5/16", 3/8")

Image: Kit Contents
The image displays the WORKPRO 20V Cordless Drill/Driver, along with its included 2.0Ah Li-ion battery, 2.4A fast charger, various screwdriver bits, and twist drill bits.
3. ຕັ້ງຄ່າ
3.1 ການສາກແບັດເຕີຣີ
The 20V Li-ion battery requires charging before first use. Connect the 2.4A Quick Charger to a power outlet. The red indicator light on the charger will illuminate. Insert the battery into the charger. The red light will blink while charging and turn solid green when fully charged. A full charge takes approximately 1 hour.

Image: Battery and Charger
This image shows the 20V Li-ion battery and the 2.4A fast charger, highlighting the 1-hour fast charging capability.
3.2 Attaching the Battery to the Drill
Align the battery with the base of the drill handle and slide it in until it clicks securely into place. To remove, press the release buttons on the sides of the battery and slide it out.
3.3 ການຕິດຂັດເຂັມຂັດ
The included belt clip can be attached to either side of the drill's base using the provided screw. This allows for convenient carrying during work.

Image: Belt Clip Attachment
The image illustrates the location for attaching the belt clip to the drill for easy access.
4. ຄໍາແນະນໍາການດໍາເນີນງານ
4.1 ຕົວກະຕຸ້ນຄວາມໄວຕົວແປ
The drill features a variable speed trigger, allowing you to control the drilling/driving speed based on the application. Press the trigger gently for slower speeds and apply more pressure for higher speeds.
4.2 2-Speed Transmission
Select between two-speed settings using the gear selector switch located on top of the drill:
- ຄວາມໄວຕໍ່າ (0-360 RPM): ເໝາະສຳລັບການນຳໃຊ້ທີ່ມີແຮງບິດສູງ ເຊັ່ນ: ການຂັບສະກູ ຫຼື ການເຈາະຮູຂະໜາດໃຫຍ່.
- ຄວາມໄວສູງ (0-1300 RPM): Suitable for fast drilling in softer materials or smaller holes.
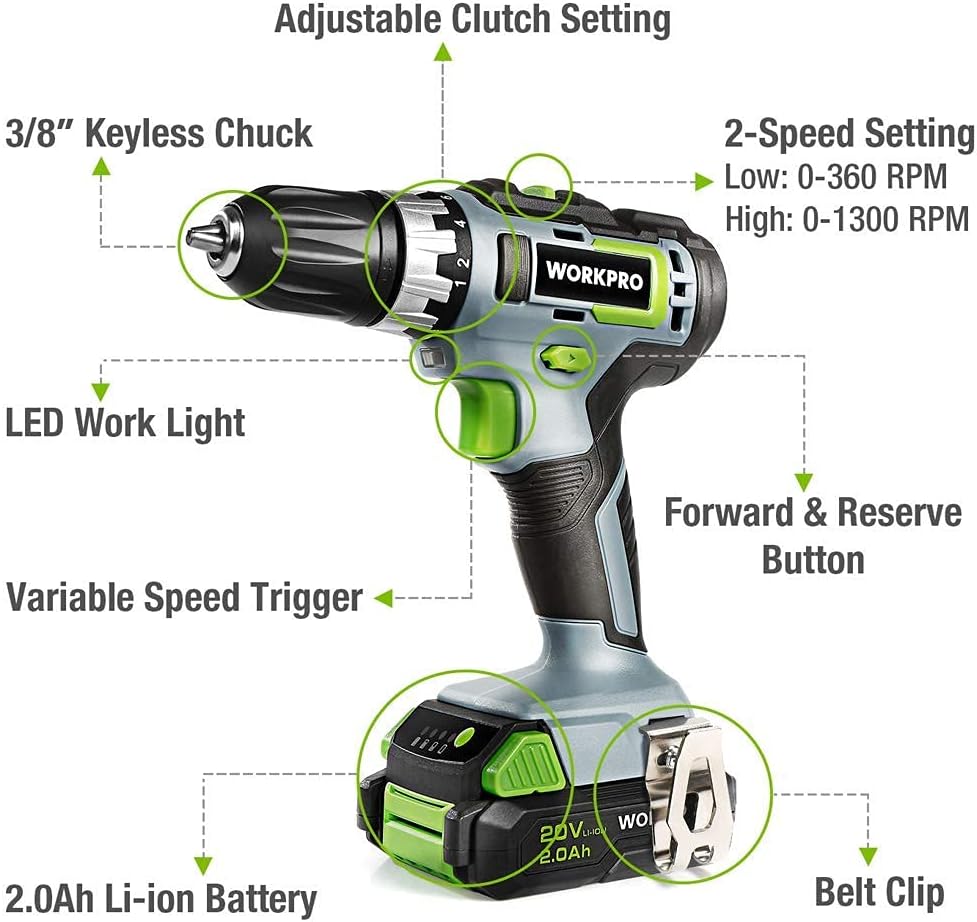
Image: 2-Speed Transmission
This image demonstrates the two-speed transmission settings on the drill, allowing for versatile use.
4.3 18+2 Torque Adjustment
The clutch offers 18 different torque settings plus 2 modes (driving and drilling). Rotate the torque collar to select the desired setting. Higher numbers provide more torque, preventing over-driving screws or damaging materials.
- ແບບຂັບຂີ່: Use settings 1-18 for driving screws.
- ຮູບແບບການເຈາະ: Use the drill icon setting for drilling applications, providing maximum torque.

Image: Torque Adjustment
The image highlights the 18+2 torque adjustment collar, showing the various settings for driving and drilling.
4.4 3/8 inch Keyless Chuck
The 3/8 inch keyless ratcheting chuck allows for quick and easy bit changes without the need for a chuck key. To insert a bit, twist the chuck counter-clockwise to open the jaws, insert the bit, and then twist clockwise to tighten securely.

Image: Keyless Chuck
This image focuses on the 3/8 inch keyless chuck, illustrating its design for easy bit insertion and removal.
4.5 ປຸ່ມ Forward/Reverse
The forward/reverse button, located above the trigger, controls the direction of rotation. Push it to the left for forward (clockwise) rotation and to the right for reverse (counter-clockwise) rotation. Center position locks the trigger for safety.
4.6 ໄຟ LED ເຮັດວຽກ
The drill is equipped with a trigger-delay LED work light that illuminates the work area when the trigger is pressed. It stays on for approximately ten seconds after the trigger is released, providing continued visibility in dimly lit spaces.

Image: LED Work Light and Variable Speed Trigger
The image shows the integrated LED work light and the variable speed trigger on the drill.
5. ບໍາລຸງຮັກສາ
Regular maintenance ensures the longevity and optimal performance of your WORKPRO drill.
- ທໍາຄວາມສະອາດ: ຮັກສາຊ່ອງລະບາຍອາກາດຂອງເຄື່ອງມືໃຫ້ຊັດເຈນ ແລະບໍ່ມີສິ່ງເສດເຫຼືອ. ໃຊ້ອ່ອນ, ງamp ຜ້າເພື່ອເຮັດຄວາມສະອາດພາຍນອກ. ຢ່າໃຊ້ສານເຄມີທີ່ຮຸນແຮງຫຼືເຄື່ອງເຮັດຄວາມສະອາດຂັດ.
- ການດູແລຫມໍ້ໄຟ: ເກັບຮັກສາຫມໍ້ໄຟໃນບ່ອນທີ່ເຢັນ, ແຫ້ງ, ຫ່າງຈາກແສງແດດໂດຍກົງແລະອຸນຫະພູມທີ່ສຸດ. ຢ່າເກັບແບັດເຕີລີທີ່ປ່ອຍປະໄວ້ໃຫ້ເຕັມທີ່ເປັນເວລາດົນ.
- Bit Storage: Store drill bits and screwdriver bits in a dry place to prevent rust.
- ການກວດກາ: Periodically inspect the drill for any signs of damage, loose screws, or worn parts. If any issues are found, discontinue use and contact customer support.
6. ການແກ້ໄຂບັນຫາ
If you encounter issues with your WORKPRO drill, refer to the following common troubleshooting tips:
- ເຈາະບໍ່ເປີດ: Ensure the battery is fully charged and securely attached to the drill. Check that the forward/reverse button is not in the center (locked) position.
- ແບັດເຕີຣີບໍ່ສາກໄຟ: Verify that the charger is properly plugged into a working power outlet and that the battery is correctly seated in the charger. Check for any visible damage to the charger or battery.
- ການສູນເສຍພະລັງງານໃນລະຫວ່າງການປະຕິບັດງານ: ແບັດເຕີຣີອາດຈະອ່ອນ. ໃຫ້ສາກແບັດເຕີຣີຄືນໃໝ່.
- ນ້ອຍ slipping ໃນ chuck: Ensure the chuck is tightened securely around the bit. The bit shank should be clean and free of oil or debris.
For persistent issues or problems not listed here, please contact WORKPRO customer support.
7. ຂໍ້ມູນຈໍາເພາະ
| ຄຸນສົມບັດ | ຂໍ້ມູນຈໍາເພາະ |
|---|---|
| ຍີ່ຫໍ້ | WorkPRO |
| ໝາຍເລກຕົວແບບ | W122035A |
| ແຫຼ່ງພະລັງງານ | ພະລັງງານຫມໍ້ໄຟ |
| ສະບັບtage | 20 ໂວນ (DC) |
| Ampອາຍຸ | 2 Amps |
| ຄວາມອາດສາມາດຫມໍ້ໄຟ | 2 Amp Hours (Li-ion) |
| ຄວາມໄວການຫມຸນສູງສຸດ | 1300 RPM |
| ຈໍານວນຄວາມໄວ | 2 (0-360 RPM / 0-1300 RPM) |
| ຂະໜາດ Chuck ສູງສຸດ | 3/8 inch (10 Millimeters) |
| ແຮງບິດສູງສຸດ | 25 Newton Meters (220 In-lbs) |
| ນ້ໍາຫນັກລາຍການ | 2.93 ປອນ (1.33 ກິໂລກຣາມ) |
| ຂະໜາດສິນຄ້າ | 16"L x 9.21"W x 3.5"H |
| ວັດສະດຸ | ABS |
8. ການຮັບປະກັນແລະການສະຫນັບສະຫນູນ
For detailed warranty information and customer support, please refer to the official WORKPRO user manual or contact WORKPRO directly.
You can download the full User Manual in PDF format here: WORKPRO 20V Cordless Drill/Driver User Manual (PDF)
ສໍາລັບການຊ່ວຍເຫຼືອເພີ່ມເຕີມ, ກະລຸນາໄປຢ້ຽມຢາມ ຮ້ານ WORKPRO ໃນ Amazon.