
1. ຂໍ້ມູນຄວາມປອດໄພທີ່ສໍາຄັນ
Please read all instructions carefully before using the blender. Failure to follow these instructions may result in electric shock, fire, or serious injury.
ຂໍ້ຄວນລະວັງຄວາມປອດໄພທົ່ວໄປ
- Always unplug the blender from the electrical outlet when not in use, before assembling or disassembling parts, and before cleaning.
- ຢ່າເອົາຖານມໍເຕີໃສ່ໃນນໍ້າ ຫຼືຂອງແຫຼວອື່ນໆ.
- ຫຼີກເວັ້ນການສໍາຜັດກັບພາກສ່ວນທີ່ເຄື່ອນຍ້າຍ.
- ຫ້າມນຳໃຊ້ເຄື່ອງຈັກທີ່ມີສາຍໄຟ ຫຼື ປລັກສຽບທີ່ເສຍຫາຍ, ຫຼື ຫຼັງຈາກເຄື່ອງໃຊ້ງານຜິດປົກກະຕິ, ຫຼືຖືກຕົກຫຼືເສຍຫາຍໃນທຸກຮູບແບບ.
- ການນໍາໃຊ້ໄຟລ໌ແນບທີ່ບໍ່ແນະນໍາຫຼືຂາຍໂດຍຜູ້ຜະລິດອາດຈະເຮັດໃຫ້ເກີດໄຟໄຫມ້, ໄຟຟ້າຊອດ, ຫຼືການບາດເຈັບ.
- ຢ່າໃຊ້ນອກ.
- ຢ່າປ່ອຍໃຫ້ສາຍໄຟແຂວນໃສ່ຂອບໂຕະ ຫຼືໂຕະ, ຫຼືແຕະພື້ນຜິວທີ່ຮ້ອນ.
- ຮັກສາມື ແລະເຄື່ອງໃຊ້ຕ່າງໆອອກຈາກຖັງໃນຂະນະທີ່ປັ່ນເພື່ອຫຼຸດຜ່ອນຄວາມສ່ຽງຕໍ່ການບາດເຈັບຮ້າຍແຮງຕໍ່ຄົນ ຫຼືຄວາມເສຍຫາຍຕໍ່ເຄື່ອງປັ່ນ. ເຄື່ອງຂູດອາດຈະຖືກນໍາໃຊ້ແຕ່ພຽງແຕ່ໃນເວລາທີ່ເຄື່ອງປັ່ນບໍ່ໄດ້ແລ່ນ.
- ແຜ່ນໃບແມ່ນແຫຼມ. ຈັດການດ້ວຍຄວາມລະມັດລະວັງ.
- ເຮັດວຽກເຄື່ອງປັ່ນດ້ວຍຝາປິດຢູ່ສະເໝີ.
- ເຄື່ອງໃຊ້ນີ້ບໍ່ໄດ້ມີຈຸດປະສົງເພື່ອໃຊ້ໂດຍບຸກຄົນ (ລວມທັງເດັກນ້ອຍ) ທີ່ມີຄວາມສາມາດທາງຮ່າງກາຍ, ຄວາມຮູ້ສຶກ ຫຼືຈິດໃຈທີ່ຫຼຸດລົງ, ຫຼືຂາດປະສົບການ ແລະຄວາມຮູ້, ເວັ້ນເສຍແຕ່ວ່າພວກເຂົາໄດ້ຮັບການຊີ້ນໍາ ຫຼືຄໍາແນະນໍາກ່ຽວກັບການນໍາໃຊ້ເຄື່ອງໃຊ້ໂດຍບຸກຄົນທີ່ຮັບຜິດຊອບຄວາມປອດໄພຂອງເຂົາເຈົ້າ.
ຄວາມປອດໄພທາງໄຟຟ້າ
ເຄື່ອງນີ້ມີປລັກຂົ້ວໂລກ (ໃບນຶ່ງກວ້າງກວ່າອີກແຜ່ນ). ເພື່ອຫຼຸດຜ່ອນຄວາມສ່ຽງຕໍ່ການເກີດໄຟຟ້າຊ໊ອກ, ປັ໊ກນີ້ແມ່ນມີຈຸດປະສົງເພື່ອໃຫ້ເຫມາະກັບທໍ່ຂົ້ວຂົ້ວພຽງແຕ່ທາງດຽວ. ຖ້າປລັກສຽບບໍ່ພໍດີກັບປລັກສຽບໄຟ, ຫັນປລັກສຽບຄືນ. ຖ້າມັນຍັງບໍ່ພໍດີ, ໃຫ້ຕິດຕໍ່ກັບຊ່າງໄຟຟ້າທີ່ມີຄຸນວຸດທິ. ຢ່າພະຍາຍາມດັດແປງປລັກສຽບໃນທາງໃດກໍ່ຕາມ.
2. ອົງປະກອບຂອງຜະລິດຕະພັນ
Familiarize yourself with the parts of your Oster Classic Series 8-Speed Blender:
- ຖານມໍເຕີ: ປະກອບມີມໍເຕີ ແລະ ແຜງຄວບຄຸມ.
- ໂຖແກ້ວ 6 ຖ້ວຍ: The main blending container.
- ຝາປິດ: Seals the jar during operation.
- Filler Cap: A removable cap in the lid for adding ingredients while blending.
- ແຜ່ນໃບຄ້າຍຄື: Consists of the Crush Pro 4® 4-point stainless steel blade, sealing gasket, and bottom cap.

Figure 2.1: Assembled Oster Classic Series 8-Speed Blender with empty glass jar.
This image displays the complete blender unit, including the motor base, the 6-cup glass jar, and the lid with its filler cap. Various fresh fruits are arranged around the base, indicating its use for preparing beverages and food.
3. ຄໍາແນະນໍາການຕິດຕັ້ງ
ກ່ອນການນໍາໃຊ້ຄັ້ງທໍາອິດ
- ຖອດເຄື່ອງປັ່ນ ແລະສ່ວນປະກອບທັງໝົດຂອງມັນ.
- Wash the glass jar, lid, filler cap, and blade assembly in warm, soapy water. Rinse thoroughly and dry.
- ເຊັດພື້ນຖານມໍເຕີດ້ວຍການໂຄສະນາamp ຜ້າ. ຢ່າເອົາພື້ນຖານມໍເຕີຢູ່ໃນນ້ໍາ.
ສະພາແຫ່ງ
- ວາງປະเก็นປະທັບຕາໃສ່ຊຸດປະກອບໃບມີດ.
- Insert the blade assembly into the bottom opening of the glass jar.
- Screw the bottom cap onto the jar, ensuring it is tightened securely to prevent leaks.
- Place the assembled jar onto the motor base, ensuring it is seated correctly.
- Place the lid onto the glass jar, and insert the filler cap into the lid opening.
4. ຄໍາແນະນໍາການດໍາເນີນງານ
ການກະກຽມສ່ວນປະກອບ
- ຕັດສ່ວນປະກອບທີ່ແຂງເປັນຕ່ອນນ້ອຍໆ (ປະມານ 1 ນິ້ວ) ເພື່ອໃຫ້ໄດ້ສ່ວນປະສົມທີ່ດີທີ່ສຸດ.
- Always add liquids first, then soft ingredients, then hard ingredients, and finally ice.
- Do not overfill the blender jar. The maximum capacity for liquids is 6 cups.
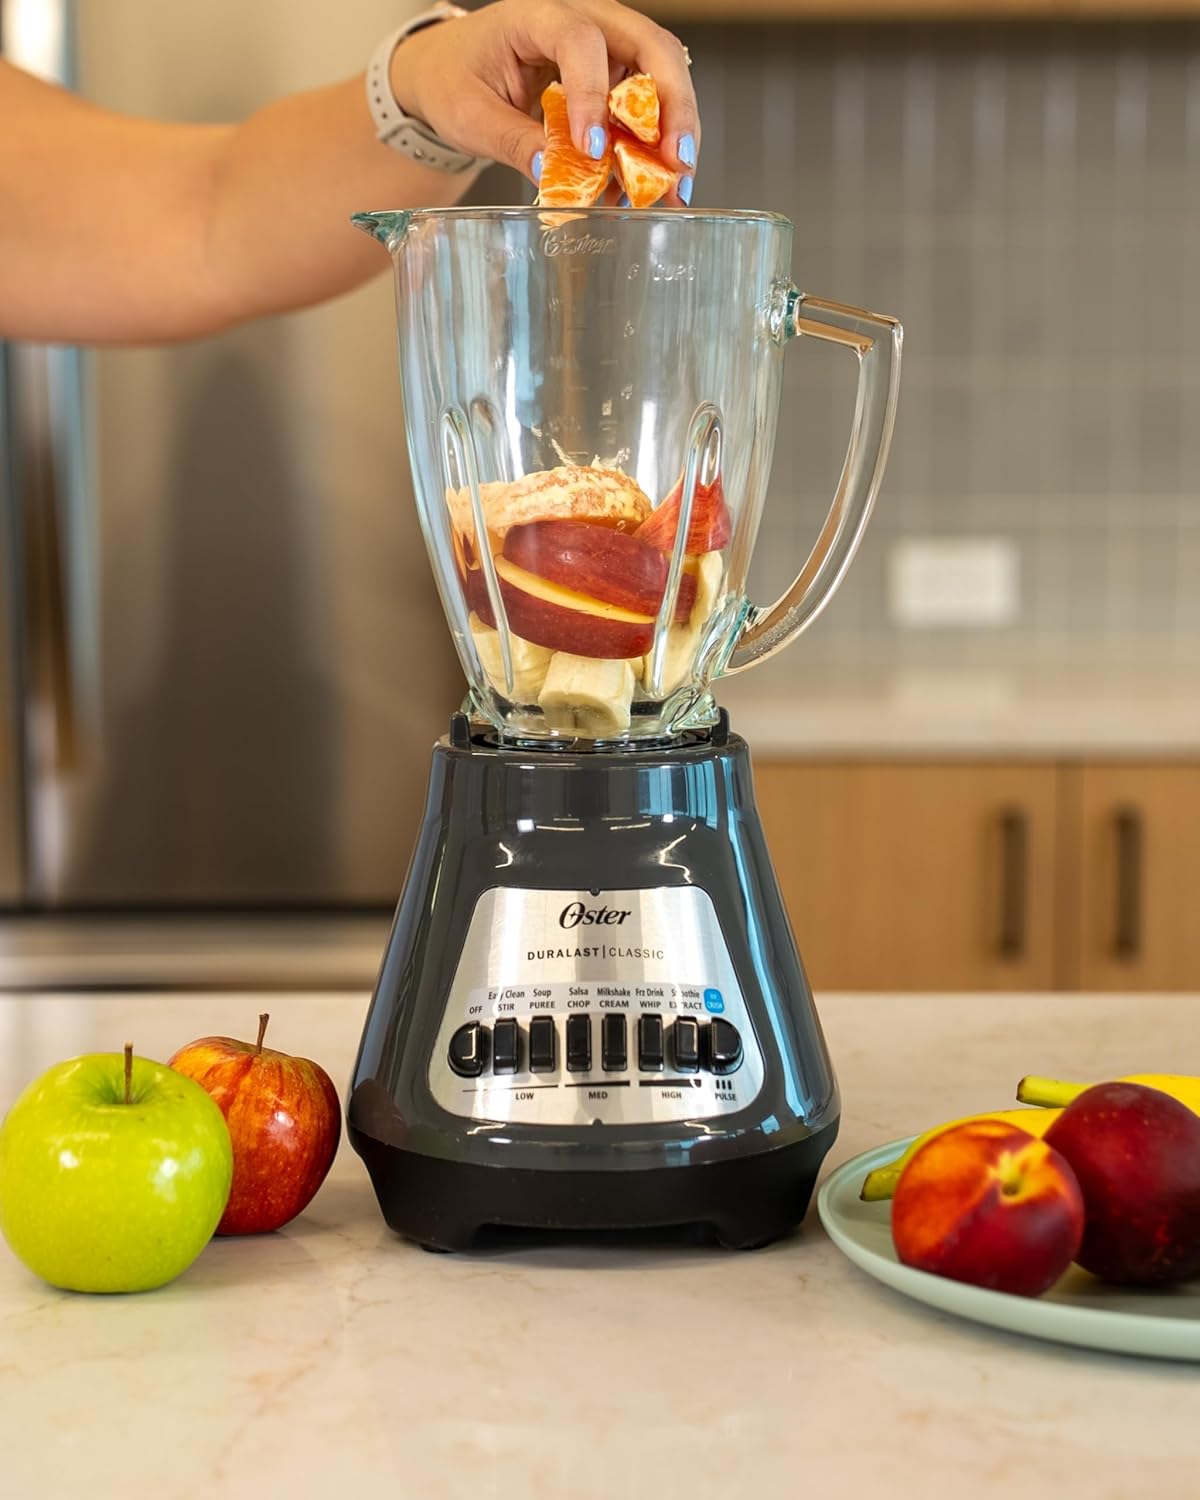
Figure 4.1: Adding ingredients to the blender jar.
This image shows a hand carefully placing orange segments into the blender's glass jar, which already contains other fruits like bananas and apple slices, demonstrating the process of loading ingredients.
ຂະບວນການປະສົມ
- Ensure the blender is properly assembled and the lid is securely in place.
- ສຽບສາຍໄຟໃສ່ບ່ອນສຽບໄຟ 220V.
- Select the desired speed setting using the push-button controls on the motor base. The blender offers 8 speeds, including specific functions like 'Ice Crush' and 'Pulse'.
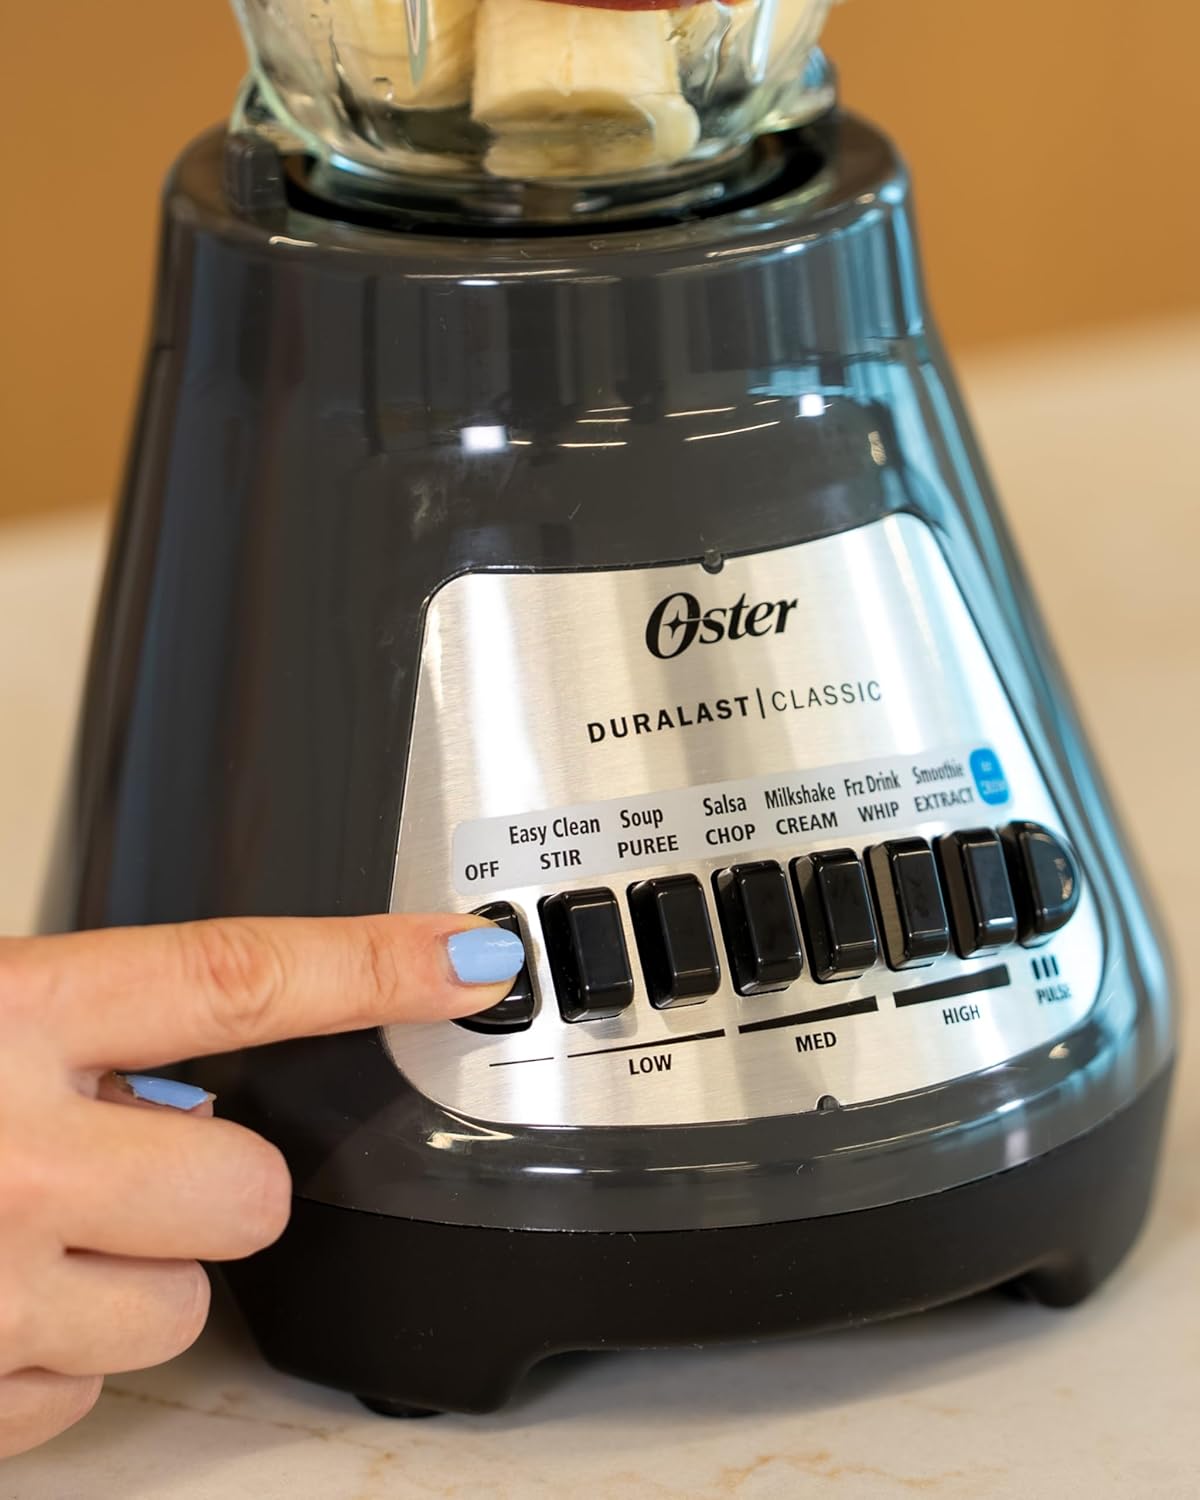
Figure 4.2: Operating the blender controls.
This image illustrates a user's hand pressing one of the control buttons on the blender's base, highlighting the push-button interface for speed selection and function activation.
- For continuous blending, press the desired speed button (Low, Med, High).
- For short bursts of power, use the 'Pulse' button. Release the button to stop.
- For crushing ice, use the dedicated 'Ice Crush' setting.

Figure 4.3: Blender in operation with fruits and ice.
This image shows the blender actively processing a mixture of colorful fruits and ice cubes within its glass jar, demonstrating its blending capability.

Figure 4.4: Blender prepared with ice and fruit.
This image displays the blender with its glass jar filled with ice and various fruits, indicating it is ready to begin the blending process.
5. ການທໍາຄວາມສະອາດແລະບໍາລຸງຮັກສາ
ການເຮັດຄວາມສະອາດເປັນປະຈຳຮັບປະກັນປະສິດທິພາບທີ່ດີທີ່ສຸດ ແລະ ຍືດອາຍຸການໃຊ້ງານຂອງເຄື່ອງປັ່ນຂອງທ່ານ.
ທໍາຄວາມສະອາດປະຈໍາວັນ
- ຖອດເຄື່ອງປັ່ນຈາກປລັກສຽບໄຟ.
- Disassemble the glass jar, blade assembly, lid, and filler cap.
- Wash these parts in warm, soapy water. The glass jar, lid, and blade assembly are also dishwasher safe.
- ເຊັດພື້ນຖານມໍເຕີດ້ວຍການໂຄສະນາamp ຜ້າ. ຢ່າເອົາຖານມໍເຕີໃສ່ໃນນໍ້າ ຫຼືຂອງແຫຼວອື່ນໆ.
- ຕາກໃຫ້ແຫ້ງທຸກພາກສ່ວນຢ່າງລະອຽດກ່ອນທີ່ຈະປະກອບ ຫຼືເກັບຮັກສາ.

Figure 5.1: Blender components in a dishwasher.
This image shows the disassembled components of the Oster blender, specifically the glass jar, blade assembly, and lid, arranged within a dishwasher rack, indicating their dishwasher-safe nature for convenient cleaning.
ການເກັບຮັກສາ
Store the blender in a clean, dry place. Ensure the power cord is neatly wrapped and not kinked.
6. ຄູ່ມືການແກ້ໄຂບັນຫາ
ຖ້າທ່ານພົບບັນຫາກັບເຄື່ອງປັ່ນຂອງທ່ານ, ໃຫ້ອ້າງອີງເຖິງບັນຫາທົ່ວໄປຕໍ່ໄປນີ້ແລະວິທີແກ້ໄຂ:
| ບັນຫາ | ສາເຫດທີ່ເປັນໄປໄດ້ | ການແກ້ໄຂ |
|---|---|---|
| Blender ບໍ່ເປີດ. | Not plugged in; power outlet not working; jar not seated correctly; motor overheated. | Ensure plug is firmly in a working outlet; check circuit breaker; ensure jar is securely placed on base; allow motor to cool for 15-20 minutes. |
| ສ່ວນປະກອບບໍ່ໄດ້ປະສົມຢ່າງລຽບງ່າຍ. | Too little liquid; too many ingredients; ingredients too large; blade assembly not tight. | Add more liquid; reduce ingredient quantity; cut ingredients into smaller pieces; ensure blade assembly is securely tightened. |
| Blender ຮົ່ວຈາກລຸ່ມຂອງກະປ໋ອງ. | Blade assembly not tight; gasket missing or improperly placed; gasket damaged. | Tighten blade assembly securely; ensure gasket is correctly seated; replace damaged gasket. |
| ກິ່ນຫອມໃນລະຫວ່າງການດໍາເນີນງານ. | ເຄື່ອງຈັກໂຫຼດເກີນ; ເຮັດວຽກຕໍ່ເນື່ອງເປັນເວລາດົນເກີນໄປ. | Reduce ingredient load; do not operate continuously for more than 3 minutes; allow motor to cool. If smell persists, discontinue use and contact customer support. |
7. ຂໍ້ກໍານົດດ້ານວິຊາການ
- ຍີ່ຫໍ້: Oster
- ໝາຍເລກຕົວແບບ: BLSTMEGG00000
- ສີ: ສີເທົາ
- ຈໍານວນຄວາມໄວ: 8
- ຄວາມອາດສາມາດ: 6 Cups (Glass Jar)
- ວັດສະດຸບັນຈຸ: ແກ້ວ
- ວັດສະດຸແຜ່ນ: Stainless Steel (Crush Pro 4® 4-point)
- ແຫຼ່ງພະລັງງານ: ໄຟຟ້າສາຍ
- ສະບັບtage: 220 ໂວນ
- ປະເພດການຄວບຄຸມ: Push Button, Manual Speed Control
- ຂະໜາດຜະລິດຕະພັນ: 8.8"D x 10.2"W x 13.8"H
- ນ້ໍາຫນັກລາຍການ: 6.78 ປອນ
- UPC: 034264492592
8. ການຮັບປະກັນແລະການສະ ໜັບ ສະ ໜູນ
ຂໍ້ມູນການຮັບປະກັນ
This Oster Classic Series 8-Speed Blender comes with a standard manufacturer's warranty. For specific details regarding warranty coverage, duration, and terms, please refer to the warranty card included with your product packaging or visit the official Oster webເວັບໄຊ.
ການຊ່ວຍເຫຼືອລູກຄ້າ
For technical assistance, replacement parts, or any other inquiries, please contact Oster Customer Service. You can find contact information on the official Oster website or through the documentation provided with your blender.
ເຈົ້າໜ້າທີ່ Oster Webເວັບໄຊ: www.oster.com