
Tacklife PES01A
ຄູ່ມືຜູ້ໃຊ້ Tacklife PES01A Circular Saw
Model: PES01A
1. ບົດແນະນຳ
Thank you for choosing the Tacklife PES01A Circular Saw. This powerful and versatile tool is designed for efficient and precise cutting of various materials, including wood and plastic. Featuring a robust 1500W motor, laser guide, and adjustable cutting capabilities, it is an ideal tool for both professional and DIY projects. Please read this manual thoroughly before operation to ensure safe and effective use of your new circular saw.

Figure 1.1: Tacklife PES01A Circular Saw overview.
2. ຄໍາແນະນໍາກ່ຽວກັບຄວາມປອດໄພທົ່ວໄປ
ປະຕິບັດຕາມຄວາມລະມັດລະວັງດ້ານຄວາມປອດໄພຂັ້ນພື້ນຖານສະເໝີເມື່ອໃຊ້ເຄື່ອງມືໄຟຟ້າເພື່ອຫຼຸດຜ່ອນຄວາມສ່ຽງຕໍ່ການເກີດອັກຄີໄພ, ການຊ໊ອກໄຟຟ້າ ແລະການບາດເຈັບສ່ວນບຸກຄົນ. ຮັກສາຄູ່ມືນີ້ໄວ້ສໍາລັບການອ້າງອີງໃນອະນາຄົດ.
2.1. ຄວາມປອດໄພຂອງພື້ນທີ່ເຮັດວຽກ
- ຮັກສາພື້ນທີ່ເຮັດວຽກໃຫ້ສະອາດ ແລະ ມີແສງສະຫວ່າງດີ. ພື້ນທີ່ວຸ້ນວາຍ ຫຼືບ່ອນມືດພາໃຫ້ເກີດອຸປະຕິເຫດ.
- ຫ້າມໃຊ້ເຄື່ອງມືໄຟຟ້າໃນບັນຍາກາດທີ່ລະເບີດ, ເຊັ່ນໃນທີ່ປະທັບຂອງຂອງແຫຼວ, ອາຍແກັສ, ຫຼືຝຸ່ນ. ເຄື່ອງມືພະລັງງານສ້າງປະກາຍໄຟທີ່ອາດຈະຕິດເຊື້ອຂີ້ຝຸ່ນຫຼືຄວັນ.
- ຮັກສາເດັກນ້ອຍ ແລະຜູ້ຢືນຢູ່ຫ່າງໆ ໃນຂະນະທີ່ໃຊ້ເຄື່ອງມືໄຟຟ້າ. ສິ່ງລົບກວນສາມາດເຮັດໃຫ້ເຈົ້າສູນເສຍການຄວບຄຸມ.
2.2. ຄວາມປອດໄພດ້ານໄຟຟ້າ
- ປລັກເຄື່ອງມືໄຟຟ້າຕ້ອງກົງກັບປລັກສຽບໄຟ. ບໍ່ເຄີຍດັດແປງປລັກສຽບໃນທາງໃດກໍ່ຕາມ.
- ຫຼີກເວັ້ນການສໍາຜັດກັບຮ່າງກາຍກັບພື້ນດິນຫຼືຫນ້າດິນ, ເຊັ່ນ: ທໍ່, radiators, ຂອບເຂດ, ແລະຕູ້ເຢັນ. ມີຄວາມສ່ຽງສູງຕໍ່ການເກີດໄຟຟ້າຊັອດ ຖ້າຮ່າງກາຍຂອງເຈົ້າຖືກດິນ ຫຼືດິນ.
- ຫ້າມບໍ່ໃຫ້ເຄື່ອງໃຊ້ໄຟຟ້າຖືກຝົນ ຫຼືສະພາບທີ່ປຽກ. ນ້ໍາເຂົ້າໄປໃນເຄື່ອງມືໄຟຟ້າຈະເພີ່ມຄວາມສ່ຽງຕໍ່ການຊ໊ອກໄຟຟ້າ.
- ຢ່າໃຊ້ສາຍບື. ຫ້າມໃຊ້ສາຍເພື່ອຖື, ດຶງ, ຫຼືຖອດສາຍໄຟ. ຮັກສາສາຍໄຟໃຫ້ຫ່າງຈາກຄວາມຮ້ອນ, ນໍ້າມັນ, ແຄມແຫຼມ, ຫຼືພາກສ່ວນທີ່ເຄື່ອນຍ້າຍ.
2.3. ຄວາມປອດໄພສ່ວນຕົວ
- ໃສ່ເຄື່ອງປ້ອງກັນຕາສະເໝີ. ໃຊ້ແວ່ນຕານິລະໄພ ຫຼືແວ່ນຕາ.
- ໃສ່ເຄື່ອງປ້ອງກັນການໄດ້ຍິນເມື່ອໃຊ້ເຄື່ອງມືເປັນເວລາດົນ.
- ແຕ່ງຕົວໃຫ້ຖືກຕ້ອງ. ຢ່າໃສ່ເຄື່ອງນຸ່ງຫລູຫລາຫຼືເຄື່ອງປະດັບ. ຮັກສາຜົມ ແລະເຄື່ອງນຸ່ງຂອງເຈົ້າໃຫ້ຫ່າງຈາກພາກສ່ວນທີ່ເຄື່ອນຍ້າຍ.
- ຕື່ນຕົວ, ສັງເກດເບິ່ງສິ່ງທີ່ເຈົ້າກໍາລັງເຮັດ, ແລະໃຊ້ຄວາມຮູ້ສຶກທົ່ວໄປໃນເວລາທີ່ໃຊ້ເຄື່ອງມືພະລັງງານ.
- Use safety clamps or a vise to secure the workpiece. This is safer than using your hand and it frees both hands to operate the tool.
2.4. Circular Saw Specific Safety
- ຮັກສາມືຢູ່ຫ່າງຈາກພື້ນທີ່ຕັດແລະແຜ່ນໃບ. ຮັກສາມືທີສອງຂອງເຈົ້າໃສ່ທີ່ຈັບຮອງ, ຫຼືທີ່ຢູ່ອາໄສຂອງມໍເຕີ. ຖ້າມືທັງສອງຈັບເລື່ອຍ, ມັນບໍ່ສາມາດຕັດດ້ວຍແຜ່ນໃບ.
- ຢ່າໄປຮອດໃຕ້ແຜ່ນວຽກ. ກອງບໍ່ສາມາດປົກປ້ອງທ່ານຈາກແຜ່ນໃບຂ້າງລຸ່ມຂອງ workpiece ໄດ້.
- ປັບຄວາມເລິກຂອງການຕັດກັບຄວາມຫນາຂອງ workpiece ໄດ້. ຫນ້ອຍກວ່າແຂ້ວເຕັມຂອງແຜ່ນໃບຄວນຈະເຫັນໄດ້ຂ້າງລຸ່ມນີ້ workpiece ໄດ້.
- ຢ່າຖືຊິ້ນວຽກຢູ່ໃນມືຂອງເຈົ້າຫຼືຂ້າມຂາຂອງເຈົ້າໃນຂະນະທີ່ຕັດ. ຮັບປະກັນ workpiece ກັບເວທີທີ່ຫມັ້ນຄົງ.
- ຖືເຄື່ອງມືໄຟຟ້າໂດຍພື້ນຜິວທີ່ມີ insulated ຈັບໃນເວລາທີ່ປະຕິບັດການທີ່ອຸປະກອນເສີມການຕັດອາດຈະຕິດຕໍ່ກັບສາຍໄຟທີ່ເຊື່ອງໄວ້ຫຼືສາຍຂອງມັນເອງ.
- Always ensure the lower guard is closed before placing the saw down.
3. ອົງປະກອບ ແລະຄຸນສົມບັດ
Familiarize yourself with the parts of your Tacklife PES01A Circular Saw before operation.

Figure 3.1: Key components of the circular saw.
- 1. ມໍເຕີທີ່ມີປະສິດທິພາບ: Ensures good heat dissipation.
- 2. ສະຫຼັບເລເຊີ: Activates the laser guide.
- 3. 3M Power Cord & Cable Tie: Convenient for storage and use.
- 4. Double Safety Switch: Requires pressing both buttons to start, preventing accidental injury.
- 5. Rubberized Handle: For comfortable and secure grip.
- 6. Support Handle: Provides additional control.
- 7. Aluminum Alloy Cover: Durable housing.
- 8. Iron Base Plate: Sturdy base for cutting.
- 9. Iron Blade Guard: Protects the blade.
ອຸປະກອນເສີມລວມ:

Figure 3.2: Standard accessories included with the saw.
- 1 x Tacklife PES01A Circular Saw
- 1 x 185mm 24-Tooth TCT Blade (for wood/plastic)
- 1 x 185mm 40-Tooth TCT Blade (for wood/plastic)
- 1 x Hex Wrench (for blade changes)
- 1 x Parallel Guide Ruler
- 1 x Dust Port Adapter (35mm diameter)
- 1 x ຄູ່ມືຜູ້ໃຊ້
- 1 x ບັດຮັບປະກັນ
4. ການຕິດຕັ້ງແລະການປະກອບ
4.1. ການຕິດຕັ້ງ/ການຖອດໃບມີດ
- Ensure the saw is unplugged from the power source before attempting any blade changes.
- ກົດປຸ່ມລັອກ spindle ຄ້າງໄວ້.
- Using the hex wrench, loosen the blade bolt by turning it counter-clockwise.
- ຍົກແຜ່ນປ້ອງກັນໃບມີດລຸ່ມຂຶ້ນ ແລະ ຄ່ອຍໆເອົາໃບມີດເກົ່າອອກ.
- Place the new blade onto the spindle, ensuring the teeth are pointing in the direction of the arrow on the saw's guard.
- Replace the blade bolt and tighten it securely with the hex wrench while holding the spindle lock button.
- Release the spindle lock and check that the blade rotates freely and the guard moves smoothly.
4.2. Attaching the Parallel Guide Ruler
The parallel guide ruler helps achieve straight cuts parallel to the edge of the workpiece.
- Slide the guide ruler into the slot on the front of the saw's base plate.
- Adjust the ruler to the desired cutting width.
- Tighten the locking screw to secure the ruler in place.
4.3. ການເຊື່ອມຕໍ່ການສະກັດຂີ້ຝຸ່ນ
For a cleaner work environment, connect a vacuum cleaner to the dust port.
- Attach the 35mm dust port adapter to the dust outlet on the saw.
- Connect your vacuum cleaner hose to the adapter.
5. ຄໍາແນະນໍາການດໍາເນີນງານ
5.1. ການປັບຄວາມເລິກຂອງການຕັດ
The cutting depth can be adjusted to match the thickness of your material. The maximum cutting depth at 90° is 65mm (2.5 inches).

Figure 5.1: Adjusting cutting depth for straight and bevel cuts.
- Loosen the depth adjustment lever located at the rear of the saw.
- Raise or lower the base plate to the desired cutting depth. Ensure only a small portion of the blade teeth extends below the workpiece.
- ບີບຕົວປັບຄວາມເລິກໃຫ້ແໜ້ນ.
5.2. Adjusting Bevel Angle (Miter Cut)
The saw can make bevel cuts up to 45°. The maximum cutting depth at 45° is 45mm (1.8 inches).
- ຄາຍປຸ່ມປັບມຸມອຽງ/ຄັນຍົກທີ່ຢູ່ດ້ານໜ້າຂອງເລື່ອຍ.
- Tilt the base plate to the desired angle (0° to 45°).
- Tighten the bevel adjustment knob/lever securely.
5.3. ການໃຊ້ຄູ່ມືເລເຊີ
The integrated laser guide provides a visual line for precise cutting.

Figure 5.2: The laser guide assists in making straight cuts.
- Locate the laser switch on the saw.
- Flip the switch to turn the laser on. A red laser line will project onto your workpiece, indicating the cutting path.
- Align the laser line with your marked cut line on the material.
- Turn off the laser when not in use to conserve battery (if applicable) or prevent accidental activation.
5.4. ການເຮັດຕັດ
ສະເຫມີໃຫ້ແນ່ໃຈວ່າ workpiece ໄດ້ຢ່າງປອດໄພ clamped ກ່ອນທີ່ຈະຕັດ.

Figure 5.3: Cutting a wooden board with the circular saw.

Figure 5.4: Cutting a plastic sheet with the circular saw.
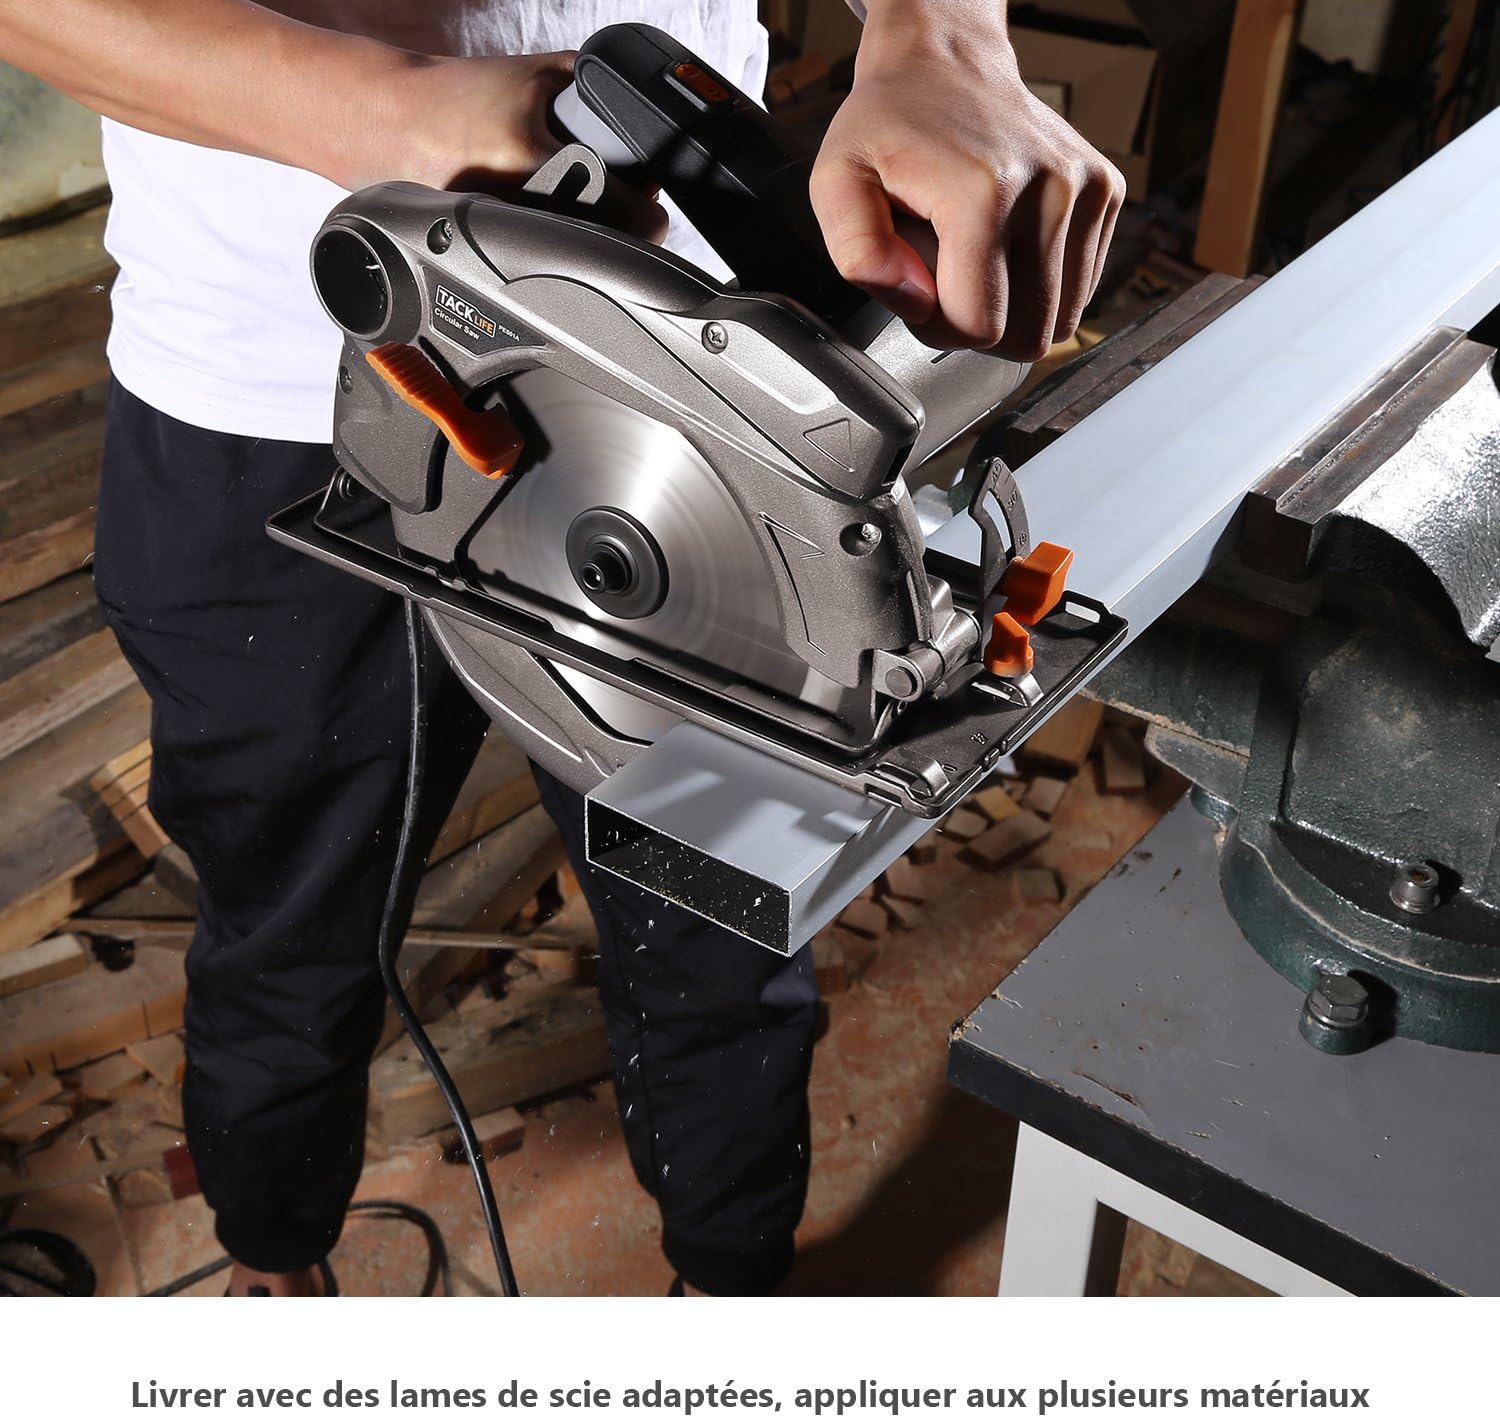
Figure 5.5: Cutting a metal profile with the circular saw (ensure appropriate blade is used).
- ສຽບສາຍເລື່ອຍເຂົ້າໄປໃນປລັກສຽບໄຟທີ່ເຫມາະສົມ.
- Hold the saw firmly with both hands, ensuring a stable grip on the main and auxiliary handles.
- To start the saw, press the double safety switch (requires pressing both buttons simultaneously for safety).
- ອະນຸຍາດໃຫ້ແຜ່ນໃບມີຄວາມໄວເຕັມທີ່ກ່ອນທີ່ຈະເລີ່ມຕົ້ນການຕັດ.
- Guide the saw smoothly and steadily along your marked line. Do not force the saw; let the blade do the work.
- Maintain a consistent feed rate.
- ເມື່ອຕັດສຳເລັດແລ້ວ, ໃຫ້ປ່ອຍໄກປືນ ແລະ ປ່ອຍໃຫ້ໃບມີດຢຸດສະງັດກ່ອນທີ່ຈະຍົກເລື່ອຍອອກຈາກຊິ້ນວຽກ.
- Unplug the saw after use.
6. ບໍາລຸງຮັກສາ
ການບໍາລຸງຮັກສາເປັນປົກກະຕິຮັບປະກັນອາຍຸຍືນແລະການດໍາເນີນງານທີ່ປອດໄພຂອງ saw ວົງຂອງທ່ານ.
6.1. ທໍາຄວາມສະອາດ
- ຖອດສາຍເລື່ອຍອອກສະເໝີກ່ອນທຳຄວາມສະອາດ.
- Use a soft brush or compressed air to remove dust and debris from the motor vents and blade guard.
- Wipe down the exterior of the saw with a damp ຜ້າ. ຢ່າໃຊ້ສານເຄມີທີ່ຮຸນແຮງຫຼືເຄື່ອງເຮັດຄວາມສະອາດຂັດ.
- Keep the base plate clean to ensure smooth gliding over the workpiece.
6.2. ການດູແລແຜ່ນ
- Inspect blades regularly for dullness, cracks, or missing teeth. Replace damaged blades immediately.
- ທຳຄວາມສະອາດຢາງ ແລະ ຂີ້ເທົ່າທີ່ສະສົມຢູ່ໃນໃບມີດໂດຍໃຊ້ນ້ຳຢາທຳຄວາມສະອາດໃບມີດທີ່ເໝາະສົມ.
- Store blades properly to prevent damage and corrosion.
6.3. ການເກັບຮັກສາ
- ເກັບຮັກສາເລື່ອຍໄວ້ໃນສະຖານທີ່ແຫ້ງ ແລະ ປອດໄພ ໃຫ້ໄກຈາກມືເດັກນ້ອຍ.
- ປົກປ້ອງສາຍໄຟຈາກຄວາມເສຍຫາຍໃນລະຫວ່າງການເກັບຮັກສາ.
7. ການແກ້ໄຂບັນຫາ
ພາກນີ້ແກ້ໄຂບັນຫາທົ່ວໄປທີ່ເຈົ້າອາດຈະພົບກັບເຄື່ອງເລື່ອຍວົງຂອງເຈົ້າ.
| ບັນຫາ | ສາເຫດທີ່ເປັນໄປໄດ້ | ການແກ້ໄຂ |
|---|---|---|
| Saw ບໍ່ເລີ່ມຕົ້ນ. | No power supply; Safety switch not engaged; Faulty power cord. | Check power outlet and circuit breaker; Ensure both safety switch buttons are pressed; Inspect power cord for damage. |
| Blade not cutting smoothly or burning wood. | Dull or dirty blade; Incorrect blade for material; Overfeeding the saw. | Replace or clean blade; Use appropriate blade for the material; Reduce feed rate. |
| ການສັ່ນສະເທືອນຫຼາຍເກີນໄປ. | Loose blade; Damaged blade; Worn bearings. | Tighten blade bolt; Replace blade; Contact customer support if bearings are suspected. |
| ຄູ່ມືເລເຊີບໍ່ເຮັດວຽກ. | Laser switch off; Laser lens dirty; Laser module faulty. | Turn on laser switch; Clean laser lens; Contact customer support. |
| Dust collection is poor. | Dust port clogged; Vacuum not powerful enough; Hose not properly connected. | Clear dust port; Use a more powerful vacuum; Ensure hose is securely attached. |
8. ຂໍ້ກໍານົດດ້ານວິຊາການ
| ຄຸນສົມບັດ | ຂໍ້ມູນຈໍາເພາະ |
|---|---|
| ຕົວແບບ | PES01A |
| ການປ້ອນຂໍ້ມູນພະລັງງານ | 1500 ວ |
| ສະບັບtage | 230 ໂວນ |
| ຄວາມໄວທີ່ບໍ່ມີການໂຫຼດ | 4700 RPM |
| ເສັ້ນຜ່າສູນກາງໃບ | 185 ມມ (7-1/4 ນິ້ວ) |
| ສູງສຸດ. ຄວາມເລິກການຕັດ (90°) | 65 ມມ (2.5 ນີ້ວ) |
| ສູງສຸດ. ຄວາມເລິກການຕັດ (45°) | 45 ມມ (1.8 ນີ້ວ) |
| ຄວາມອາດສາມາດ Bevel | 0° - 45° |
| ນ້ຳໜັກ | 4.9 ກິໂລ (10.8 ປອນ) |
| ຄູ່ມືເລເຊີ | ແມ່ນແລ້ວ |
| ເສັ້ນຜ່າສູນກາງຜອດຂີຸ້່ນ | 35 ມມ |
9. ການຮັບປະກັນແລະການສະຫນັບສະຫນູນ
Tacklife products are manufactured to high-quality standards and are warranted against defects in materials and workmanship. Please refer to the included warranty card for specific terms and conditions, including the warranty period and registration process.
ຮູບທີ 9.1: ຕົວຢ່າງample of included warranty card.
ການຊ່ວຍເຫຼືອລູກຄ້າ:
For technical assistance, troubleshooting, or warranty claims, please contact Tacklife customer support. Contact information can typically be found on the warranty card or the official Tacklife webເວັບໄຊ.
- Webເວັບໄຊ: www.tacklife.com (ກະລຸນາກວດສອບເຈົ້າຫນ້າທີ່ webເວັບໄຊທ໌ສຳລັບຂໍ້ມູນຕິດຕໍ່ທີ່ທັນສະໄໝທີ່ສຸດ.)
- ອີເມວ: Refer to your warranty card or product packaging.
When contacting support, please have your product model (PES01A) and purchase date ready.
Ask a question about this manual
Ask about setup, troubleshooting, compatibility, parts, safety, or missing instructions. Manuals+ will review the question and use this page’s manual context to help answer it.