
ແນະນຳ
Welcome to the instruction manual for your new USHA Ayush Sewing Machine. This machine is designed for basic straight stitching and offers essential features for various sewing projects. To ensure safe and efficient operation, please read this manual thoroughly before using the machine. Keep this manual for future reference.
The USHA Ayush Sewing Machine is known for its economical design and user-friendly features, including an auto-tripping, spring-loaded bobbin winder for consistent bobbin winding and perfect stitch formation. It also features a lever-type stitch regulator for easy control over forward and reverse stitching, and a convenient slide plate for simple bobbin insertion.
1. ການຕິດຕັ້ງແລະການປະກອບ
Your USHA Ayush Sewing Machine will be delivered unassembled, consisting of the machine head, handle, and base. Follow these steps for initial setup:
- ການຫຸ້ມຫໍ່: ເອົາສ່ວນປະກອບທັງຫມົດອອກຈາກການຫຸ້ມຫໍ່ຢ່າງລະມັດລະວັງ. ໃຫ້ແນ່ໃຈວ່າທຸກພາກສ່ວນມີຢູ່ໃນບັນຊີລາຍຊື່ການຫຸ້ມຫໍ່.
- ການຈັດວາງ: Place the sewing machine base on a stable, flat surface.
- Attaching the Machine Head: Securely attach the machine head to the base. Refer to the diagrams for proper alignment and fastening.
- ການຕິດຕັ້ງ Handle ໄດ້: If your model includes a hand-crank handle, attach it to the flywheel according to the instructions provided in the accessory kit.
- ການເຊື່ອມຕໍ່ພະລັງງານ (ຖ້າມີ): If your machine is an electric model, connect the power cord to a suitable electrical outlet. Ensure the voltage ກົງກັບຄວາມຕ້ອງການຂອງເຄື່ອງຂອງທ່ານ.

Figure 1: The USHA Ayush Sewing Machine, fully assembled and ready for use.
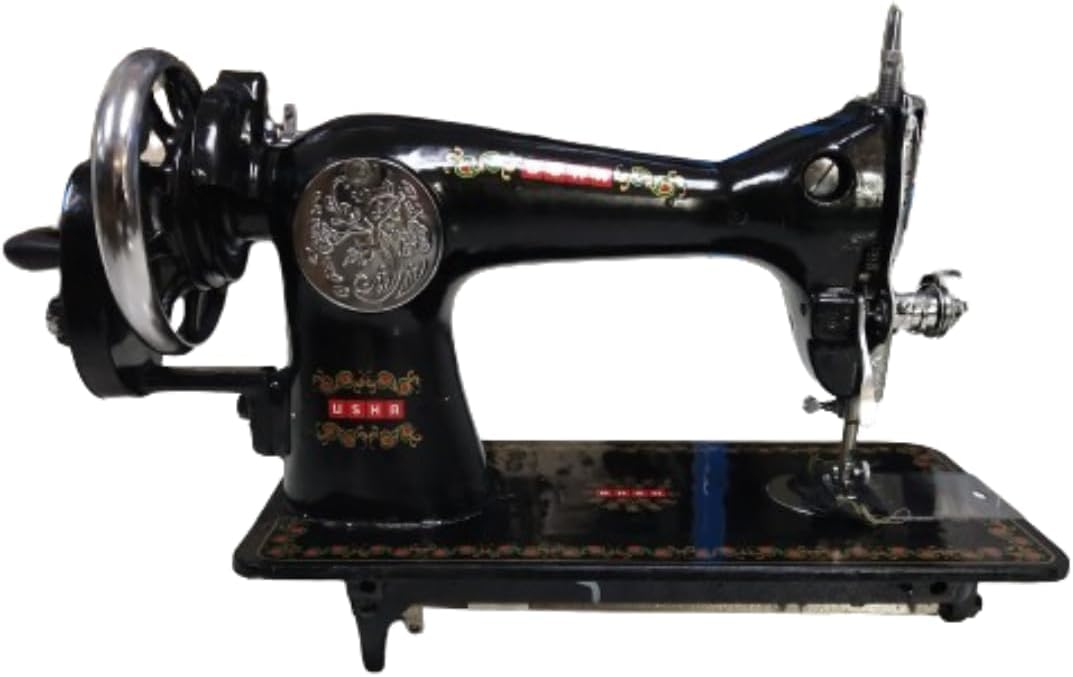
ຮູບ 2: ຂ້າງ view of the USHA Ayush Sewing Machine, highlighting the hand crank and flywheel.

ຮູບທີ 3: ດ້ານໜ້າໃກ້ຊິດ view of the USHA Ayush Sewing Machine, showing the needle, presser foot, and stitch plate.
2. ຄໍາແນະນໍາການດໍາເນີນງານ
This section guides you through the basic operation of your USHA Ayush Sewing Machine.
2.1. ການພັນດວ້ຍກະບອກ
The USHA Ayush features an auto-tripping, spring-loaded bobbin winder for uniform and perfect bobbin winding.
- ວາງ bobbin ເປົ່າໃສ່ spindle bobbin winder.
- Guide the thread from the spool pin through the tension disc of the bobbin winder.
- ພັນດ້າຍສອງສາມເທື່ອອ້ອມຮອບກະບອກ.
- Push the bobbin winder lever towards the flywheel until it engages.
- Start the machine (either by hand crank or foot pedal if electric). The bobbin will wind automatically and the winder will trip off when the bobbin is full.
- Cut the thread and remove the full bobbin.
2.2. ການໃສ່ກະບອກມ້ວນ
ເຄື່ອງມີອຸປະກອນ A slide plate for easy bobbin insertion.
- Open the slide plate located on the needle plate.
- Insert the bobbin into the bobbin case, ensuring the thread unwinds in the correct direction (refer to the markings on the bobbin case).
- Pull the thread through the tension spring of the bobbin case.
- ປິດແຜ່ນສະໄລ້.
2.3. ການສອດເກຍດ້າຍດ້ານເທິງ
Follow the numbered threading path indicated on your machine. Generally, this involves:
- ວາງຫຼອດດ້າຍໃສ່ກັບເຂັມຫຼອດດ້າຍ.
- ນຳພາດ້າຍຜ່ານຄູ່ມືດ້າຍດ້ານເທິງ.
- Pass the thread through the tension discs.
- ສອດຄັນຍົກຈາກຂວາຫາຊ້າຍ.
- Guide the thread through the lower thread guide.
- Finally, thread the needle from front to back.
2.4. ການເພີ່ມເສັ້ນດ້າຍຂອງກະບອກ
- ຖືກະທູ້ເທິງເບົາໆດ້ວຍມືຊ້າຍຂອງເຈົ້າ.
- ໝຸນລໍ້ມືມາທາງຕົວທ່ານ (ທວນກັບເຂັມໂມງ) ເພື່ອຫຼຸດເຂັມລົງໃນແຜ່ນເຂັມ ແລະ ຈາກນັ້ນດຶງມັນກັບຄືນມາ.
- The upper thread will catch the bobbin thread, forming a loop. Pull this loop up through the needle plate opening.
- ດຶງກະທູ້ທັງສອງດ້ານເທິງ ແລະ bobbin ພາຍໃຕ້ຕີນ presser ແລະໄປທາງຫລັງຂອງເຄື່ອງ.
2.5. Stitch Regulator and Pressure Adjustment
- Lever Type Stitch Regulator: Your machine features a lever-type stitch regulator. Move the lever up or down to adjust the stitch length. The lever also controls forward and reverse stitching. Push the lever fully down for reverse stitching.
- Screw Type Pressure Adjustment: A screw-type mechanism allows for adjusting the needle bar pressure. This is crucial for different fabric thicknesses. Turn the screw clockwise to increase pressure for thicker fabrics and counter-clockwise to decrease pressure for lighter fabrics. Adjust as needed to prevent skipped stitches or fabric puckering.
2.6. ເລີ່ມຫຍິບ
- ວາງຜ້າພາຍໃຕ້ຕີນທີ່ກົດດັນ.
- ເຮັດໃຫ້ເຄື່ອງແທກຕີນສູງຂື້ນ.
- Begin sewing by turning the handwheel or pressing the foot pedal. Guide the fabric gently.
3. ບໍາລຸງຮັກສາ
Regular maintenance ensures the longevity and optimal performance of your USHA Ayush Sewing Machine.
3.1. ທໍາຄວາມສະອາດ
- ການກຳຈັດຂີ້ເທົ່າ: Regularly remove lint and dust from the bobbin area, feed dogs, and under the needle plate using a small brush or lint brush.
- ການອະນາໄມພື້ນຜິວ: Wipe the exterior of the machine with a soft, dry cloth. Avoid using harsh chemicals.
3.2. Oiling
The moving parts of your sewing machine require periodic oiling. Use only high-quality sewing machine oil.
- Turn off and unplug the machine (if electric).
- Tilt the machine head back to access the underside mechanisms.
- Apply a small drop of oil to all moving metal parts, especially joints and shafts.
- Also, apply a drop of oil to the bobbin case race.
- Run the machine for a few minutes on a scrap piece of fabric to distribute the oil and absorb any excess.

ຮູບທີ 4: ຂ້າງລຸ່ມ view of the USHA Ayush Sewing Machine, illustrating the various moving parts that require periodic oiling for smooth operation.
4. ການແກ້ໄຂບັນຫາ
If you encounter issues with your sewing machine, consult this section for common problems and their solutions.
| ບັນຫາ | ສາເຫດທີ່ເປັນໄປໄດ້ | ການແກ້ໄຂ |
|---|---|---|
| ຂ້າມ Stitches | Incorrect needle, bent needle, improper threading, incorrect needle bar pressure. | Use the correct needle for the fabric, replace bent needles, re-thread the machine carefully, adjust needle bar pressure. |
| ກະທູ້ແຕກ | Poor quality thread, incorrect tension, needle bent or blunt, improper threading. | Use good quality thread, adjust upper or bobbin tension, replace needle, re-thread. |
| ການຍັບຍັ້ງຜ້າ | Incorrect tension, dull needle, incorrect needle bar pressure. | Adjust tension, replace needle, adjust needle bar pressure. |
| ເຄື່ອງຕິດຂັດ | Thread tangled in bobbin case, lint buildup, incorrect bobbin insertion. | Remove bobbin case and clear tangled thread, clean bobbin area, re-insert bobbin correctly. |
If the problem persists after attempting these solutions, please contact USHA customer support or a qualified service technician.
5. ຂໍ້ມູນຈໍາເພາະ
- ຕົວແບບ: AAYUSH
- ປະເພດ: ເຄື່ອງຕັດຫຍິບ Straight Stitch
- ສີ: ດຳ
- ວັດສະດຸ: Plastic (Base), Metal (Machine Head)
- ນ້ໍາຫນັກລາຍການ: Approximately 22 pounds (9989 Grams)
- ຂະໜາດແພັກເກດ: 20.79 x 12.91 x 9.92 ນິ້ວ
- Stitch Regulator: Lever type, for forward and reverse stitching
- ເຄື່ອງມ້ວນກະບອກ: Auto tripping, spring-loaded
- ການປັບຄວາມດັນ: Screw type for needle bar pressure
- ລວມມີ: Plastic base (Top cover not included)
- ແຫຼ່ງພະລັງງານ: Corded Electric (Note: While listed as 'Is Electric: No' in some specifications, this refers to it not being fully automated, but it is designed to be powered by a corded electric motor.)
6. ການຮັບປະກັນແລະການສະຫນັບສະຫນູນ
For detailed information regarding the warranty period, terms, and conditions for your USHA Ayush Sewing Machine, please refer to the official warranty card included with your product or visit the official USHA webເວັບໄຊ.
Should you require technical assistance, spare parts, or service, please contact USHA customer support. Contact details can typically be found on the product packaging, the official USHA webເວັບໄຊ, ຫຼືເອກະສານການຊື້ຂອງທ່ານ.