
1. ບົດແນະນຳ
This manual provides detailed instructions for the installation, operation, and maintenance of your Akozon Digital Programmable Timer. Please read this manual carefully before use to ensure proper function and safety.

Figure 1: Akozon Digital Programmable Timer 12V
2. ຜະລິດຕະພັນເກີນview ແລະຄຸນສົມບັດ
The Akozon Digital Programmable Timer is a weekly programmable electronic timer designed for precise control of various electrical equipment. Its robust design and advanced features ensure reliable operation.
- ການຄວບຄຸມອັດຕະໂນມັດ: Automatically turns electrical equipment on and off according to preset schedules.
- ຄວາມແມ່ນຍໍາສູງ: Equipped with a high-precision chip for accurate timing.
- ໂປຣແກມປະຈຳອາທິດ: Supports advanced programming for up to one week in advance.
- ຫຼາຍໂຄງການ: Features 16 ON/OFF settings (programs) for daily or weekly scheduling.
- ພະລັງງານສຳຮອງ: Integrated high-performance rechargeable battery maintains time display and stores data for over 12 months during power outages.
- ການກໍ່ສ້າງທົນທານ: Housing made of hard, durable plastic for extended lifespan.
- ຈໍ LCD: Clear LCD for easy viewing of time and program status.
- ການຕິດຕັ້ງລົດໄຟ DIN: Designed for convenient installation on a DIN rail.
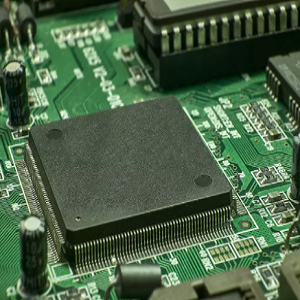
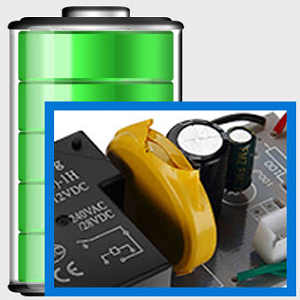
Figure 2: Internal components showing the high-precision chip and rechargeable backup battery.
3. ຂໍ້ມູນຈໍາເພາະ
| ໝາຍເລກຕົວແບບ | Akozonqegcgmk04u-01 |
| ການປ້ອນຂໍ້ມູນ Voltage | 12V DC / AC |
| ຄວາມອາດສາມາດຜົນຜະລິດ | 25(16)A, 240VAC |
| ການບໍລິໂພກພະລັງງານ | <1W |
| ຊ່ວງເວລາ | 1 ນາທີຫາ 168 ຊົ່ວໂມງ |
| ໂຄງການ | 16 ON/OFF settings (daily/weekly) |
| ຜິດພາດເວລາ | <±2 seconds/day |
| ໜ່ວຍຄວາມຈຳຄວາມລົ້ມເຫຼວຂອງພະລັງງານ | >12 months (with internal rechargeable battery) |
| ອຸນຫະພູມປະຕິບັດການ | -20°C ເຖິງ 55°C |
| ວິທີການຕິດຕັ້ງ | ບໍລິສັດ DIN Rail |
| ຂະໜາດ (ປະມານ) | ຂະ ໜາດ 36mm (W) x 86mm (H) x 65mm (D) |
| ນ້ຳໜັກ (ປະມານ) | 120g |
| ຈໍສະແດງຜົນ | ຈໍ LCD |

Figure 3: Detailed product dimensions and key specifications.
4. ຂໍ້ມູນຄວາມປອດໄພ
- ສະເຫມີຕັດການເຊື່ອມຕໍ່ໄຟຟ້າກ່ອນທີ່ຈະຕິດຕັ້ງຫຼືບໍາລຸງຮັກສາ.
- Installation should be performed by a qualified electrician to prevent electric shock or damage to the device.
- ຮັບປະກັນການປ້ອນຂໍ້ມູນ voltage matches the timer's specifications (12V DC/AC). Connecting to incorrect voltage ອາດຈະທໍາລາຍຫນ່ວຍງານ.
- Do not expose the device to excessive moisture or extreme temperatures outside the specified operating range.
- Do not disassemble the timer; refer servicing to qualified personnel.
5. ການຕິດຕັ້ງແລະການຕິດຕັ້ງ
5.1 DIN Rail Installation
The timer is designed for easy installation on a standard 35mm DIN rail. Simply clip the timer onto the rail in your distribution box.

ຮູບທີ 4: ຕົວຢ່າງample of the timer installed on a DIN rail within a distribution box.
5.2 ຄໍາແນະນໍາການສາຍ
Refer to the wiring diagram below for correct connection. Ensure all connections are secure and comply with local electrical codes.
- ອາຄານຜູ້ໂດຍສານ 1 ແລະ 2: Power input (12V DC/AC).
- Terminals 3, 4, 5: Output contacts.
- 3: ປິດປົກກະຕິ (NC)
- 4: ທົ່ວໄປ (COM)
- 5: ເປີດປົກກະຕິ (NO)

Figure 5: Detailed wiring diagram showing connections for power input and output contacts.

ຮູບທີ 6: ຕົວຢ່າງamples of wiring methods, including direct load connection and connection via a contactor.
6. ຄໍາແນະນໍາການດໍາເນີນງານ
6.1 Initial Setup and Unlocking
- Upon first use, connect the timer to power (12V DC/AC).
- ກົດ ຣີເຊັດ button to clear all previous settings and initialize the timer.
- The timer display may be locked. To unlock, press the ຄ/ຣ button four times. The lock icon will disappear from the display. If no operation occurs for 15 seconds, the timer will automatically lock again.
6.2 ກໍານົດເວລາແລະວັນໃນປະຈຸບັນ
After unlocking, set the current time and day:
- ກົດ P button (Program button) once.
- ກົດ D+ button to set the current day of the week (MO, TU, WE, TH, FR, SA, SU).
- ກົດ H+ ປຸ່ມເພື່ອກໍານົດຊົ່ວໂມງປະຈຸບັນ.
- ກົດ M+ ປຸ່ມເພື່ອກໍານົດນາທີປະຈຸບັນ.
- ກົດ P button again to exit time setting mode.

ຮູບທີ 7: ໄລຍະໃກ້ view of the timer's control buttons.

Figure 8: Explanation of button functions and display elements, including day, hour, minute, and reset.
6.3 ການຄວບຄຸມດ້ວຍມື
ກົດ ຄູ່ມື C/R button to cycle through manual control modes:
- ເປີດ: Output is continuously ON.
- ອັດຕະໂນມັດ: Timer operates according to programmed schedules.
- ປິດ: Output is continuously OFF.
ເລືອກ ອັດຕະໂນມັດ for the timer to follow your programmed settings.
7. ຕາຕະລາງເວລາເປີດ/ປິດການຂຽນໂປຣແກຣມ
The timer supports up to 16 ON/OFF programs. Follow these steps to set your desired schedules:
- ກົດ P ເພື່ອເຂົ້າສູ່ໂໝດການຂຽນໂປຣແກຣມ. ໜ້າຈໍຈະສະແດງ "1 ON".
- ກົດ D+ to select the day(s) for this program. You can choose a single day, weekdays, weekends, or all days.
- ກົດ H+ ເພື່ອຕັ້ງຊົ່ວໂມງເປີດ.
- ກົດ M+ ເພື່ອຕັ້ງນາທີ ເປີດ.
- ກົດ P ອີກເທື່ອຫນຶ່ງ. ຈໍສະແດງຜົນຈະສະແດງ "1 OFF".
- ກົດ D+ to select the day(s) for this OFF program (usually the same as ON, but can be different).
- ກົດ H+ to set the OFF hour.
- ກົດ M+ to set the OFF minute.
- Repeat steps 1-8 for additional ON/OFF programs (up to 16). Press P to advance to the next program number.
- ເພື່ອອອກຈາກໂຫມດການຂຽນໂປລແກລມ, ກົດປຸ່ມ ຄູ່ມື C/R button. Ensure the timer is set to ອັດຕະໂນມັດ ຮູບແບບສໍາລັບໂຄງການທີ່ຈະປະຕິບັດ.
Note: If you need to cancel a program, press the ຄ/ຣ ປຸ່ມໃນຂະນະທີ່ viewing the specific ON or OFF program. This will clear the settings for that program.
8. ຄໍາຮ້ອງສະຫມັກ
The Akozon Digital Programmable Timer is versatile and can be used in various applications, including:
- Controlling lamps and lighting systems (e.g., streetlights, garden lights, neon signs).
- Managing water heaters and preheaters.
- Automating agricultural facilities (e.g., irrigation systems).
- Controlling broadcasting equipment.
- Scheduling household appliances.
- Operating sprayers and bottling equipment.

ຮູບທີ 9: ຕົວຢ່າງamples of environments where the timer can be used, such as controlling outdoor lighting and industrial equipment.
9. ບໍາລຸງຮັກສາ
- Keep the timer clean and free from dust. Use a soft, dry cloth for cleaning.
- ຢ່າໃຊ້ເຄື່ອງເຮັດຄວາມສະອາດຂັດຫຼືສານລະລາຍ.
- ຮັບປະກັນການລະບາຍອາກາດທີ່ເຫມາະສົມຮອບອຸປະກອນເພື່ອປ້ອງກັນຄວາມຮ້ອນເກີນ.
- The internal battery is designed for long-term backup. If the timer consistently loses time or program settings after a power outage, the internal battery may need professional inspection.
10. ການແກ້ໄຂບັນຫາ
| ບັນຫາ | ສາເຫດທີ່ເປັນໄປໄດ້ | ການແກ້ໄຂ |
|---|---|---|
| ຈໍສະແດງຜົນຫວ່າງເປົ່າ. | No power supply or internal battery depleted. | Check power connections. Allow time for the internal battery to charge (connect to power for several hours). |
| Timer does not respond to button presses. | Timer is locked. | ກົດ ຄ/ຣ button four times to unlock. |
| ໂຄງການບໍ່ດໍາເນີນການ. | Timer is not in AUTO mode. Incorrect program settings. | ກົດ ຄູ່ມື C/R ຈົນກວ່າ "AUTO" ຈະປາກົດຂຶ້ນ.view ແລະ ແກ້ໄຂການຕັ້ງຄ່າໂປຣແກຣມໃຫ້ຖືກຕ້ອງ. |
| Time or settings are lost after power outage. | Internal backup battery is not charging or is depleted. | Ensure the timer is connected to power for sufficient time to charge the internal battery. If the issue persists, contact customer support. |
| Output is always ON or OFF, ignoring programs. | Timer is in manual ON or OFF mode. | ກົດ ຄູ່ມື C/R until "AUTO" is displayed. |
11. ການຮັບປະກັນແລະການສະຫນັບສະຫນູນ
Akozon products are manufactured to high-quality standards. For warranty information or technical support, please refer to the contact details provided with your purchase or visit the official Akozon webເວັບໄຊ.
ກະລຸນາຮັກສາຫຼັກຖານການຊື້ຂອງທ່ານສໍາລັບການຮຽກຮ້ອງການຮັບປະກັນ.