Amazon Basics DLB111-US290
Amazon Basics Single Computer Monitor Stand User Manual
Model: DLB111-US290 | Brand: Amazon Basics
ແນະນຳ
This user manual provides comprehensive instructions for the assembly, operation, and maintenance of your Amazon Basics Single Computer Monitor Stand. This desk-mounted arm is designed to enhance your workspace ergonomics and free up valuable desk space by securely holding a single computer monitor.
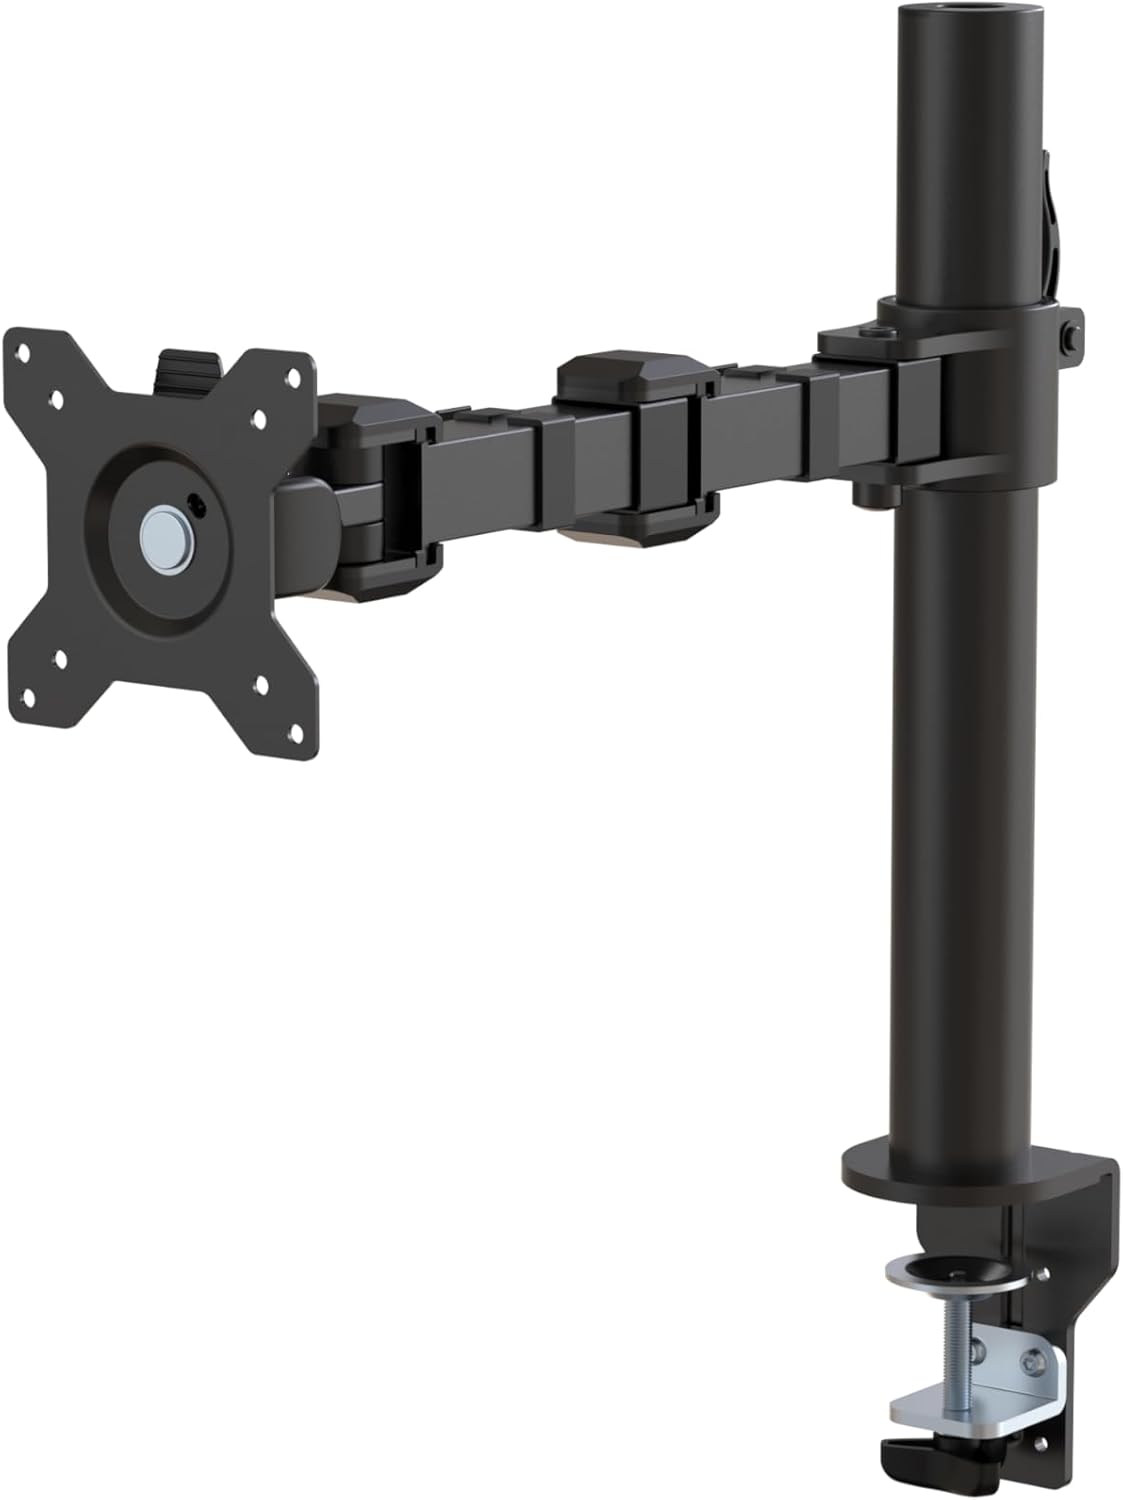
ຮູບ 1: ເກີນview of the Amazon Basics Single Computer Monitor Stand.
ຂໍ້ມູນຄວາມປອດໄພທີ່ສໍາຄັນ
- ອ່ານຄໍາແນະນໍາທັງຫມົດຢ່າງລະອຽດກ່ອນທີ່ຈະປະກອບແລະນໍາໃຊ້.
- ບໍ່ເກີນຄວາມອາດສາມາດນ້ໍາຫນັກສູງສຸດຂອງ 22 ປອນ (10 ກິໂລກໍາ).
- Ensure your desk surface is stable and can support the combined weight of the monitor arm and your monitor.
- Verify that the desk thickness is between 0.8 to 3.9 inches (2 cm to 10 cm) for proper clamp ການຕິດຕັ້ງ.
- Use only the provided hardware. If any parts are missing or damaged, contact customer support.
- ຮັກສາເດັກນ້ອຍ ແລະສັດລ້ຽງໄວ້ໄກໃນລະຫວ່າງການຊຸມນຸມ.
- ກວດເບິ່ງທຸກສະກູແລະການເຊື່ອມຕໍ່ເປັນໄລຍະເພື່ອຮັບປະກັນວ່າພວກມັນແຫນ້ນແຫນ້ນແລະປອດໄພ.
ເນື້ອໃນຊຸດ
ກະລຸນາກວດສອບວ່າອົງປະກອບທັງໝົດມີຢູ່ກ່ອນທີ່ຈະເລີ່ມການປະກອບ:
- Monitor Arm Assembly (Pre-assembled arm and VESA plate)
- ໂຕະ Clamp ຖານ
- ເສົາເຂັມ
- Hardware Kit (Screws for VESA mounting, Allen keys)
- ຄລິບການຈັດການສາຍ
- ຄູ່ມືຜູ້ໃຊ້
ຄໍາແນະນໍາການຕິດຕັ້ງ
ຂັ້ນຕອນທີ 1: ຕິດໂຕະ Clamp ຖານ
ຈັດຕຳແໜ່ງໂຕະ clamp base on your desk edge. Ensure the desk thickness is compatible (0.8 to 3.9 inches). Tighten the clamp screw securely until the base is firmly attached to the desk. Do not overtighten.

Figure 2: Securely attaching the desk clamp base to your desk.
Step 2: Install Mounting Pole
Insert the mounting pole into the hole on the desk clamp base. Secure it by tightening the set screw on the side of the clamp base using the provided Allen key.
Step 3: Attach Monitor Arm to Pole
Slide the monitor arm assembly onto the mounting pole. Adjust the height to your desired position and tighten the height adjustment screw on the arm collar to secure it.
ຂັ້ນຕອນທີ 4: ແນບແຜ່ນ VESA ໃສ່ຈໍພາບ
The monitor arm features a detachable VESA plate. Remove the VESA plate from the arm by lifting it up. Align the VESA plate with the mounting holes on the back of your monitor (compatible with 100x100mm and 75x75mm VESA patterns). Use the appropriate screws from the hardware kit to secure the plate to your monitor. Ensure the screws are tightened firmly but do not overtighten.

Figure 3: The detachable VESA plate for easy monitor attachment.
Step 5: Mount Monitor to Arm
Carefully slide the monitor (with the attached VESA plate) onto the monitor arm. Ensure it clicks securely into place. You may need to adjust the tension screws on the arm joints to support the monitor's weight and allow for smooth movement.

Figure 4: Monitor securely mounted on the arm, viewed ຈາກທາງຫນ້າ.

Figure 5: Top-down perspective of the monitor mounted, showcasing desk space optimization.
ຂັ້ນຕອນທີ 6: ການຈັດການສາຍ
Utilize the integrated cable management system to route your monitor cables (power, video, etc.) along the arm and down the pole. This helps maintain a tidy workspace and prevents cable clutter.
ຄໍາແນະນໍາການດໍາເນີນງານ
The monitor arm offers a full range of motion to customize your viewປະສົບການ:
- ການປັບຄວາມສູງ: The horizontal arm can be adjusted from 7.9 to 14.2 inches high along the pole. Loosen the height adjustment screw on the arm collar, slide the arm to the desired height, and re-tighten.
- ອຽງ: Adjust the screen tilt from -15 to +85 degrees to reduce glare and optimize viewມຸມ.
- ໝູນ: Swivel the monitor left or right up to 180 degrees at various joints for collaborative viewing or screen sharing.
- ໝຸນ: Rotate the monitor 360 degrees to switch between landscape and portrait modes without removing the monitor.

Figure 6: Visual representation of the flexible screen adjustment capabilities: Tilt (-85/+15 degrees), Swivel (±180 degrees), and Rotation (360 degrees).
ການຈັດຕໍາແຫນ່ງ Ergonomic
Proper monitor positioning is crucial for ergonomic comfort and reducing strain. Adjust the monitor arm so that the top of your monitor screen is at or slightly below eye level when you are sitting upright. Your eyes should be approximately an arm's length away from the screen. Ensure your wrists are straight and your forearms are parallel to the floor when typing.

Figure 7: Comparison of correct and incorrect sitting postures, highlighting the importance of proper monitor height.
ບໍາລຸງຮັກສາ
- ທໍາຄວາມສະອາດ: ເຊັດແຂນຂອງຈໍພາບດ້ວຍຜ້າອ່ອນໆ, ງamp ຜ້າ. ຫຼີກລ້ຽງການເຮັດຄວາມສະອາດຂັດຫຼືສານລະລາຍທີ່ອາດຈະທໍາລາຍການສໍາເລັດຮູບ.
- ກວດສອບຄວາມເຄັ່ງຄັດ: Periodically check all screws and connections, especially the desk clamp and VESA plate screws, to ensure they are tight and secure. Re-tighten if necessary.
- ການລະບາຍສີ: ບໍ່ຈຳເປັນຕ້ອງມີການຫຼໍ່ລື່ນສຳລັບຊິ້ນສ່ວນທີ່ເຄື່ອນທີ່.
ການແກ້ໄຂບັນຫາ
| ບັນຫາ | ສາເຫດທີ່ເປັນໄປໄດ້ | ການແກ້ໄຂ |
|---|---|---|
| ຕິດຕາມກວດກາການຫົດຕົວຂອງແຂນ ຫຼື ບໍ່ໄດ້ຢູ່ໃນຕຳແໜ່ງ. | Tension screws are too loose. | Tighten the tension screws on the arm joints using the provided Allen key until the arm holds the monitor's weight. |
| Monitor wobbles on the arm. | VESA plate screws are loose or desk clamp is not secure. | Ensure the VESA plate screws attaching the monitor are tight. Re-tighten the desk clamp ສະກູ. |
| Cannot adjust monitor height. | Height adjustment screw is too tight. | Loosen the height adjustment screw on the arm collar, adjust height, then re-tighten. |
ຂໍ້ມູນຈໍາເພາະ
| ຄຸນສົມບັດ | ລາຍລະອຽດ |
|---|---|
| ໝາຍເລກຕົວແບບ | DLB111-US290 |
| ຂະໜາດສິນຄ້າ | 20 x 18.13 x 4.5 ນິ້ວ |
| ນ້ໍາຫນັກລາຍການ | 5.59 ປອນ |
| ວັດສະດຸ | ເຫຼັກໂລຫະປະສົມ |
| ສີ | ດຳ |
| ປະເພດການຕິດຕັ້ງ | ໂຕະ Clamp ພູ |
| ຂະຫນາດຫນ້າຈໍເຂົ້າກັນໄດ້ | 13 ຫາ 30 ນິ້ວ |
| ຄວາມອາດສາມາດນ້ໍາຫນັກສູງສຸດ | 22 ປອນ (10 ກິໂລ) |
| ຄວາມເຂົ້າກັນໄດ້ຂອງຄວາມໜາຂອງໂຕະ | 0.8 ຫາ 3.9 ນິ້ວ |
| ຄວາມເຂົ້າກັນໄດ້ຂອງ VESA | 75x75mm, 100x100mm |
| ຊ່ວງການປັບຄວາມສູງ | 7.9 to 14.2 inches (horizontal arm) |
| ມຸມອຽງ | -15 ເຖິງ + 85 ອົງສາ |
| ພືດຫມູນວຽນ | 360 ອົງສາ |
ການຮັບປະກັນແລະການສະຫນັບສະຫນູນ
This product is backed by an Amazon Basics limited 1-year warranty.
For detailed warranty information or technical support, please refer to the official documentation or contact Amazon Basics customer service.
- ຄູ່ມືການນໍາໃຊ້ (PDF): ດາວໂຫລດຄູ່ມືຜູ້ໃຊ້
- ການຮັບປະກັນ (PDF): ດາວໂຫລດຂໍ້ມູນການຮັບປະກັນ
Ask a question about this manual
Ask about setup, troubleshooting, compatibility, parts, safety, or missing instructions. Manuals+ will review the question and use this page’s manual context to help answer it.