1. ບົດແນະນຳ
This manual provides detailed instructions for the setup, operation, and maintenance of your ELECROW 7 Inch 1024x600 IPS Capacitive Touchscreen Monitor. This display is designed for broad compatibility with devices such as Raspberry Pi (5/4/3B+/3B/2B+), BB Black, Banana Pi, Jetson Nano, and Windows 11/10/8/7 systems.
ຄຸນນະສົມບັດທີ່ສໍາຄັນ:
- HD Visual: 7-inch IPS screen with 1024x600 resolution and 170° wide viewing angle for consistent colors and clear viewing.
- Capacitive Touch: Supports up to 5-point touch functionality without requiring driver installation for most compatible systems.
- ສຽບ ແລະ ຫຼິ້ນ: Simple connectivity via HD (HDMI) and Micro USB ports for immediate use.
- ຄໍາຮ້ອງສະຫມັກອະເນກປະສົງ: Suitable for use as a Raspberry Pi display, mini PC monitor, gaming console screen, or a computer temperature monitor.
2. ສິ່ງທີ່ຢູ່ໃນກ່ອງ
ກະລຸນາກວດສອບວ່າອົງປະກອບທັງໝົດມີຢູ່ກ່ອນທີ່ຈະດໍາເນີນການຕິດຕັ້ງ.
- 7 Inch Capacitive Display x 1
- ສາຍ HD x 1
- ສາຍ USB x 1
- Micro HD Adapter x 1
- Copper Screws Pack (4pcs) x 1
- DVD x 1 (Contains drivers and documentation)
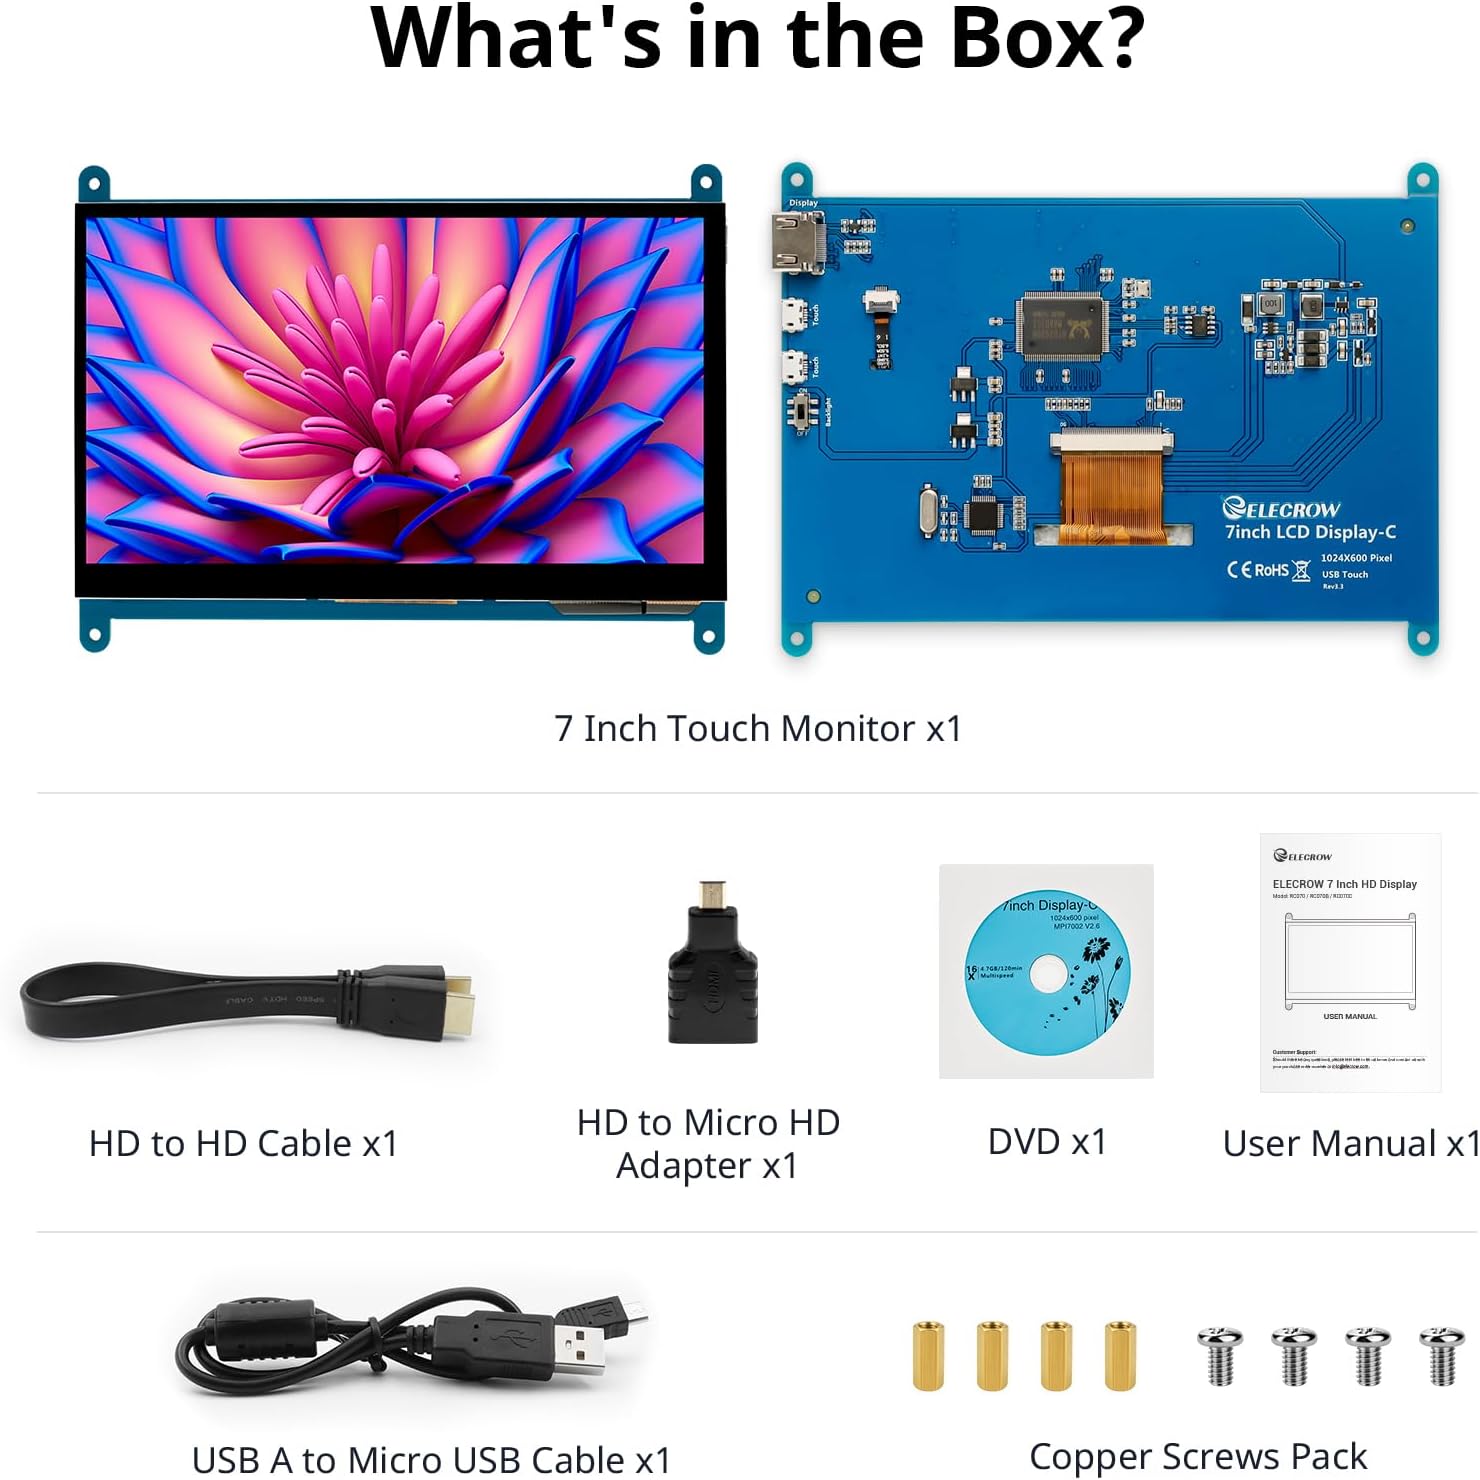
ຮູບພາບ: ສ່ວນປະກອບທັງໝົດທີ່ລວມຢູ່ໃນການຫຸ້ມຫໍ່ຜະລິດຕະພັນ.
3. ການຕິດຕັ້ງ ແລະການເຊື່ອມຕໍ່
Follow these steps to connect your ELECROW 7 Inch Touchscreen Monitor to your device.
3.1 Hardware Overview

ຮູບພາບ: ດ້ານຫລັງ view of the monitor highlighting the Standard HD Port, Micro USB Port for touch and power, and Backlight switch.
- Standard HD Port: For video data transfer.
- ພອດ Micro USB: For touch functionality and power supply.
- ສະຫຼັບແສງຫຼັງ: To turn the display backlight on or off.
3.2 ການເຊື່ອມຕໍ່ກັບ Raspberry Pi
To connect the monitor to a Raspberry Pi, you will need both the HD cable for video and the USB cable for touch and power.
- Connect one end of the HD cable to the Standard HD Port on the monitor and the other end to the HDMI port on your Raspberry Pi. Use the Micro HD adapter if necessary for your Raspberry Pi model.
- Connect the Micro USB cable to the Micro USB Port on the monitor. Connect the other end of the USB cable to a USB port on your Raspberry Pi for power and touch data.
- Ensure the backlight switch on the monitor is in the 'On' position.
- Power on your Raspberry Pi. The display should automatically detect and show the output.
For touch functionality with Raspberry Pi, power can be supplied via the Raspberry Pi's USB port. If using an external power source for the Raspberry Pi, ensure it is sufficient. For optimal performance, especially with older Raspberry Pi models, an external power supply for the monitor might be beneficial if the Pi cannot provide enough current.
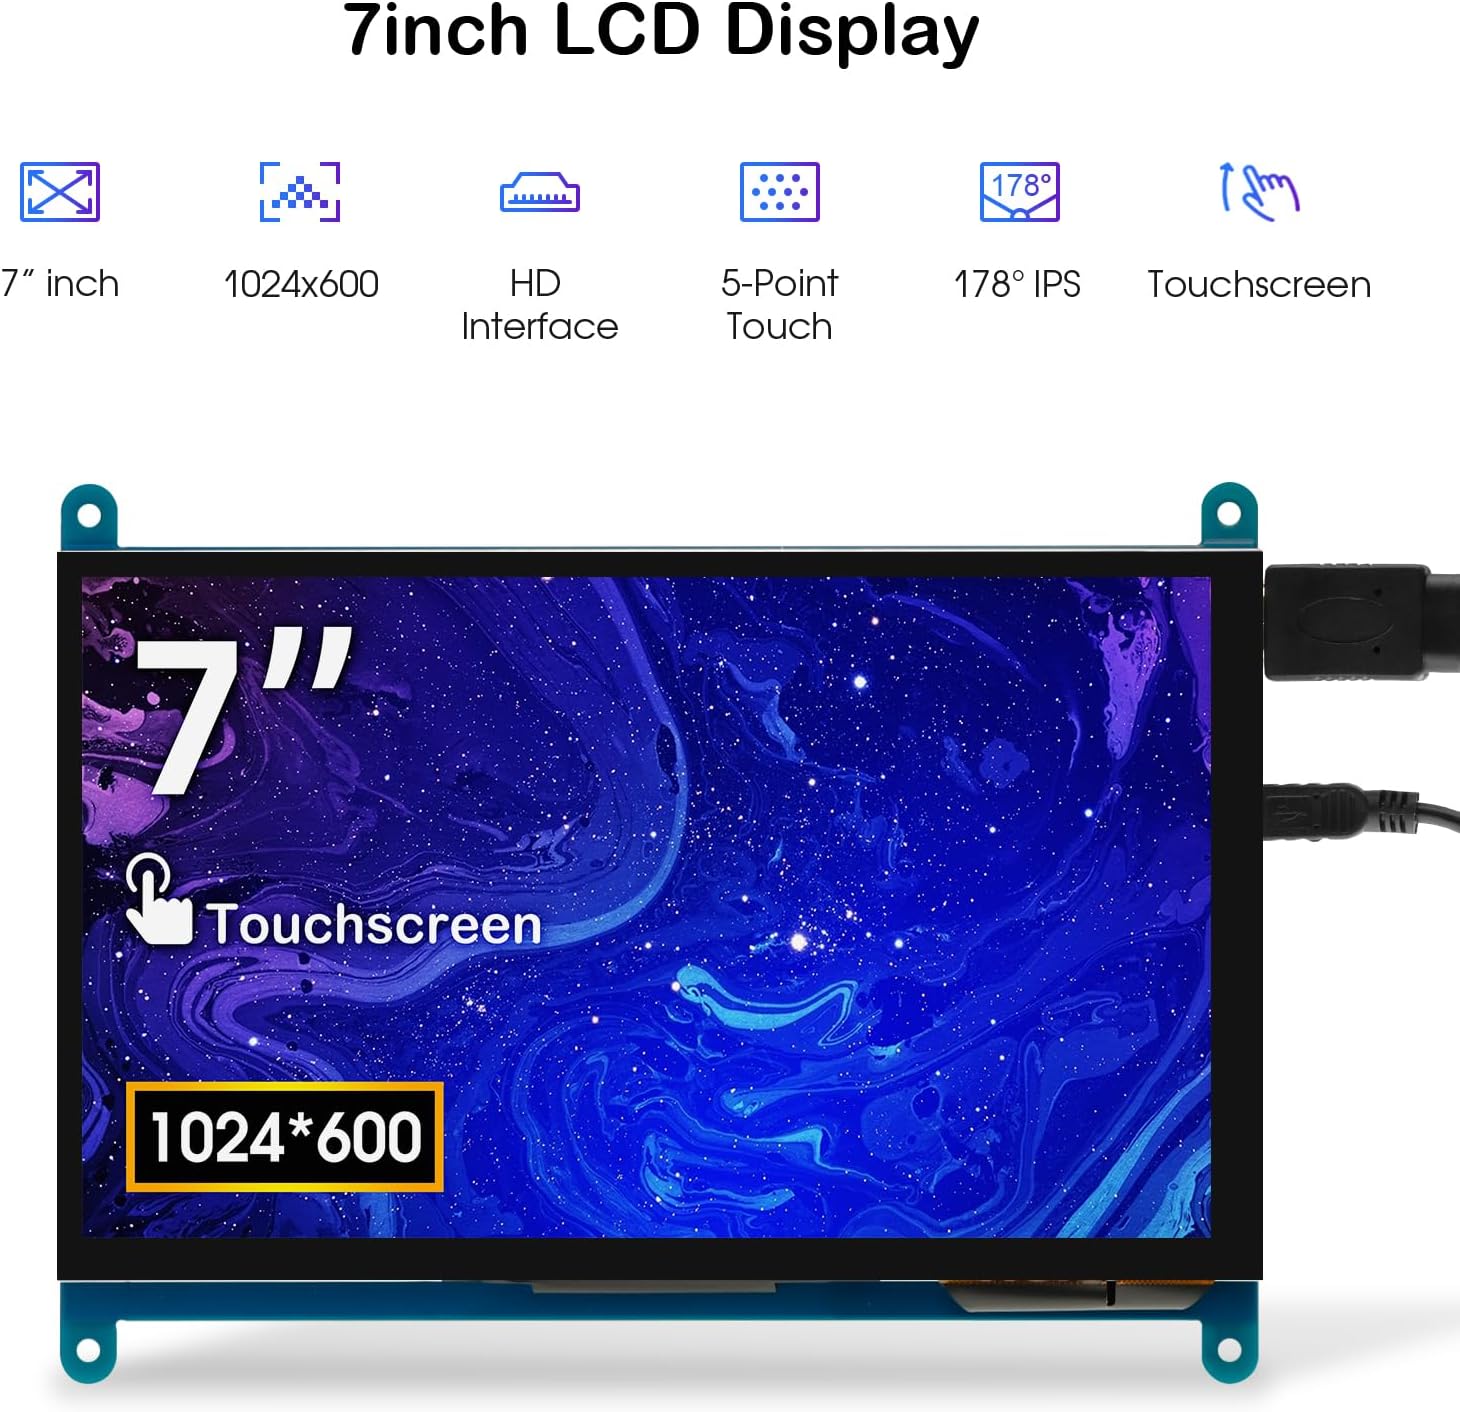
Image: The 7-inch touchscreen connected to a Raspberry Pi board, displaying a graphical user interface.
3.3 Connecting to Windows PC/Laptop
For Windows systems, the monitor functions as a plug-and-play display and touchscreen.
- Connect the HD cable from the monitor's Standard HD Port to an HDMI port on your PC or laptop.
- Connect the Micro USB cable from the monitor's Micro USB Port to a USB-A port on your PC or laptop. This provides power and enables touch functionality.
- Ensure the backlight switch is 'On'.
- Your Windows system should automatically detect the display and touchscreen. No additional drivers are typically required for Windows 7/8/10/11 for basic display and 5-point touch.

Image: The 7-inch touchscreen connected to a laptop, demonstrating seamless connectivity with various operating systems including Windows.
4. ຄໍາແນະນໍາການດໍາເນີນງານ
4.1 ການທໍາງານຂອງສໍາຜັດ
The monitor supports 5-point capacitive touch, allowing for various gestures.
- ແຕະ: Single touch for selection or activation.
- ກົດ: Sustained touch for context menus or drag operations.
- ຊູມເຂົ້າ/ອອກ: Pinch gestures with two fingers.
- Mouse Click: A single tap typically registers as a left-click.
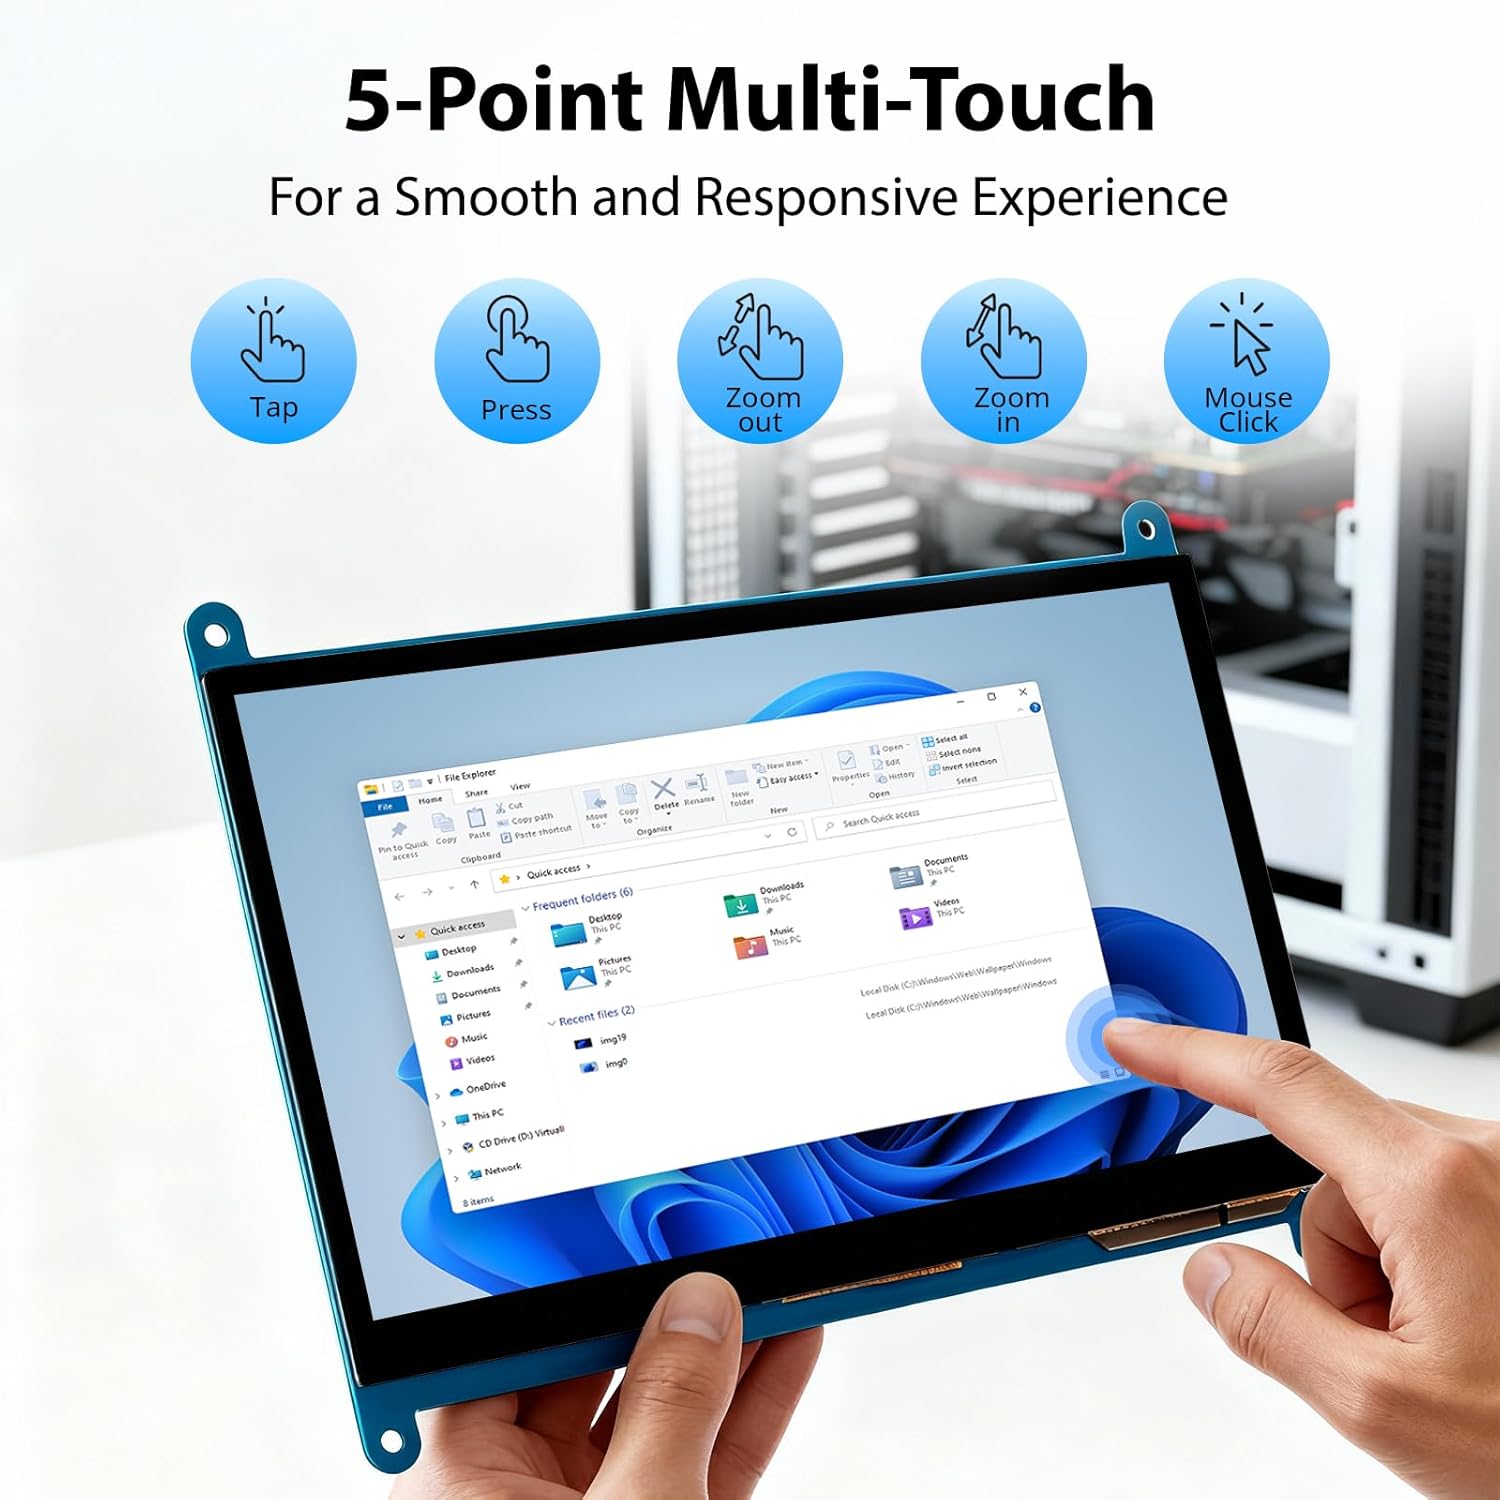
Image: Visual guide to the 5-point multi-touch capabilities of the screen, showing common gestures.
4.2 ຮູບແບບການສະແດງ
When connected to a computer, the monitor can operate in several display modes:
- ໂໝດຊໍ້າກັນ: ຈໍສະແດງຜົນສະທ້ອນເນື້ອໃນຂອງຈໍສະແດງຜົນຕົ້ນຕໍຂອງທ່ານ.
- ຂະຫຍາຍໂໝດ: The monitor acts as an extension of your primary display, providing additional screen space.
- ໂໝດໜ້າຈໍທີສອງ: ຈໍສະແດງຜົນເຮັດວຽກເປັນຈໍສະແດງຜົນ sole, ໂດຍຈໍສະແດງຜົນຕົ້ນຕໍຖືກປິດ.
ໂດຍປົກກະຕິແລ້ວໂໝດເຫຼົ່ານີ້ສາມາດຕັ້ງຄ່າໄດ້ຜ່ານການຕັ້ງຄ່າຈໍສະແດງຜົນຂອງລະບົບປະຕິບັດການຂອງທ່ານ.

Image: Illustrations demonstrating the three display modes: Duplicate, Extend, and Second Screen, showing how the monitor can be used with a laptop.
4.3 ການຄວບຄຸມໄຟ Backlight
The monitor features a physical switch to control the backlight. This allows you to turn the display illumination on or off without disconnecting power. Note that there is no granular brightness control; it is an on/off function only.
Video: This video demonstrates the backlight control switch on the ELECROW 7 Inch Touchscreen, showing how to turn the display illumination on and off.
5. ບໍາລຸງຮັກສາ
ການບໍາລຸງຮັກສາທີ່ເຫມາະສົມຮັບປະກັນອາຍຸຍືນແລະການປະຕິບັດທີ່ດີທີ່ສຸດຂອງຈໍພາບຂອງທ່ານ.
- ທໍາຄວາມສະອາດຫນ້າຈໍ: ໃຊ້ຜ້າແພທີ່ອ່ອນໆ ທີ່ບໍ່ມີເສັ້ນດ່າງ dampລ້າງດ້ວຍນໍ້າ ຫຼື ນໍ້າຢາທໍາຄວາມສະອາດໜ້າຈໍ. ຫຼີກລ່ຽງສານເຄມີທີ່ຮຸນແຮງ ຫຼື ວັດສະດຸຂັດທີ່ອາດຈະທໍາລາຍພື້ນຜິວໜ້າຈໍ.
- ການດູແລທົ່ວໄປ: Keep the monitor in a clean, dry environment. Avoid exposing it to extreme temperatures, direct sunlight, or high humidity.
- ການຈັດການ: Handle the monitor by its edges. Avoid applying excessive pressure to the screen.
6. ການແກ້ໄຂບັນຫາ
ຖ້າທ່ານພົບບັນຫາກັບຈໍພາບຂອງທ່ານ, ໃຫ້ອ້າງອີງເຖິງບັນຫາທົ່ວໄປຕໍ່ໄປນີ້ແລະວິທີແກ້ໄຂ.
| ບັນຫາ | ສາເຫດທີ່ເປັນໄປໄດ້ | ການແກ້ໄຂ |
|---|---|---|
| ບໍ່ມີຈໍສະແດງຜົນ/ສີດຳ |
|
|
| ໜ້າຈໍສຳຜັດບໍ່ຕອບສະໜອງ |
|
|
| Display resolution incorrect |
|
|
| ບໍ່ມີການຄວບຄຸມຄວາມສະຫວ່າງ | The monitor only has an on/off switch for the backlight, not adjustable brightness. | This is expected behavior. The monitor does not support adjustable brightness. |
7. ຂໍ້ມູນຈໍາເພາະ
Detailed technical specifications for the ELECROW 7 Inch Touchscreen Monitor.
| ຄຸນສົມບັດ | ລາຍລະອຽດ |
|---|---|
| ຍີ່ຫໍ້ | ໄຟຟ້າ |
| ຊື່ຕົວແບບ | RC070 |
| ຂະໜາດໜ້າຈໍ | 7 ນິ້ວ |
| ການສະແດງຄວາມລະອຽດສູງສຸດ | 1024 x 600 |
| ຄວາມລະອຽດເດີມ | 1024x600 |
| ປະເພດການສະແດງ | ຈໍ LCD |
| ເຕັກໂນໂລຊີການສະແດງ | IPS |
| ອັດຕາສ່ວນ | 1.71:1 |
| ອັດຕາການໂຫຼດຂໍ້ມູນຄືນໃໝ່ | 60 Hz |
| ເວລາຕອບສະຫນອງ | 8 ມິນລິວິນາທີ |
| ອັດຕາສ່ວນກົງກັນຂ້າມ | 800:1 |
| ຄວາມສະຫວ່າງ | 300 ລມ |
| Viewໃນມຸມ | 170 ອົງສາ |
| ລາຍລະອຽດຫນ້າຈໍ | ເຫຼື້ອມເປັນເງົາ |
| ເຕັກໂນໂລຊີການເຊື່ອມຕໍ່ | HDMI |
| ການເຊື່ອມຕໍ່ຮາດແວ | HDMI, USB |
| Total Number of HDMI Ports | 1 |
| ພອດ USB ທັງໝົດ | 2 (Micro USB for power/touch, USB-A for power/touch) |
| ການບໍລິໂພກພະລັງງານ | 12.5 ວັດ |
| ສະບັບtage | 5 ໂວນ |
| ຂະໜາດລາຍການ (D x W x H) | 0.3"D x 6.1"W x 4.8"H |
| ນ້ໍາຫນັກລາຍການ | 7.36 ອອນ |
| ອຸປະກອນທີ່ເຂົ້າກັນໄດ້ | Raspberry Pi, BB Black, Banana Pi, Jetson Nano, Computers, Laptops, Gaming Consoles |
8. ການຮັບປະກັນແລະການສະຫນັບສະຫນູນ
Your ELECROW 7 Inch Touchscreen Monitor comes with a manufacturer's warranty.
- ປະເພດການຮັບປະກັນ: 1 ປີຮັບປະກັນຜູ້ຜະລິດ
- ລາຍລະອຽດການຮັບປະກັນ: ຜູ້ຜະລິດ 1 ປີ
For technical support or warranty claims, please contact ELECROW customer service through their official webເວັບໄຊ ຫຼືເວທີທີ່ຜະລິດຕະພັນຖືກຊື້.