
ແນະນຳ
This manual provides detailed instructions for the installation, operation, and maintenance of your Venstar T1900 Residential Slimline Platinum Thermostat. Please read this manual thoroughly before attempting to install or operate the thermostat to ensure proper function and to avoid potential damage.
ຂໍ້ມູນຄວາມປອດໄພທີ່ສໍາຄັນ
- Always turn off power to the heating/cooling system at the main circuit breaker or fuse box before installing or servicing the thermostat.
- This thermostat operates on 24 Volts AC. Do not connect to line voltage (120V ຫຼື 240V).
- ການຕິດຕັ້ງຄວນປະຕິບັດໂດຍຊ່າງເຕັກນິກທີ່ມີຄຸນວຸດທິ ຖ້າທ່ານບໍ່ຄຸ້ນເຄີຍກັບສາຍໄຟ.
- Do not short circuit the terminals on the gas valve or at the system control to test the thermostat. This will damage the thermostat and void the warranty.
- ຮັບປະກັນວ່າການເຊື່ອມຕໍ່ສາຍໄຟທັງໝົດແມ່ນປອດໄພ ແລະ ມີฉนวนເພື່ອປ້ອງກັນການລັດວົງຈອນ.
ເນື້ອໃນຊຸດ
ກວດສອບວ່າຊຸດຂອງທ່ານມີລາຍການດັ່ງຕໍ່ໄປນີ້:
- Venstar T1900 Thermostat Unit
- ຮາດແວຕິດຕັ້ງ (ສະກູ ແລະສະມໍຝາ)
- ຄູ່ມືຜູ້ໃຊ້ (ເອກະສານນີ້)
ສິນຄ້າເກີນview
The Venstar T1900 is a 7-day programmable digital thermostat designed for residential use. It offers precise temperature control and energy-saving scheduling capabilities. This thermostat is compatible with heat/cool, heat pump, and dual-fuel systems, controlling up to three heat stages ແລະສອງເຢັນ stages.
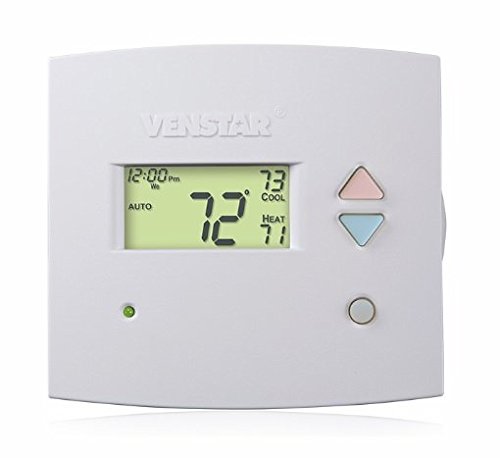
ຮູບທີ 1: ດ້ານໜ້າ view of the Venstar T1900 Thermostat. This image displays the thermostat's LCD screen and control buttons, indicating its slimline design.
ຄຸນນະສົມບັດທີ່ສໍາຄັນ:
- ຄວາມສາມາດໃນການຂຽນໂປຣແກຣມໄດ້ 7 ມື້: Allows for customized heating and cooling schedules for each day of the week.
- ຄວາມເຂົ້າກັນໄດ້ຂອງລະບົບ: Works with heat/cool, dual-fuel, and heat pump systems.
- Multi-Stage ການຄວບຄຸມ: Manages up to three heat stages ແລະສອງເຢັນ stages.
- ຄວາມສາມາດໃນການຄວບຄຸມໄລຍະໄກ: Controllable by phone using an optional add-on (sold separately).
- Automatic or Manual Operation: Provides flexibility for scheduled or on-demand temperature adjustments.
ຄູ່ມືການຕິດຕັ້ງ
ເຄື່ອງມືທີ່ຕ້ອງການ:
- Screwdriver (Phillips ແລະ/ຫຼື flathead)
- Drill with appropriate drill bit (if installing new wall anchors)
- ສາຍລວດ
- ສໍ
- ລະດັບ (ທາງເລືອກ)
1. ປິດພະລັງງານ
Locate the circuit breaker or fuse box that controls your heating and cooling system. Turn off the power completely before proceeding with any wiring.
2. Remove Old Thermostat (if applicable)
- ເອົາຝາປິດເຄື່ອງຄວບຄຸມອຸນຫະພູມເກົ່າຂອງເຈົ້າອອກຢ່າງລະມັດລະວັງ.
- ເອົາຮູບຂອງການເຊື່ອມຕໍ່ສາຍໄຟທີ່ມີຢູ່ສໍາລັບການອ້າງອີງ.
- Label each wire with the terminal designation it was connected to (e.g., R, G, Y, W).
- ຖອດສາຍໄຟອອກ ແລະຖອດແຜ່ນຍຶດຂອງເຄື່ອງຄວບຄຸມອຸນຫະພູມເກົ່າອອກຈາກຝາ.
3. ຕິດຕັ້ງຖານເຄື່ອງຄວບຄຸມອຸນຫະພູມໃໝ່
- Separate the front cover of the T1900 thermostat from its base plate.
- Position the base plate on the wall where you want to install the thermostat. Ensure it is level.
- ໝາຍຮູສຽບດ້ວຍສໍ.
- Drill pilot holes if necessary and insert wall anchors.
- ຍຶດແຜ່ນຖານເຄື່ອງຄວບຄຸມອຸນຫະພູມເຂົ້າກັບຝາໂດຍໃຊ້ສະກູທີ່ໃຫ້ມາ.
4. ສາຍໄຟ
Connect the wires from your HVAC system to the corresponding terminals on the T1900 thermostat base. Refer to the wiring diagram provided with your specific HVAC system for precise connections. Ensure wires are stripped approximately 3/8 inch and securely fastened under the terminal screws.
ການກຳນົດປາຍທາງທົ່ວໄປ:
- R/Rc/Rh: 24V Power (Heating/Cooling)
- C: Common (24V return)
- G: ພັດລົມ
- Y/Y1: ເຄື່ອງອັດແອ Stage 1 (ຄວາມເຢັນ)
- Y2: ເຄື່ອງອັດແອ Stage 2 (ຄວາມເຢັນ)
- W/W1: ຄວາມຮ້ອນ S.tage 1 (ຄວາມຮ້ອນ)
- W2: ຄວາມຮ້ອນ S.tage 2 (ຄວາມຮ້ອນ)
- O / B: Reversing Valve (Heat Pumps)
Note: The T1900 supports various system types. Consult the detailed wiring diagrams in the full installation manual for specific configurations (e.g., heat pump with auxiliary heat, conventional multi-stage systems).
5. ຕິດຕັ້ງເຄື່ອງຄວບຄຸມອຸນຫະພູມໃສ່ຖານ
Once wiring is complete and verified, carefully align the thermostat front cover with the mounted base plate and snap it into place.
6. ຟື້ນຟູພະລັງງານ
Return to your circuit breaker or fuse box and restore power to your heating and cooling system.
ການຕິດຕັ້ງເບື້ອງຕົ້ນ
Upon initial power-up, the thermostat may prompt you to configure basic settings. Follow the on-screen instructions to set the current date, time, and system type (e.g., Conventional, Heat Pump).
System Type Configuration:
It is crucial to correctly configure the thermostat for your specific HVAC system. Incorrect settings can lead to improper operation or damage. Access the installer settings menu (refer to the full installation guide for specific button sequences) to select:
- ປະເພດລະບົບ: Heat/Cool, Heat Pump, Dual Fuel
- ຈໍານວນຄວາມຮ້ອນ Stages
- ຈໍານວນ Cool Stages
- Reversing Valve Operation: O (ເຮັດຄວາມເຢັນ) ຫຼື B (ເຮັດຄວາມຮ້ອນ)
ຄໍາແນະນໍາການດໍາເນີນງານ
ເຂົ້າໃຈການສະແດງຜົນ:
The LCD screen displays the current temperature, set temperature, system mode, fan mode, time, and programming status. Refer to the icons and indicators on the screen for current operational status.
Setting System Mode:
ກົດ ໂໝດ ປຸ່ມເພື່ອວົງຈອນຜ່ານໂຫມດລະບົບທີ່ມີຢູ່:
- ຄວາມຮ້ອນ: The system will operate to maintain the heating setpoint.
- ເຢັນ: The system will operate to maintain the cooling setpoint.
- ອັດຕະໂນມັດ: ເຄື່ອງຄວບຄຸມອຸນຫະພູມຈະສະຫຼັບໂດຍອັດຕະໂນມັດລະຫວ່າງການໃຫ້ຄວາມຮ້ອນ ແລະ ການໃຫ້ຄວາມເຢັນຕາມຄວາມຕ້ອງການເພື່ອຮັກສາລະດັບອຸນຫະພູມທີ່ຕັ້ງໄວ້.
- ປິດ: ລະບົບທຳຄວາມຮ້ອນ ແລະ ຄວາມເຢັນຖືກປິດໄວ້.
Setting Fan Mode:
ກົດ ແຟນAN ປຸ່ມເພື່ອໝຸນວຽນຜ່ານໂໝດພັດລົມ:
- ອັດຕະໂນມັດ: ພັດລົມເຮັດວຽກພຽງແຕ່ເມື່ອລະບົບເຮັດຄວາມຮ້ອນຫຼືຄວາມເຢັນເຮັດວຽກຢ່າງຫ້າວຫັນ.
- ເປີດ: The fan runs continuously, regardless of heating or cooling calls.
ປັບອຸນຫະພູມ:
ໃຊ້ UP ແລະ ລົງ arrow buttons to adjust the desired temperature setpoint. In programmable modes, this will temporarily override the schedule until the next scheduled change.
Programming Schedules (7-Day):
The T1900 allows for 7-day programming, enabling different schedules for each day of the week. This feature helps save energy by adjusting temperatures when you are away or asleep.
- ກົດ ໂປຣແກຣມ ປຸ່ມເພື່ອເຂົ້າສູ່ໂຫມດການຂຽນໂປຼແກຼມ.
- ໃຊ້ ວັນ button to select the day or group of days you wish to program (e.g., Mon-Fri, Sat-Sun, or individual days).
- ໃຊ້ TIME button to cycle through the four available periods: Wake, Leave, Return, Sleep.
- ໃຊ້ UP ແລະ ລົງ arrow buttons to set the desired temperature for each period.
- ໃຊ້ ຖື button to exit programming mode or save changes.
Refer to the detailed programming section in the full user guide for advanced options and specific button sequences.
Remote Control (Optional Add-on):
The Venstar T1900 thermostat can be controlled remotely via a phone using an optional add-on module (sold separately). This module connects to the thermostat and allows for remote access and control through a dedicated application. Installation and setup instructions for the remote control module are provided with the module itself.
ບໍາລຸງຮັກສາ
ການເຮັດຄວາມສະອາດເຄື່ອງຄວບຄຸມອຸນຫະພູມ:
ເພື່ອຮັກສາຮູບລັກສະນະ ແລະ ໜ້າທີ່ການເຮັດວຽກຂອງເຄື່ອງຄວບຄຸມອຸນຫະພູມຂອງທ່ານ, ໃຫ້ເຊັດພາຍນອກເປັນໄລຍະໆດ້ວຍຜ້າອ່ອນໆ.amp cloth. Do not use abrasive cleaners, solvents, or chemical sprays, as these can damage the plastic and electronic components.
ການປ່ຽນແບັດເຕີຣີ:
The Venstar T1900 thermostat does not require batteries for operation as it is powered by the 24V AC system.
ການແກ້ໄຂບັນຫາ
If you experience issues with your Venstar T1900 thermostat, consult the following common problems and solutions:
| ບັນຫາ | ສາເຫດທີ່ເປັນໄປໄດ້ | ການແກ້ໄຂ |
|---|---|---|
| ຈໍສະແດງຜົນເຄື່ອງຄວບຄຸມອຸນຫະພູມຫວ່າງເປົ່າ | ບໍ່ມີພະລັງງານຕໍ່ກັບເຄື່ອງຄວບຄຸມອຸນຫະພູມ. | ກວດເບິ່ງຕົວຕັດວົງຈອນສໍາລັບລະບົບ HVAC ຂອງທ່ານ. ໃຫ້ແນ່ໃຈວ່າການເຊື່ອມຕໍ່ສາຍໄຟທັງຫມົດແມ່ນປອດໄພ. |
| Heating/Cooling system does not respond | ເລືອກໂໝດລະບົບບໍ່ຖືກຕ້ອງ; ບັນຫາການເຊື່ອມຕໍ່ສາຍໄຟ; ລະບົບລັອກ. | Verify the system mode (HEAT/COOL/AUTO). Check wiring connections. Wait 5 minutes for system lockout to reset. |
| ການອ່ານອຸນຫະພູມເບິ່ງຄືວ່າບໍ່ຖືກຕ້ອງ | ຕຳແໜ່ງຂອງເຄື່ອງຄວບຄຸມອຸນຫະພູມ; ການອຸດຕັນຂອງເຊັນເຊີ. | Ensure the thermostat is not exposed to direct sunlight, drafts, or heat sources. Clean any dust from the thermostat vents. |
| Programming schedule is not working | Program not saved; temporary override active; incorrect time/day setting. | Ensure programs are saved. Check if a temporary override is active and cancel it. Verify current time and day settings. |
| ພັດລົມເຮັດວຽກຢ່າງຕໍ່ເນື່ອງໃນໂໝດ AUTO | Fan mode set to ON; wiring issue. | Press the FAN button to ensure it is set to AUTO. Check fan wiring. |
If these solutions do not resolve the issue, please contact customer support or a qualified HVAC technician.
ຂໍ້ມູນຈໍາເພາະ
| ຄຸນສົມບັດ | ຂໍ້ມູນຈໍາເພາະ |
|---|---|
| ຍີ່ຫໍ້ | Venstar |
| ຊື່ຕົວແບບ | Venstar T1900 |
| ປະເພດການຄວບຄຸມ | ປຸ່ມກົດ |
| ຄຸນນະສົມບັດພິເສດ | ສາມາດຕັ້ງໂປຣແກຣມໄດ້ |
| ສີ | ສີຂາວ |
| ການນໍາໃຊ້ສະເພາະສໍາລັບຜະລິດຕະພັນ | Heat Pump, Heater |
| ປະເພດການຄວບຄຸມອຸນຫະພູມ | Programmable, Smart/Remote (with add-on) |
| ສະບັບtage | 24 វ៉ុល AC |
| ປະເພດການສະແດງ | LCD ຫຼື LED |
| ວິທີການຄວບຄຸມ | Remote (with add-on) |
| ແສງຫຼັງ | ແມ່ນແລ້ວ |
| ຂະໜາດສິນຄ້າ | 5.3 x 2 x 2 ນິ້ວ |
| ນ້ໍາຫນັກລາຍການ | 0.01 ອອນ |
| ຕ້ອງໃຊ້ແບັດເຕີຣີ? | ບໍ່ |
ຂໍ້ມູນການຮັບປະກັນ
Venstar products are manufactured to high-quality standards. This product is covered by a limited warranty against defects in materials and workmanship. The specific terms and duration of the warranty may vary. Please refer to the warranty card included with your product or visit the official Venstar webສະຖານທີ່ສໍາລັບການຮັບປະກັນລາຍລະອຽດແລະຂັ້ນຕອນການລົງທະບຽນ.
ການຊ່ວຍເຫຼືອລູກຄ້າ
For technical assistance, troubleshooting, or warranty inquiries, please contact Venstar customer support. You can typically find contact information, including phone numbers and email addresses, on the official Venstar webເວັບໄຊ (www.venstar.com) ຫຼືການຫຸ້ມຫໍ່ຜະລິດຕະພັນ.
When contacting support, please have your thermostat model number (T1900) and any relevant purchase information ready.