1. ບົດແນະນຳ
The Microsoft Surface 3 is a versatile 10.8-inch tablet designed for productivity and portability. Running on Windows 10 and powered by an Intel Atom processor, it offers a full PC experience in a compact form factor. This manual provides essential information for setting up, operating, maintaining, and troubleshooting your device.

Image: Microsoft Surface 3 Tablet with an attached red Type Cover keyboard and a silver Surface Pen. The screen displays a colorful image with digital annotations, demonstrating its versatility.
2. ສິ່ງທີ່ຢູ່ໃນກ່ອງ
Upon unboxing your Microsoft Surface 3, verify that all standard components are present:
- Microsoft Surface 3 Tablet
- Power Supply Unit (Charger)
- ຄູ່ມືເລີ່ມຕົ້ນດ່ວນ (ຖ້າລວມ)
ໝາຍເຫດ: The Surface Pen and Type Cover keyboard are optional accessories and are typically sold separately. Ensure you have these if your purchase included them.
3. ອຸປະກອນເກີນview
Familiarize yourself with the physical features and ports of your Surface 3 tablet.
3.1 ພອດ ແລະ ປຸ່ມຕ່າງໆ
- ພອດ USB 3.0: ສຳລັບເຊື່ອມຕໍ່ອຸປະກອນ USB ເຊັ່ນ: ໄດຣຟ໌ພາຍນອກ, ເມົາສ໌ ຫຼື ແປ້ນພິມ.
- ພອດສາກ Micro USB: ໃຊ້ສໍາລັບການສາກໄຟອຸປະກອນ.
- Mini DisplayPort: ສໍາລັບການເຊື່ອມຕໍ່ກັບຈໍສະແດງຜົນພາຍນອກຫຼືໂປເຈັກເຕີ.
- ຫູຟັງ Jack: ສໍາລັບສຽງອອກໄປຫາຫູຟັງຫຼືລໍາໂພງພາຍນອກ.
- ຊ່ອງສຽບກາດ MicroSD: For expanding storage with a microSDXC card.
- ປຸ່ມລະດັບສຽງ: ເພື່ອປັບລະດັບສຽງ.
- ປຸ່ມເປີດປິດ: ເພື່ອເປີດ/ປິດອຸປະກອນ ຫຼື ເຮັດໃຫ້ມັນເຂົ້າສູ່ໂໝດນອນ.
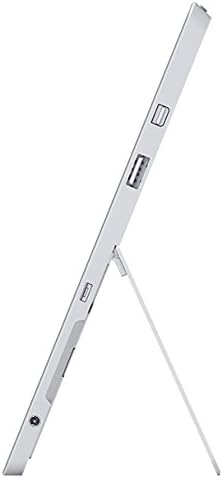
ຮູບພາບ: ຂ້າງ view of the Microsoft Surface 3, illustrating the various ports including USB, Mini DisplayPort, and the kickstand in an open position.

ຮູບພາບ: ໃກ້ຊິດ view of the microSD card slot on the Microsoft Surface 3, with a microSD card partially inserted, demonstrating storage expansion capability.
3.2 ກ້ອງຖ່າຍຮູບ
- ກ້ອງຫຼັງ: 8 MP for capturing photos and videos.
- ກ້ອງໜ້າ: 3.5 MP for video calls and selfies.
4. ຕັ້ງຄ່າ
4.1 ຄ່າບໍລິການເບື້ອງຕົ້ນ
Before first use, connect the Surface 3 to the power supply using the Micro USB charging port and allow it to charge fully. The battery indicator on the screen will show charging status.
4.2 ການເປີດເຄື່ອງ ແລະ ການຕັ້ງຄ່າ Windows
- ກົດຄ້າງໄວ້ ປຸ່ມເປີດປິດ until the Microsoft logo appears on the screen.
- Follow the on-screen prompts to complete the Windows 10 setup process. This includes selecting your language, connecting to a Wi-Fi network, and creating or signing in with a Microsoft account.
- ອະນຸຍາດໃຫ້ລະບົບດາວໂຫຼດ ແລະ ຕິດຕັ້ງການອັບເດດທີ່ຍັງຄ້າງຢູ່ ເພື່ອປະສິດທິພາບ ແລະ ຄວາມປອດໄພທີ່ດີທີ່ສຸດ.
4.3 Attaching Optional Accessories
- ປະເພດປົກຫຸ້ມ: Align the Type Cover with the magnetic connector at the bottom edge of the Surface 3 until it clicks into place.
- ປາກກາໜ້າດິນ: The Surface Pen can be magnetically attached to the side of the Surface 3 for storage. For initial pairing, follow the instructions provided with the pen or in Windows settings.
5. ການເຮັດວຽກ
5.1 ການນໍາທາງ
- ໜ້າຈໍສຳຜັດ: Use gestures like tap, swipe, pinch-to-zoom for navigation.
- ປາກກາໜ້າດິນ: Use the pen for precise input, drawing, writing, and annotating.
- Type Cover (Optional): Provides a traditional keyboard and trackpad experience.

Image: Microsoft Surface 3 in use with a Type Cover keyboard and Surface Pen, displaying a Windows 10 interface with various applications.
5.2 ຄຸນສົມບັດຕ່າງໆຂອງ Windows 10
- ເມນູເລີ່ມຕົ້ນ: ເຂົ້າເຖິງແອັບພລິເຄຊັນ, ການຕັ້ງຄ່າ ແລະຕົວເລືອກພະລັງງານ.
- ສູນປະຕິບັດງານ: Swipe from the right edge of the screen to access quick settings and notifications.
- ວຽກງານ View: View open applications and virtual desktops.
- ໂໝດແທັບເລັດ: Switch to Tablet Mode for a touch-optimized interface.
5.3 ການເຊື່ອມຕໍ່ Wi-Fi
- ເປີດ ສູນປະຕິບັດງານ by swiping from the right edge of the screen or clicking the icon in the taskbar.
- ແຕະທີ່ Wi-Fi ໄອຄອນ.
- ເລືອກເຄືອຂ່າຍທີ່ທ່ານຕ້ອງການຈາກບັນຊີລາຍຊື່ແລະໃສ່ລະຫັດຜ່ານຖ້າຫາກວ່າ prompted.
6. ບໍາລຸງຮັກສາ
6.1 ການທໍາຄວາມສະອາດ
- ໃຊ້ຜ້າແພທີ່ອ່ອນນຸ້ມ ງampened with water or a screen cleaner specifically designed for electronics to clean the screen.
- ຫຼີກລ່ຽງສານເຄມີຮຸນແຮງ, ວັດສະດຸຂັດ, ຫຼື ຄວາມຊຸ່ມຊື່ນຫຼາຍເກີນໄປ.
- Clean the device exterior with a soft, dry cloth.
6.2 ການປັບປຸງຊອບແວ
Regularly check for and install Windows updates to ensure your device has the latest security patches and performance improvements. Go to ການຕັ້ງຄ່າ > ອັບເດດ ແລະຄວາມປອດໄພ > Windows Update.
6.3 ການດູແລຫມໍ້ໄຟ
- ຫຼີກເວັ້ນອຸນຫະພູມທີ່ຮຸນແຮງ, ຍ້ອນວ່າພວກມັນສາມາດເຮັດໃຫ້ອາຍຸຫມໍ້ໄຟຫຼຸດລົງ.
- For optimal battery longevity, avoid consistently draining the battery to 0% or keeping it at 100% for extended periods.
- The Surface 3 has an average battery life of up to 8 hours under typical usage conditions.
7. ການແກ້ໄຂບັນຫາ
7.1 ອຸປະກອນບໍ່ເປີດ
- Ensure the device is charged. Connect the power supply and wait a few minutes before attempting to power on again.
- Perform a force restart by holding the ປຸ່ມເປີດປິດ for 10-15 seconds, then release and press it again briefly.
7.2 ບັນຫາການເຊື່ອມຕໍ່ Wi-Fi
- Toggle Wi-Fi off and on in the Action Center.
- Restart your Surface 3 and your Wi-Fi router.
- Ensure you are within range of the Wi-Fi network and have the correct password.
7.3 ການປະຕິບັດຊ້າ
- ປິດແອັບພລິເຄຊັນທີ່ບໍ່ຈໍາເປັນທີ່ເຮັດວຽກຢູ່ໃນພື້ນຫຼັງ.
- ກວດເບິ່ງ ແລະຕິດຕັ້ງການອັບເດດ Windows ທີ່ຍັງຄ້າງຢູ່.
- ໃຫ້ແນ່ໃຈວ່າທ່ານມີພື້ນທີ່ຈັດເກັບຂໍ້ມູນຫວ່າງພຽງພໍ.
8. ຂໍ້ມູນຈໍາເພາະ
| ຄຸນສົມບັດ | ລາຍລະອຽດ |
|---|---|
| ໝາຍເລກຕົວແບບ | 7G6-00014 |
| ຂະຫນາດຈໍສະແດງຜົນ | 10.8 ນິ້ວ |
| ຄວາມລະອຽດໜ້າຈໍ | 1920x1280 ພິກເຊລ |
| ໂຮງງານຜະລິດ | Intel Atom x7-Z8700 (2.4 GHz) |
| RAM | 4 GB |
| ການເກັບຮັກສາ | SSD 128 GB |
| ລະບົບປະຕິບັດການ | Windows 10 |
| Graphics Coprocessor | Quad-core Intel Atom x7-Z8700 processor |
| ປະເພດໄຮ້ສາຍ | 802.11ac Wi-Fi, Bluetooth 4.0 |
| ພອດ USB | 1x USB 2.0, 1x USB 3.0 |
| ອາຍຸຫມໍ້ໄຟສະເລ່ຍ | 8 ຊົ່ວໂມງ |
| ນ້ໍາຫນັກລາຍການ | 1.37 ປອນ |
| ຂະໜາດສິນຄ້າ | 14.02 x 8.64 x 1.58 ນິ້ວ |
| ຫລັງ Webຄວາມລະອຽດກ້ອງ | 8 MP |
| ດ້ານໜ້າ Webຄວາມລະອຽດກ້ອງ | 3.5 MP |
9. ການຮັບປະກັນແລະການສະຫນັບສະຫນູນ
Your Microsoft Surface 3 Tablet is covered by a limited manufacturer's warranty. For detailed warranty information, including terms and conditions, please refer to the documentation provided with your purchase or visit the official Microsoft support webເວັບໄຊ.
For technical assistance, software updates, and additional resources, please visit the official Microsoft Support website or contact their customer service. Keep your device's serial number (located on the back of the tablet or in Windows settings) readily available when seeking support.


