1. ບົດແນະນຳ
This manual provides detailed instructions for the installation, operation, and maintenance of your ASUS X99-DELUXE motherboard. The ASUS X99-DELUXE is an ATX motherboard designed for high-performance computing, supporting Intel LGA 2011-3 processors and DDR4 memory.

ຮູບ 1: ເທິງລົງລຸ່ມ view of the ASUS X99-DELUXE Motherboard, showing the CPU socket, RAM slots, and heatsinks.
2. ຄຸນນະສົມບັດທີ່ສໍາຄັນ
- ASUS OC Socket: Designed to enhance 8-core CPU and DDR4 performance beyond standard X99 expectations.
- ຮອງຮັບ DDR4 Memory: Features a special memory overclocking design, supporting DDR4 memory speeds up to 3200MHz (O.C.).
- Dual M.2 X4 Support: Provides two M.2 slots with PCIe 3.0 x4 interface, enabling data transfer speeds up to 32Gb/s for compatible NVMe SSDs.
- Fan Extension Card: Includes an extension card for advanced PC cooling management.
- ການເພີ່ມປະສິດທິພາບ 5 ວິທີ: Utilizes Dual Intelligent Processors 5 for system optimization, including performance tuning, power saving, digital power control, and fan control.
- UEFI BIOS: Features a media-acclaimed Unified Extensible Firmware Interface (UEFI) BIOS for intuitive system configuration.
- SATA Express: Supports SATA Express for storage speeds up to 10Gb/s.
3. ການຕິດຕັ້ງແລະການຕິດຕັ້ງ
ກ່ອນທີ່ຈະເລີ່ມຕົ້ນການຕິດຕັ້ງ, ໃຫ້ແນ່ໃຈວ່າລະບົບຂອງທ່ານຖືກປິດແລະຕັດການເຊື່ອມຕໍ່ຈາກແຫຼ່ງພະລັງງານ. ຈັບເມນບອດໂດຍຂອບຂອງມັນເພື່ອຫຼີກເວັ້ນການໄຫຼຄົງທີ່.
3.1. CPU Installation (LGA 2011-3 Socket)
- Carefully open the CPU socket retention mechanism.
- Align the triangular mark on the CPU with the corresponding mark on the socket.
- ຄ່ອຍໆວາງ CPU ເຂົ້າໄປໃນເຕົ້າຮັບໂດຍບໍ່ມີການບັງຄັບມັນ.
- Close the retention mechanism to secure the CPU. Ensure no pins are bent during this process.

ຮູບທີ 2: ມຸມ view of the ASUS X99-DELUXE Motherboard, highlighting the LGA 2011-3 CPU socket.
3.2. ການຕິດຕັ້ງໜ່ວຍຄວາມຈຳ (DDR4)
The motherboard supports DDR4 memory modules. Refer to the motherboard manual for specific memory configurations and supported speeds.
- ເປີດຄລິບຢູ່ທັງສອງສົ້ນຂອງຊ່ອງສຽບ DIMM.
- ວາງຈຸດໃສ່ໃນໂມດູນຄວາມຈຳ DDR4 ດ້ວຍກະແຈໃນຊ່ອງສຽບ DIMM.
- ໃສ່ໂມດູນເຂົ້າໄປໃນຊ່ອງໃຫ້ແໜ້ນຈົນກວ່າຄລິບຈະເຂົ້າທີ່.
3.3. ການຕິດຕັ້ງອຸປະກອນເກັບຂໍ້ມູນ (M.2, SATA)
Install M.2 SSDs into the dedicated M.2 slots and SATA drives to the SATA ports. The motherboard supports SATA 3 (6Gb/s) and SATA Express.
3.4. ເຊື່ອມຕໍ່ອຸປະກອນເສີມ
Connect your display, keyboard, mouse, and other peripherals to the rear I/O panel. The motherboard provides various USB ports, Ethernet ports, and audio jacks.
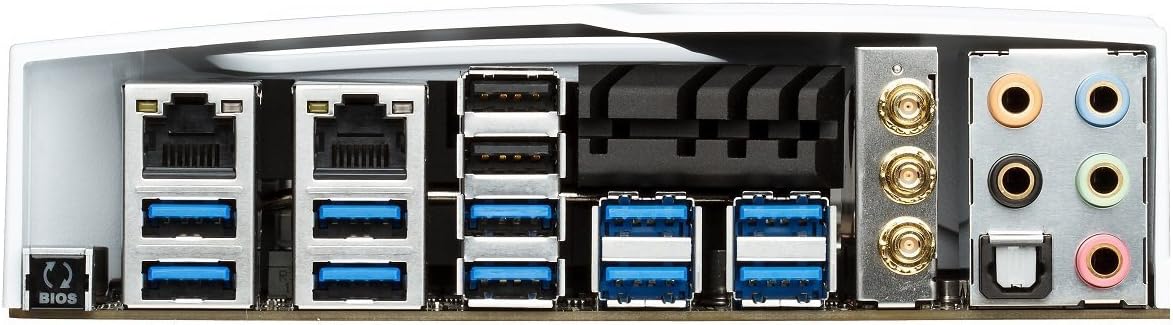
Figure 3: Rear I/O panel of the ASUS X99-DELUXE Motherboard, showing USB ports, Ethernet, and audio jacks.
4. ຄໍາແນະນໍາການດໍາເນີນງານ
4.1. UEFI BIOS Configuration
The UEFI BIOS allows you to configure system settings, boot options, and hardware parameters. To enter the BIOS, press the DEL ກະແຈໃນລະຫວ່າງການເລີ່ມຕົ້ນລະບົບ.
- ໂໝດ EZ: Provides a simplified interface for basic settings.
- ແບບພິເສດ: Offers comprehensive control over all motherboard features, including overclocking and fan control.
4.2. ການຕິດຕັ້ງໄດເວີ
After installing your operating system (e.g., Windows XP, as listed in specifications, and newer OS versions), install the necessary drivers for the motherboard chipset, audio, network, and other integrated components. These are typically provided on a support DVD or available for download from the ASUS webເວັບໄຊ.
4.3. 5-Way Optimization
The 5-Way Optimization feature, accessible through ASUS software, automatically tunes your system for optimal performance, power efficiency, digital power delivery, and fan acoustics based on your usage. It is recommended to manage overclocking and fan settings directly within the BIOS for more precise control.
5. ບໍາລຸງຮັກສາ
ການບຳລຸງຮັກສາແບບປົກກະຕິຈະຊ່ວຍຮັບປະກັນການໃຊ້ງານທີ່ຍາວນານ ແລະ ຄວາມໝັ້ນຄົງຂອງເມນບອດຂອງທ່ານ.
- ການກຳຈັດຂີ້ຝຸ່ນ: ເຮັດຄວາມສະອາດຝຸ່ນຈາກເມນບອດເປັນໄລຍະໆ ແລະອົງປະກອບເຮັດຄວາມເຢັນໂດຍໃຊ້ອາກາດບີບອັດ. ກວດໃຫ້ແນ່ໃຈວ່າລະບົບປິດ ແລະຖອດປລັກອອກກ່ອນທຳຄວາມສະອາດ.
- ກວດສອບການເຊື່ອມຕໍ່: Verify that all cables and components are securely seated.
- ອັບເດດ BIOS: ກວດເບິ່ງການສະຫນັບສະຫນູນ ASUS website for the latest BIOS updates to improve compatibility and performance. Follow update instructions carefully.
6. ການແກ້ໄຂບັນຫາ
If you encounter issues with your ASUS X99-DELUXE motherboard, consider the following troubleshooting steps:
- ບໍ່ມີພະລັງງານ / ບໍ່ມີ Boot:
- ໃຫ້ແນ່ໃຈວ່າສາຍໄຟທັງໝົດ (24-pin ATX, CPU 8-pin) ຖືກເຊື່ອມຕໍ່ຢ່າງປອດໄພ.
- ກວດສອບວ່າໜ່ວຍສະໜອງພະລັງງານ (PSU) ເຮັດວຽກຢ່າງຖືກຕ້ອງ.
- ກວດສອບການເຊື່ອມຕໍ່ສະວິດໄຟຂອງແຜງດ້ານໜ້າກັບເມນບອດ.
- ບໍ່ມີການສະແດງຜົນ:
- Confirm the graphics card is properly seated in its PCIe slot and has adequate power.
- ກວດໃຫ້ແນ່ໃຈວ່າສາຍຈໍຕິດຂັດກັບກາຟິກກາດຢ່າງປອດໄພ.
- ທົດສອບດ້ວຍສາຍສະແດງຜົນອື່ນ ຫຼືຈໍພາບຖ້າເປັນໄປໄດ້.
- ລະບົບບໍ່ສະຖຽນ/ຂັດຂ້ອງ:
- Check RAM modules for proper seating; try reseating them or testing one module at a time.
- Ensure CPU cooler is correctly installed and making good contact with the CPU. Monitor CPU temperatures.
- ປັບການຕັ້ງຄ່າ BIOS ເປັນຄ່າເລີ່ມຕົ້ນ.
- Bent CPU Socket Pins:
Bent pins in the CPU socket can cause severe system malfunctions or prevent booting. This type of damage is typically not covered under warranty. Exercise extreme caution during CPU installation to avoid bending pins.
7. ຂໍ້ມູນຈໍາເພາະ
| ປະເພດ | ຂໍ້ມູນຈໍາເພາະ |
|---|---|
| ຍີ່ຫໍ້ | ASUS |
| ຊື່ຕົວແບບ | X99-DELUXE |
| ເຕົ້າສຽບ CPU | LGA 2011-3 |
| ໂປເຊດເຊີທີ່ເຂົ້າກັນໄດ້ | Intel Core i7 (LGA 2011-3) |
| ປະເພດຊິບເຊັດ | Intel X99 |
| ເທກໂນໂລຍີຫນ່ວຍຄວາມຈໍາ RAM | DDR4 |
| ຄວາມໄວໂມງຄວາມຈຳ | ສູງສຸດ 3200 MHz (OC) |
| ສະລັອດຕິງຫນ່ວຍຄວາມຈໍາສາມາດໃຊ້ໄດ້ | 8 |
| ຂະໜາດຄວາມຈຳ RAM ສູງສຸດ | 64 GB |
| ການໂຕ້ຕອບບັດກາຟິກ | PCI Express |
| Total PCIe Ports | 5 |
| ພອດ SATA ທັງໝົດ | 8 |
| ຮອງຮັບລະບົບລົດເມມາດຕະຖານ | SATA 3 |
| ພອດ USB 2.0 | 2 (internal headers, total ports may vary) |
| ພອດ USB ທັງໝົດ | Various (including USB 3.0 on rear I/O) |
| ຈໍານວນພອດອີເທີເນັດ | 1 (Dual Gigabit LAN) |
| ປະເພດຕົວເຊື່ອມຕໍ່ພະລັງງານຫຼັກ | 24-Pin ATX |
| ອຸປະກອນທີ່ເຂົ້າກັນໄດ້ | ຄອມພິວເຕີສ່ວນບຸກຄົນ |
| ເວທີ | Windows XP (and newer OS versions) |
| ນ້ໍາຫນັກລາຍການ | 4.44 ປອນ (ປະມານ 2.01 ກິໂລ) |
8. ການຮັບປະກັນແລະການສະຫນັບສະຫນູນ
ສໍາລັບຂໍ້ມູນການຮັບປະກັນ ແລະການຊ່ວຍເຫຼືອດ້ານວິຊາການ, ກະລຸນາອ້າງອີງເຖິງ ASUS ຢ່າງເປັນທາງການ webເວັບໄຊ ຫຼືຕິດຕໍ່ບໍລິການລູກຄ້າ ASUS. ຮັກສາຫຼັກຖານການຊື້ຂອງທ່ານສໍາລັບການຮ້ອງຂໍການຮັບປະກັນ.
ຮອງຮັບ ASUS Webເວັບໄຊ: https://www.asus.com/support/
Note: Damage resulting from improper installation, misuse, or unauthorized modifications may void your product warranty.