
1. ບົດແນະນຳ
This manual provides detailed instructions for the installation, operation, maintenance, and troubleshooting of the ASUS P7F-M Micro ATX Motherboard. Please read this manual thoroughly before installing or using the motherboard to ensure proper setup and functionality.
The ASUS P7F-M is designed for Intel Xeon 3400 series, Core i7, Core i5, and Core i3 processors with an LGA 1156 socket, supporting DDR3 memory and offering various expansion and connectivity options.
2. ການຕິດຕັ້ງແລະການຕິດຕັ້ງ
Before beginning installation, ensure your system is powered off and disconnected from the power source. Wear an anti-static wrist strap to prevent electrostatic discharge (ESD) damage to components.
2.1 ໂຄງຮ່າງຂອງເມນບອດ

ຮູບພາບ: ເທິງລົງລຸ່ມ view of the ASUS P7F-M motherboard, showing the CPU socket, RAM slots, PCIe slots, and various connectors.

ຮູບພາບ: ມຸມ view of the ASUS P7F-M motherboard, highlighting the rear I/O panel, CPU socket, and expansion slots.
2.2 ການຕິດຕັ້ງ CPU
- ຊອກຫາຊັອກເກັດ CPU LGA 1156 ຢູ່ໃນເມນບອດ.
- Gently push down the load lever and pull it sideways to open the socket retention frame.
- ວາງ CPU ກັບຊັອກເກັດຢ່າງລະມັດລະວັງ, ໃຫ້ແນ່ໃຈວ່າສາມຫຼ່ຽມຄໍາໃນ CPU ກົງກັບສາມຫຼ່ຽມຢູ່ໃນເຕົ້າຮັບ. ຢ່າບັງຄັບ CPU ເຂົ້າໄປໃນເຕົ້າສຽບ.
- Close the retention frame and push the load lever back into place until it clicks.

ຮູບພາບ: ໃກ້ຊິດ view of the LGA 1156 CPU socket on the ASUS P7F-M motherboard, ready for processor installation.
2.3 ການຕິດຕັ້ງຫນ່ວຍຄວາມຈໍາ
The motherboard supports 4x DDR3-1333/1066 DIMMs, with a maximum capacity of 16GB. It supports both ECC and non-ECC un-buffered memory.
- ເປີດຄລິບຢູ່ທັງສອງສົ້ນຂອງຊ່ອງສຽບ DIMM.
- ວາງໂມດູນໜ່ວຍຄວາມຈຳກັບຊ່ອງສຽບ, ຮັບປະກັນວ່າຮອຍບັ້ງຢູ່ໃນໂມດູນກົງກັບກະແຈໃນຊ່ອງສຽບ.
- ກົດລົງໃຫ້ແໜ້ນທັງສອງສົ້ນຂອງໂມດູນໜ່ວຍຄວາມຈຳຈົນກວ່າຄລິບຈະເຂົ້າໃສ່.
ຮູບພາບ: ໃກ້ຊິດ view of the four DDR3 DIMM slots on the ASUS P7F-M motherboard, showing their arrangement.
2.4 ການຕິດຕັ້ງບັດຂະຫຍາຍ
The motherboard features:
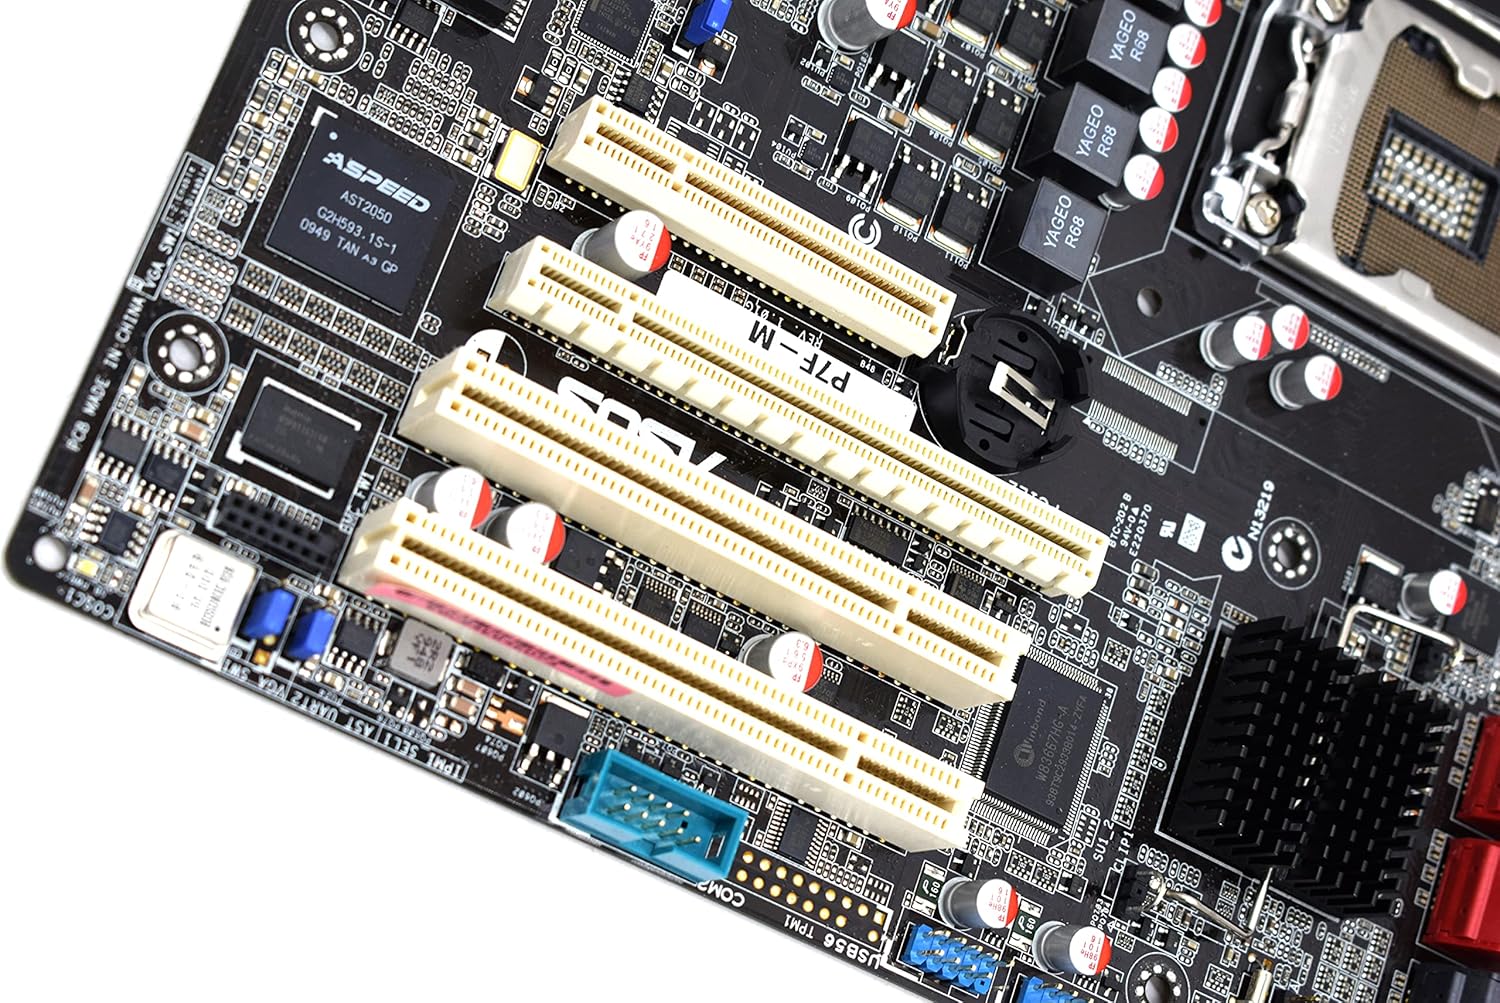
- 1x PCI-Express x16 Slot
- 1x PCI-Express x8 Slot (operates at x4)
- 2x 32bit/33MHz PCI Slots
- Select an appropriate expansion slot for your card.
- Remove the corresponding metal slot cover from your PC case.
- Align the card with the slot and press down firmly until it is securely seated.
- ຮັບປະກັນບັດດ້ວຍສະກູກັບກໍລະນີ PC.

ຮູບພາບ: ໃກ້ຊິດ view of the PCI Express and PCI expansion slots on the ASUS P7F-M motherboard.
2.5 ການເຊື່ອມຕໍ່ອຸປະກອນເກັບຂໍ້ມູນ
Connect your SATA storage devices (HDDs, SSDs, optical drives) to the SATA ports on the motherboard.

ຮູບພາບ: ໃກ້ຊິດ view of the SATA ports on the ASUS P7F-M motherboard, typically located near the chipset.
2.6 ການເຊື່ອມຕໍ່ພະລັງງານ
Connect the 24-pin ATX main power connector and the 8-pin CPU power connector from your power supply unit (PSU) to the corresponding ports on the motherboard.
2.7 ການເຊື່ອມຕໍ່ແຜງດ້ານຫລັງ
ເຊື່ອມຕໍ່ອຸປະກອນເສີມເຂົ້າກັບພອດ I/O ດ້ານຫຼັງ:
- ພອດ USB 2.0: For keyboards, mice, and other USB devices.
- ພອດ PS/2: For legacy PS/2 keyboards and mice.
- RJ45 LAN Ports: ສໍາລັບການເຊື່ອມຕໍ່ເຄືອຂ່າຍ.
- Port Serial: For serial devices.
- ຜອດ VGA: For video output to a monitor.
3. ຄໍາແນະນໍາການດໍາເນີນງານ
3.1 ການເປີດເຄື່ອງເບື້ອງຕົ້ນ
After all components are installed and connected, connect the power cable to your PSU and press the power button on your PC case. The system should initiate the Power-On Self-Test (POST).
3.2 ການຕັ້ງຄ່າ BIOS/UEFI
During POST, press the designated key (usually DEL or F2) to enter the BIOS setup utility. Here you can configure system settings, boot order, and monitor hardware status.
3.3 ການຕິດຕັ້ງໄດເວີ
After installing your operating system, install the necessary drivers for the motherboard chipset, LAN, and any other integrated components. These drivers are typically provided on a support CD or available for download from the ASUS webເວັບໄຊ.
4. ບໍາລຸງຮັກສາ
4.1 ການທໍາຄວາມສະອາດ
ເຮັດຄວາມສະອາດພາຍໃນຄອມພິວເຕີຂອງທ່ານເປັນປົກກະຕິເພື່ອປ້ອງກັນການເກີດຂີ້ຝຸ່ນ, ເຊິ່ງສາມາດນໍາໄປສູ່ຄວາມຮ້ອນເກີນໄປແລະຄວາມລົ້ມເຫຼວຂອງອົງປະກອບ. ໃຊ້ອາກາດບີບອັດເພື່ອເອົາຝຸ່ນອອກຈາກພັດລົມ, ເຄື່ອງເຮັດຄວາມຮ້ອນ, ແລະອົງປະກອບອື່ນໆ. ກວດໃຫ້ແນ່ໃຈວ່າລະບົບປິດ ແລະຖອດປລັກອອກກ່ອນທຳຄວາມສະອາດ.
4.2 ການປັບປຸງ BIOS
ກວດສອບການຮອງຮັບ ASUS ເປັນໄລຍະ website for updated BIOS versions. BIOS updates can improve system stability, add support for new hardware, or fix bugs. Follow the instructions provided by ASUS carefully when performing a BIOS update to avoid system damage.
5. ການແກ້ໄຂບັນຫາ
If you encounter issues with your ASUS P7F-M motherboard, consider the following troubleshooting steps:
- ບໍ່ມີພະລັງງານ: Ensure all power cables (24-pin ATX, 8-pin CPU) are securely connected. Verify the PSU is functioning correctly.
- ບໍ່ມີການສະແດງຜົນ: Check that the monitor is connected to the correct video output (VGA on the motherboard or a dedicated graphics card). Reseat the graphics card and memory modules.
- ຄວາມບໍ່ສະຖຽນລະພາບຂອງລະບົບ: This can be caused by incompatible memory, insufficient power, or overheating. Verify memory compatibility and check CPU/case fan operation.
- ລະຫັດສຽງ POST: Listen for beep codes during startup. Refer to the ASUS website or a general BIOS beep code guide to diagnose the issue.
- Component Detection Issues: Ensure all components (CPU, RAM, expansion cards, storage drives) are properly seated and connected.
ສຳລັບການຊ່ວຍເຫຼືອເພີ່ມເຕີມ, ປຶກສາຝ່າຍສະໜັບສະໜູນ ASUS webສະຖານທີ່ຫຼືຕິດຕໍ່ສະຫນັບສະຫນູນດ້ານວິຊາການຂອງເຂົາເຈົ້າ.
6. ຂໍ້ມູນຈໍາເພາະ
Below are the detailed technical specifications for the ASUS P7F-M Motherboard:
| ຄຸນສົມບັດ | ຂໍ້ມູນຈໍາເພາະ |
|---|---|
| ເຕົ້າສຽບ CPU | LGA 1156 |
| ໂປເຊດເຊີທີ່ເຂົ້າກັນໄດ້ | Intel Quad Core Xeon 3400 series, Core i7-800, Core i5-700, Core i3 series |
| ຊິບເຊັດ | Intel 3420 PCH Chipset |
| Memory Slots | 4x DDR3 DIMMs |
| ປະເພດຄວາມຈໍາ | DDR3-1333/1066, Dual Channel, Un-buffered, ECC/non-ECC |
| ຄວາມອາດສາມາດຫນ່ວຍຄວາມຈໍາສູງສຸດ | 16GB |
| ສະລັອດຕິງ PCI-Express x16 | 1 |
| ສະລັອດຕິງ PCI-Express x8 | 1 (runs in x4 mode) |
| ສະລັອດຕິງ PCI | 2x 32bit/33MHz |
| LAN Controller | Intel 82574L Dual Port Gigabit LAN controller, 1x Management LAN |
| ພອດ USB 2.0 | 7 (2 rear, 5 via header) |
| ຜອດ PS/2 | 2 |
| ຜອດ LAN RJ45 | 3 |
| Serial Ports | 2 (1 rear, 1 via header) |
| VGA Port | 1 |
| ຕົວເຊື່ອມຕໍ່ພະລັງງານຫຼັກ | 1x 24-pin |
| ຕົວເຊື່ອມຕໍ່ພະລັງງານ CPU | 1x 8-pin |
| ປັດໄຈແບບຟອມ | Micro ATX |
| ຂະໜາດ | 13.3 x 11.1 x 3.1 ນິ້ວ (ຊຸດ) |
| ນ້ໍາຫນັກລາຍການ | 1.5 ປອນ |
7. ການຮັບປະກັນແລະການສະຫນັບສະຫນູນ
For information regarding the product warranty, please refer to the warranty card included with your motherboard or visit the official ASUS website. ASUS provides technical support and resources, including driver downloads, FAQs, and contact information, on their support portal.
ຮອງຮັບ ASUS Webເວັບໄຊ: https://www.asus.com/support/