
1. ບົດແນະນຳ
This manual provides instructions for the installation, configuration, and operation of your ASUS RT-N13U Wireless-N Router. The RT-N13U is a versatile networking device capable of functioning as a wireless router, an access point, or a wireless repeater. It also features a USB 2.0 port for enhanced functionalities such as printer sharing, FTP hosting, network storage, and direct BitTorrent downloading.
ກະລຸນາອ່ານຄູ່ມືນີ້ຢ່າງລະອຽດກ່ອນທີ່ຈະນໍາໃຊ້ອຸປະກອນເພື່ອຮັບປະກັນການຕັ້ງຄ່າທີ່ເຫມາະສົມແລະປະຕິບັດທີ່ດີທີ່ສຸດ.
2. ຜະລິດຕະພັນເກີນview
2.1 ລັກສະນະທີ່ສໍາຄັນ
- EZ All-in-One Printer Sharing: Utilize the USB port to share a printer across your network.
- EZ Switch: Easily switch between Router, Repeater, and Access Point modes with a single touch.
- Enhanced Download Master: ດາວໂຫຼດ files directly to a connected USB hard drive even when your computer is off.
- Wireless-N Connectivity: Supports 802.11b/g/n standards for high-speed wireless networking.
- 4 LAN Ports: Provides four 10/100 Mbps Ethernet ports for wired connections.
- Diagnostic and Bandwidth Management Tools: Includes Dr. Surf and EZQoS for network monitoring and quality of service management.
2.2 ເນື້ອໃນຊຸດ
- ASUS RT-N13U Wireless-N Router
- Power Adapter
- ສາຍອີເທີເນັດ
- ຄູ່ມືເລີ່ມຕົ້ນດ່ວນ
- ສະຫນັບສະຫນູນ CD (ບັນຈຸຄູ່ມືການນໍາໃຊ້ແລະອຸປະກອນ)
2.3 ການໂຕ້ຕອບຮາດແວ
Familiarize yourself with the ports, buttons, and LED indicators on your RT-N13U router.
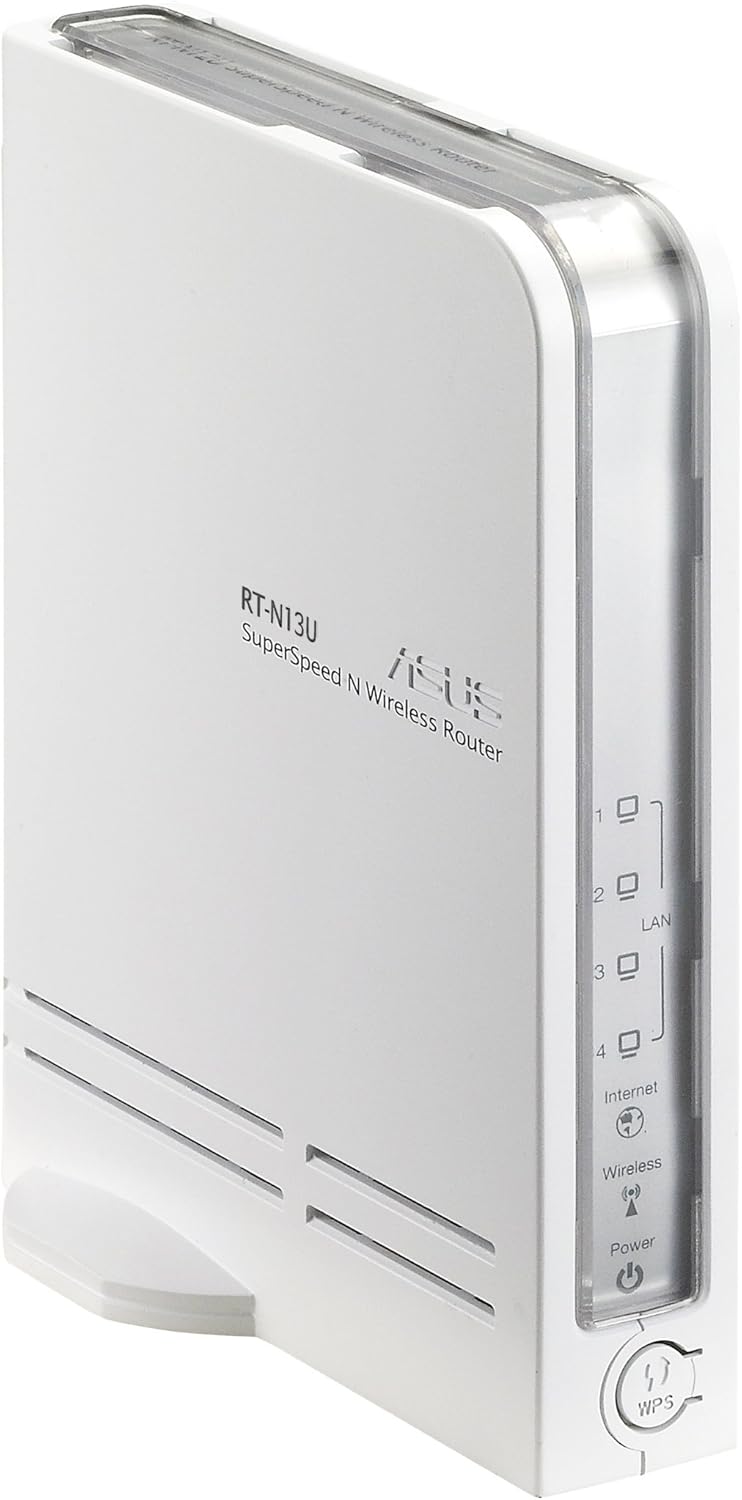
ຮູບທີ 1: ດ້ານ ໜ້າ ແລະດ້ານຂ້າງ View of the ASUS RT-N13U Router. This image shows the front panel with LED indicators for Power, Wireless, Internet, and LAN ports (1-4), along with the WPS button.

ຮູບທີ 2: ຫລັງ View of the ASUS RT-N13U Router. This image displays the rear panel, including the USB 2.0 port, four LAN ports (yellow), one Internet (WAN) port (blue), and the power input port.
ຕົວຊີ້ວັດ LED:
- ໄຟ LED: Indicates power status. Solid green for normal operation.
- LED ໄຮ້ສາຍ: Indicates wireless activity. Blinks when data is being transmitted wirelessly.
- ອິນເຕີເນັດ LED: Indicates internet connection status. Solid green for connected, blinking for activity.
- LAN 1-4 LEDs: Indicate activity on the respective LAN ports. Solid green for connected, blinking for activity.
- WPS LED: Indicates Wi-Fi Protected Setup status.
ພອດ ແລະ ປຸ່ມ:
- ພອດ USB 2.0: For connecting USB devices such as printers or external storage.
- ພອດ LAN (1-4): Connect wired devices like computers or gaming consoles.
- ຜອດອິນເຕີເນັດ (WAN): ເຊື່ອມຕໍ່ກັບໂມເດັມຂອງທ່ານເພື່ອເຂົ້າເຖິງອິນເຕີເນັດ.
- ພອດພະລັງງານ: ເຊື່ອມຕໍ່ກັບອະແດບເຕີພະລັງງານທີ່ລວມຢູ່.
- ປຸ່ມ WPS: ເລີ່ມ Wi-Fi Protected Setup ເພື່ອການເຊື່ອມຕໍ່ໄຮ້ສາຍງ່າຍໆ.
- ປຸ່ມຣີເຊັດ: (Typically a small pinhole button) Used to restore factory default settings.
- EZ Switch: A physical switch to change the device's operating mode (Router, AP, Repeater).
3. ຕັ້ງຄ່າ
3.1 ການເຊື່ອມຕໍ່ຮາດແວເບື້ອງຕົ້ນ
- Connect the power adapter to the router's Power port and plug it into a power outlet.
- Connect one end of the Ethernet cable to the Internet (WAN) port of the RT-N13U and the other end to your modem's Ethernet port.
- (Optional) For initial configuration, connect your computer directly to one of the LAN ports (1-4) on the router using an Ethernet cable.
- Power on your modem, then power on the RT-N13U router. Wait for the Power, Internet, and Wireless LEDs to stabilize.
3.2 Configuration Modes
The RT-N13U supports three operating modes, selectable via the EZ Switch:
- ແບບ Router: The default mode, where the device acts as a gateway for your network, providing internet access and managing local network traffic.
- ໂໝດຈຸດເຂົ້າເຖິງ (AP): Extends an existing wired network by adding wireless connectivity. In this mode, internet features are typically disabled, and the device acts as a wireless hub.
- ໂໝດຊ້ຳ: Extends the range of an existing wireless network by receiving and re-transmitting the wireless signal.
Select the desired mode using the physical EZ Switch on the router before proceeding with software configuration.
3.3 Web ການເຂົ້າເຖິງການໂຕ້ຕອບ
- ເປີດ ກ web browser (e.g., Chrome, Firefox, or IE8/Edge; IE9 beta may have compatibility issues).
- ໃນແຖບທີ່ຢູ່, ພິມທີ່ຢູ່ IP ເລີ່ມຕົ້ນຂອງເຣົາເຕີ (ໂດຍທົ່ວໄປ
192.168.1.1orrouter.asus.com) ແລະກົດ Enter. - ໃສ່ຊື່ຜູ້ໃຊ້ ແລະ ລະຫັດຜ່ານເລີ່ມຕົ້ນ (ໂດຍປົກກະຕິ
adminfor both). Refer to the label on the bottom of your router if these defaults do not work. - Follow the on-screen setup wizard.
3.4 Internet Connection Setup (Router Mode)
If the EZ UI setup feature does not automatically configure your internet connection, manual steps may be required, especially for certain Internet Service Providers (ISPs).
- ເກັບກຳຂໍ້ມູນ:
- Your computer's MAC address (Physical Address). On Windows, open Command Prompt and type
ipconfig /all. - Your ISP's DNS server addresses. If connected via Ethernet, use
ipconfig /allto find "DNS Servers".
- Your computer's MAC address (Physical Address). On Windows, open Command Prompt and type
- Access Network Map: ໃນ router ຂອງ web interface, navigate to the "Network Map" or "EZ-UI" section.
- ການຕັ້ງຄ່າດ້ວຍຕົນເອງ: If the connection fails, the system may prompt for manual configuration.
- ໃຊ້ ໂຄນ MAC feature. Some ISPs tie your internet service to a specific MAC address. Cloning your computer's MAC address to the router can resolve connectivity issues.
- Manually enter your ISP's DNS server addresses if required.
- Apply Settings and Restart: Apply the new settings. The router will restart. Your computer may temporarily lose connection. Reconnect to the router.
- Power Cycle (If Needed): If the internet connection is still not established:
- Power off the wireless router.
- Power off your modem/ISP's box.
- ລໍຖ້າ 5 ນາທີ.
- First, power on the modem/ISP's box and wait for it to fully boot.
- Then, power on the ASUS RT-N13U router.
- Check for internet connectivity.
Note: For optimal wireless performance, ensure the wireless radio is set to "N only" mode in the router's settings if all your devices support 802.11n.
4. ການດໍາເນີນງານ
4.1 ອຸປະກອນເຊື່ອມຕໍ່
ການເຊື່ອມຕໍ່ແບບມີສາຍ:
Connect Ethernet-enabled devices (e.g., desktop computers, smart TVs, gaming consoles) to the yellow LAN ports (1-4) on the back of the router using Ethernet cables.
Wireless Connections:
- ໃນອຸປະກອນໄຮ້ສາຍຂອງທ່ານ (ແລັບທັອບ, ສະມາດໂຟນ, ແທັບເລັດ), ຄົ້ນຫາເຄືອຂ່າຍ Wi-Fi ທີ່ມີຢູ່.
- Select the network name (SSID) of your ASUS RT-N13U (default SSID is usually "ASUS" or "ASUS_RT-N13U").
- Enter the network security key (password). This can be found on a label on the router or in the router's web ການໂຕ້ຕອບ.
- Alternatively, press the WPS button on the router and then activate WPS on your wireless device within two minutes for a quick connection.
4.2 USB Features
The USB 2.0 port on the RT-N13U provides additional functionalities:
ການແບ່ງປັນເຄື່ອງພິມ:
Connect a compatible USB printer to the USB 2.0 port. Configure printer sharing through the router's web interface to allow multiple computers on your network to print to it.
Download Master:
Connect a USB storage device (e.g., external hard drive, flash drive) to the USB 2.0 port. The Download Master feature allows you to initiate downloads (including BitTorrent) directly to the connected storage device, even when your computer is turned off. This feature typically works only when the router is in Router Mode.
Note: Ensure the USB storage device is formatted correctly and recognized by the router. For BitTorrent downloads, you may need to provide the exact URL location for the downloader to function properly.
5. ບໍາລຸງຮັກສາ
5.1 ການອັບເດດເຟີມແວ
Regularly updating the router's firmware is crucial for performance improvements, security enhancements, and bug fixes. Visit the official ASUS support website for the RT-N13U model to download the latest firmware. Follow the instructions provided with the firmware update package carefully to avoid damaging the device.
Note: Firmware updates can resolve many common issues and improve compatibility with various devices and services.
5.2 ການຟື້ນຟູຄ່າເລີ່ມຕົ້ນຂອງໂຮງງານ
If you encounter persistent issues or forget your login credentials, you can restore the router to its factory default settings. This will erase all custom configurations.
- ເມື່ອເປີດ router, ຊອກຫາປຸ່ມ Reset (ມັກຈະເປັນຮູນ້ອຍໆ) ໃນອຸປະກອນ.
- ໃຊ້ຄລິບໜີບເຈ້ຍ ຫຼື ວັດຖຸແຫຼມທີ່ຄ້າຍຄືກັນເພື່ອກົດປຸ່ມ Reset ຄ້າງໄວ້ປະມານ 5-10 ວິນາທີ.
- Release the button when the Power LED starts blinking rapidly or all LEDs briefly flash.
- The router will restart with factory default settings. You will need to reconfigure it from scratch.
6. ການແກ້ໄຂບັນຫາ
6.1 ບັນຫາທົ່ວໄປ ແລະການແກ້ໄຂ
- ບໍ່ມີການເຊື່ອມຕໍ່ອິນເຕີເນັດ:
- ກວດສອບການເຊື່ອມຕໍ່ສາຍທັງໝົດ (ພອດ WAN ຈາກໂມເດັມຫາເຣົາເຕີ, ພອດ LAN ຈາກເຣົາເຕີຫາຄອມພິວເຕີ).
- Perform a power cycle on both your modem and router (unplug, wait 5 minutes, plug modem first, then router).
- Verify your ISP settings in the router's web interface, especially if MAC cloning or specific DNS servers are required.
- Ensure the router is in the correct operating mode (Router Mode for internet access).
- ບໍ່ສາມາດເຂົ້າເຖິງເຣົາເຕີໄດ້ Web ການໂຕ້ຕອບ:
- ໃຫ້ແນ່ໃຈວ່າຄອມພິວເຕີຂອງທ່ານເຊື່ອມຕໍ່ກັບເຣົາເຕີ (ແບບມີສາຍ ຫຼື ແບບໄຮ້ສາຍ).
- Verify the IP address (e.g.,
192.168.1.1) is correct. - ລອງອັນອື່ນ web ຕົວທ່ອງເວັບ.
- ປິດການນຳໃຊ້ໄຟວໍ ຫຼືຊອບແວປ້ອງກັນໄວຣັດຢູ່ໃນຄອມພິວເຕີຂອງທ່ານຊົ່ວຄາວ.
- If you forgot the password, perform a factory reset (see Section 5.2).
- ຄວາມໄວໄຮ້ສາຍຊ້າ ຫຼືການເຊື່ອມຕໍ່ທີ່ຫຼຸດລົງ:
- ກວດໃຫ້ແນ່ໃຈວ່າເຟີມແວຂອງເຣົາເຕີອັບເດດແລ້ວ.
- Check for wireless interference from other devices (cordless phones, microwaves).
- Adjust the wireless channel in the router settings.
- Position the router in a central location, away from obstructions.
- If all devices support 802.11n, set the wireless mode to "N only" for higher speeds.
- ອຸປະກອນ USB ບໍ່ໄດ້ຮັບຮູ້:
- Ensure the USB device is properly connected and powered (if external power is required).
- ກວດສອບເຣົາເຕີ web interface for USB device status and configuration.
- Verify compatibility of the USB device with the router.
- Ensure the router is in Router Mode for USB features like Download Master.
6.2 ຄວາມໝາຍຂອງຕົວຊີ້ວັດ LED
| ຕົວຊີ້ວັດ LED | ສະຖານະ | ລາຍລະອຽດ |
|---|---|---|
| ພະລັງງານ | ສີຂຽວແຂງ | ອຸປະກອນຖືກເປີດ ແລະເຮັດວຽກຕາມປົກກະຕິ. |
| ປິດ | ອຸປະກອນຖືກປິດ. | |
| ໄຮ້ສາຍ | ສີຂຽວແຂງ | ຟັງຊັນໄຮ້ສາຍຖືກເປີດໃຊ້ງານ. |
| ກະພິບສີຂຽວ | Wireless data transmission is active. | |
| ອິນເຕີເນັດ | ສີຂຽວແຂງ | ເຊື່ອມຕໍ່ກັບອິນເຕີເນັດ. |
| ກະພິບສີຂຽວ | Internet data transmission is active. | |
| ປິດ | ບໍ່ມີການເຊື່ອມຕໍ່ອິນເຕີເນັດ. | |
| LAN 1-4 | ສີຂຽວແຂງ | ອຸປະກອນຖືກເຊື່ອມຕໍ່ກັບພອດ LAN ທີ່ສອດຄ້ອງກັນ. |
| ກະພິບສີຂຽວ | Data transmission is active on the corresponding LAN port. | |
| WPS | ກະພິບ | WPS connection process is active. |
7. ຂໍ້ມູນຈໍາເພາະ
| ຄຸນສົມບັດ | ລາຍລະອຽດ |
|---|---|
| ຊື່ຕົວແບບ | RT-N13U |
| ມາດຕະຖານໄຮ້ສາຍ | 802.11b/g/n |
| ແຖບຄວາມຖີ່ | ແຖບຄວາມຖີ່ດຽວ (2.4 GHz) |
| ເຕັກໂນໂລຊີການເຊື່ອມຕໍ່ | ໄຮ້ສາຍ, ອີເທີເນັດ |
| ພອດອີເທີເນັດ | LAN 4 x 10/100 Mbps, 1 x 10/100 Mbps WAN |
| ພອດ USB | 1 x USB 2.0 |
| ປະເພດເສົາອາກາດ | ພາຍໃນ |
| ຄຸນນະສົມບັດພິເສດ | Access Point Mode, Repeater Mode, WPS, Printer Sharing, Download Master |
| ຂະໜາດສິນຄ້າ | 10 x 8.88 x 3.75 ນິ້ວ |
| ນ້ໍາຫນັກລາຍການ | 5.3 ອອນສ໌ (ປະມານ 150 ກຣາມ) |
| ຜູ້ຜະລິດ | ASUS |
| ວັນທີທີ່ມີໃຫ້ທໍາອິດ | ວັນທີ 28 ກັນຍາ 2009 |
8. ຂໍ້ມູນຄວາມປອດໄພ
- Use only the power adapter provided with the device. Using an incompatible adapter may damage the device and void your warranty.
- ຢ່າປ່ອຍໃຫ້ອຸປະກອນຖືກນໍ້າ, ຄວາມຊຸ່ມຊື່ນ, ຫຼືອຸນຫະພູມທີ່ຮຸນແຮງ.
- ວາງອຸປະກອນຢູ່ໃນພື້ນທີ່ລະບາຍອາກາດໄດ້ດີເພື່ອປ້ອງກັນຄວາມຮ້ອນເກີນໄປ.
- ຢ່າເປີດອຸປະກອນ casing. Servicing should only be performed by authorized personnel.
- ຮັກສາອຸປະກອນໃຫ້ຫ່າງຈາກສະຫນາມແມ່ເຫຼັກໄຟຟ້າທີ່ເຂັ້ມແຂງ.
9. ການຮັບປະກັນແລະການສະຫນັບສະຫນູນ
ສຳລັບຂໍ້ມູນການຮັບປະກັນ, ການສະໜັບສະໜູນດ້ານເຕັກນິກ, ແລະ ການຊ່ວຍເຫຼືອເພີ່ມເຕີມ, ກະລຸນາເຂົ້າເບິ່ງທີ່ຝ່າຍສະໜັບສະໜູນ ASUS ຢ່າງເປັນທາງການ website or contact ASUS customer service. Details can typically be found on the ASUS webເວັບໄຊ ຫຼືໃນເອກະສານປະກອບກັບຜະລິດຕະພັນຂອງທ່ານ.
ຮອງຮັບ ASUS Webເວັບໄຊ: www.asus.com/support/